Sansevierias are some of the most low-maintenance houseplants out there, but even these hardy plants can benefit from proper care. If you’re looking to promote healthy growth and development in your sansevieria, it’s essential to get the basics right. From choosing the right variety for your space and lighting conditions, to addressing common problems like pests and diseases, there’s a lot to consider when it comes to sansevieria care.
In this article, we’ll be sharing expert tips on how to keep your sansevieria thriving, including advice on watering, fertilizing, and pruning. Whether you’re a seasoned plant parent or just starting out with indoor gardening, our guide will help you identify potential issues before they become major problems. By the end of this post, you’ll have all the knowledge you need to care for your sansevieria like a pro.
Choosing the Right Sansevieria Variety
When it comes to adding a new Sansevieria to your collection, selecting the right variety is crucial, and there are many factors to consider in making this decision.
With so many different species to choose from, you’ll want to think about things like growth habits, leaf patterns, and size requirements.
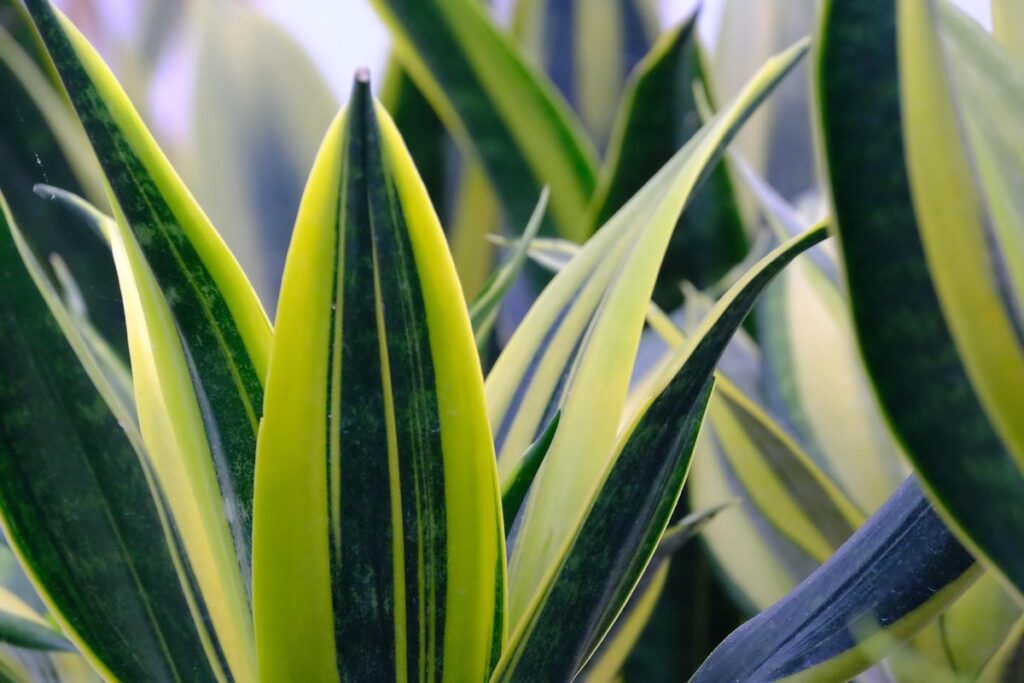
Understanding the Different Types of Sansevierias
When it comes to choosing the right Sansevieria variety, understanding their unique characteristics and growth habits is crucial. With over 70 species of Sansevierias, each with its own distinct features, selecting the perfect one can be overwhelming.
Let’s start by exploring some of the most popular types of Sansevierias:
* Laurentii: Known for its striking yellow edges and deep green center, this variety is a favorite among plant enthusiasts. It thrives in bright, indirect light and tolerates infrequent watering.
* Trifasciata: Also known as Mother-in-Law’s Tongue, this Sansevieria features upright leaves with yellow borders and dark green coloration. It prefers well-draining soil and can handle a range of lighting conditions.
* Cylindrica: With its cylindrical leaves and golden edges, this variety is perfect for adding a touch of tropical flair to any room. It requires bright, indirect light and regular watering.
Each Sansevieria type has its own unique needs and characteristics. Researching and understanding these differences will help you choose the right plant for your space and care abilities.
Selecting a Sansevieria for Your Home or Office Environment
When selecting a Sansevieria for your home or office environment, it’s essential to consider the specific conditions of your space. Lighting is one crucial factor to take into account. If your area receives bright, direct sunlight, opt for varieties like ‘Moonshine’ or ‘Cylindrica’, which can tolerate high light levels without burning their leaves.
On the other hand, if your space has limited natural light, choose a Sansevieria that prefers shadier conditions, such as ‘Starfish’ or ‘Hahnii’. Consider the temperature in your environment too. Most Sansevierias thrive in temperatures between 65°F to 75°F (18°C to 24°C), so avoid placing them near heating vents or radiators.
Humidity levels also play a role. Sansevierias are adaptable to average humidity, but they’ll do better in spaces with moderate moisture. If your home is particularly dry, you can place the pot on a tray filled with water and pebbles to increase the surrounding humidity.
Lighting Requirements for Sansevierias
When it comes to growing healthy and happy sansevierias, proper lighting is crucial. This section will explore the specific lighting requirements your plants need to thrive.
The Importance of Light in Sansevieria Growth
Light plays a crucial role in promoting healthy growth and development in Sansevieria plants. These low-maintenance plants can thrive in various lighting conditions, but they still require adequate light to grow robustly. When exposed to sufficient light, Sansevierias develop sturdy leaves, produce more offsets, and increase their overall mass.
In fact, a study on the effects of light intensity on Sansevieria growth found that plants grown under high-light conditions (around 50,000 lux) showed significant improvements in leaf size and number compared to those grown under low-light conditions. To replicate this at home, consider placing your Sansevierias near an east- or west-facing window or use grow lights with a spectrum of 4000K-5000K.
If you’re growing Sansevierias indoors, it’s essential to monitor their light exposure and adjust accordingly. Avoid placing them in dark corners or under direct sunlight, which can cause scorching. Instead, provide them with filtered or dappled light, which mimics natural conditions and promotes healthy growth. By doing so, you’ll be able to enjoy the benefits of these beautiful plants while maintaining their optimal health.
How to Provide Optimal Lighting Conditions for Your Sansevieria
When it comes to providing optimal lighting conditions for your Sansevieria, placement is key. Direct sunlight can scorch the leaves and cause them to become misshapen, but east- and west-facing windows are ideal alternatives.
For a Sansevieria in an east-facing window, aim for a spot about 3-4 feet away from the glass to avoid direct morning sun. This will allow your plant to soak up gentle, indirect light throughout the day. Conversely, if you have a Sansevieria placed near a west-facing window, consider positioning it slightly closer to the glass – around 2-3 feet away – to maximize the soft, diffused light that streams in during late afternoon.
When placing your Sansevieria in a room without natural light sources, make sure it’s at least 6-8 inches away from any nearby lamps or artificial lighting. This will prevent direct heat from causing stress to the plant. By carefully considering the placement of your Sansevieria and using these simple guidelines, you can create an optimal environment for your plant to thrive in.
Watering Sansevierias: The Right Balance
To keep your sansevieria thriving, it’s essential to strike the right balance when watering – too little can be just as detrimental as overwatering.
Understanding the Watering Needs of Sansevierias
When it comes to Sansevierias, getting the watering right can be a bit of a challenge. These plants are known for their ability to thrive in dry conditions, but that doesn’t mean they don’t need water at all. In fact, overwatering is one of the most common mistakes people make when caring for Sansevierias.
So, how often should you water your Sansevieria? A good rule of thumb is to check the soil moisture by sticking your finger into the soil up to the first knuckle. If the soil feels dry, it’s time to water. If it still feels moist, wait a few more days and check again.
The frequency of watering also depends on the season. During the spring and summer months when the plant is actively growing, you’ll need to water more frequently – every 7-10 days in most cases. In the fall and winter months, however, you can reduce watering to once a month or even less often if your Sansevieria is dormant.
It’s also essential to note that Sansevierias prefer well-draining soil to prevent root rot. If you’re unsure whether your plant needs water, it’s always better to err on the side of caution and wait a few more days rather than risking overwatering. With time and practice, you’ll develop a sense of when your Sansevieria needs watering, and with proper care, these low-maintenance plants will thrive under your care.
Avoiding Overwatering and Underwatering
Recognizing the signs of overwatering and underwatering in sansevieria plants is crucial to maintaining their health. Overwatering can cause the leaves to become soft, mushy, and discolored, while underwatering will leave them dry, brittle, and prone to breaking. To avoid these issues, check your plant regularly for signs of water stress.
If the soil feels wet to the touch or there’s visible moisture on the surface, it may be a sign that you’re overwatering. Conversely, if the soil is parched and feels dry, underwatering might be the issue. Adjust your watering schedule accordingly by observing your plant’s response to different watering frequencies.
Start by reducing the frequency of watering for plants showing signs of overwatering. Increase the time between waterings for those suffering from underwatering. Monitor your plant’s response closely and adjust as needed. A general rule of thumb is to water sansevierias when the top 1-2 inches of soil feel dry to the touch. However, this can vary depending on factors like temperature, humidity, and pot size.
Temperature and Humidity Preferences
When it comes to creating a comfortable environment for your sansevieria, understanding its ideal temperature and humidity levels is crucial to prevent issues like leaf drop or pests. Let’s dive into the specifics of these preferences.
The Ideal Temperature Range for Sansevierias
Maintaining an ideal temperature range is crucial for the health and well-being of your Sansevieria plant. These tropical plants thrive in temperatures between 65°F (18°C) and 75°F (24°C), making them perfect for indoor spaces with average temperatures.
To avoid extreme temperatures, keep your Sansevieria away from heating vents, fireplaces, and air conditioning units. Direct exposure to these sources can cause temperature fluctuations that might stress the plant.
Avoid placing your Sansevieria near drafty windows or exterior walls during peak summer months when temperatures soar outside. Conversely, ensure it’s not exposed to cold drafts in winter.
Some Sansevieria species, like Sansevieria Trifasciata, are more tolerant of temperature fluctuations than others. However, even these hardy plants will suffer if consistently subjected to extreme temperatures.
To maintain a comfortable environment for your Sansevieria, consider keeping it at least 3-4 feet away from any heat-emitting source. This distance will help regulate the plant’s microclimate and prevent sudden temperature drops or rises. By maintaining an ideal temperature range, you’ll ensure your Sansevieria stays healthy and thrives under your care.
It’s worth noting that Sansevierias can adapt to a wide range of temperatures but consistently prefer warmer conditions.
Maintaining Optimal Humidity Levels for Your Sansevieria
Maintaining optimal humidity levels is crucial for the health and growth of your Sansevieria plant. Since these plants are native to arid regions, they have adapted to survive with low humidity. However, most homes have a relatively high humidity level, which can lead to root rot and other issues.
To create a humid environment that promotes healthy growth in your Sansevieria, you can follow these tips:
* Place the plant on a tray filled with water and pebbles. As the water evaporates, it will increase the surrounding air’s moisture content.
* Use a humidifier nearby to maintain a consistent humidity level between 40-50%.
* Group plants together, as they release moisture through transpiration, creating a microclimate that benefits each other.
Keep in mind that Sansevieria can thrive in low-humidity environments if you monitor the soil moisture and adjust your watering schedule accordingly. Monitor your plant’s response to these humidity levels and make adjustments as needed. With proper care, your Sansevieria will grow strong and healthy, requiring minimal attention.
Fertilizing and Repotting Your Sansevieria
To keep your Sansevieria thriving, it’s essential to fertilize and repot it at the right times, which we’ll cover in the next steps. Proper care will make a huge difference in its growth and health.
Fertilizing Sansevierias: When and How Much
Fertilizing your Sansevieria plant provides essential nutrients for its growth and development. When done correctly, it can lead to healthier leaves, more vibrant colors, and a robust root system. However, over-fertilization can be detrimental to the plant’s health.
To determine when to fertilize, consider the plant’s growing season. During spring and summer months, your Sansevieria is actively producing new growth, making this an ideal time for fertilizer application. Dilute a balanced, water-soluble fertilizer (20-20-20) according to the manufacturer’s instructions and apply it once a month during these periods.
In contrast, avoid fertilizing during fall and winter when your Sansevieria is dormant. Instead, stick to a light, water-soluble fertilizer at half the recommended strength every 2-3 months. Organic fertilizers like compost tea or worm castings can also be used as an alternative to synthetic options. When selecting a fertilizer, always choose one that’s specifically designed for indoor plants and contains no added salts.
Some key factors to keep in mind when fertilizing include:
* Dilute the fertilizer according to the manufacturer’s instructions
* Avoid over-fertilizing, which can cause burning of roots and leaves
* Choose a balanced fertilizer with equal NPK ratios (e.g., 20-20-20)
The Right Time to Repot Your Sansevieria
When it comes to repotting your Sansevieria, timing is everything. A mature plant that’s been in its pot for a while may start showing signs of needing more room to grow. Check the roots by gently removing the plant from its pot. If they’re circling or growing out of the drainage holes, it’s likely time for a repot.
Choose a well-draining potting mix specifically designed for tropical plants like Sansevieria. This will help prevent waterlogged soil and root rot. Select a container that’s only 1-2 sizes larger than the current one to avoid overwhelming the roots. A good rule of thumb is to increase the pot size by about 10-20% to give the roots some extra room.
For example, if your Sansevieria is in an 8-inch pot, consider moving it into a 9 or 10-inch container. This will provide enough space for the plant to continue growing without becoming waterlogged. Remember to handle the roots gently and avoid over-watering after repotting to prevent any potential issues. With the right care and attention, your Sansevieria should thrive in its new home.
Common Problems and Pests
As you care for your Sansevieria, you may encounter some unwanted visitors or issues that can affect its health, such as pests and common problems. Here are a few to watch out for.
Identifying and Addressing Common Issues in Sansevierias
As you care for your Sansevieria, it’s not uncommon to encounter some common issues. One of the most frustrating problems is leaf drop, where leaves suddenly start falling off without apparent reason. This can be caused by overwatering, which puts undue stress on the plant, or underwatering, which causes the leaves to shrivel and fall. Make sure you’re watering your Sansevieria correctly, allowing the top inch of soil to dry out between waterings.
Another issue you might face is yellowing leaves. This can be due to overfertilization, which can burn the roots and cause leaf discoloration. Check your fertilizer dosage and consider using a balanced, water-soluble formula specifically designed for indoor plants like Sansevierias. You should also keep an eye out for pests like spider mites or mealybugs, which thrive in dry environments and feed on sap.
If you do notice any of these issues, take action quickly to prevent further damage. Inspect your plant regularly and address problems promptly to ensure the health and longevity of your Sansevieria.
Natural Pest Control Methods for Your Sansevieria
When it comes to naturally controlling pest infestations on your sansevieria plant, there are several effective methods you can try before resorting to chemical-based treatments. One of the most popular and eco-friendly options is neem oil.
Neem oil is a natural insecticide that’s derived from the seeds of the neem tree. It works by disrupting the life cycle of insects, preventing them from reproducing or causing harm to your plant. To use neem oil on your sansevieria, mix it with water according to the label instructions and spray it directly onto the affected areas.
In addition to neem oil, insecticidal soap is another natural pest control method you can try. This mild detergent-like soap works by suffocating insects, causing them to dehydrate and die. To use insecticidal soap on your sansevieria, mix it with water according to the label instructions and spray it directly onto the affected areas.
By using these natural pest control methods, you can keep your sansevieria plant healthy and thriving while minimizing harm to the environment.
Frequently Asked Questions
Can I propagate my Sansevieria through leaf cuttings or division if it’s a mature plant?
Yes, you can propagate your mature Sansevieria through leaf cuttings or division, but make sure the mother plant is healthy and robust. Take 4-6 inch long leaf cuttings from the top of the plant, and remove lower leaves to prevent decay in water. Alternatively, gently divide established plants during spring or summer when they’re actively growing.
What are some common mistakes people make when fertilizing their Sansevierias?
Common mistakes include over-fertilizing, which can cause burning of roots and damage to the plant, as well as using too much nitrogen, which promotes leaf growth but neglects root health. Use a balanced fertilizer during spring and summer, following the product’s instructions for dilution rates.
How often should I repot my Sansevieria, and what are some signs it needs to be transferred to a larger pot?
Repot your Sansevieria every 2-3 years when it becomes pot-bound. Look out for signs such as roots growing out of the drainage holes or the plant becoming top-heavy and unstable in its container.
Can I grow Sansevierias outdoors, and what’s the best time to do so?
While Sansevierias are primarily indoor plants, they can thrive outdoors in USDA zones 10-12. The ideal time for outdoor growth is spring and summer when temperatures range from 65°F to 75°F (18°C to 24°C). Ensure your plant has protection from direct sunlight during the hottest part of the day.
Are there any natural pest control methods I can use instead of chemical pesticides?
Yes, you can use neem oil or insecticidal soap to control pests like spider mites and mealybugs. Spray these solutions on affected areas according to product instructions, making sure to spray undersides of leaves as well for optimal coverage.