Germinating seeds are like tiny miracles – from a seemingly lifeless state, they burst into growth, transforming into vibrant seedlings that’ll eventually become lush plants. But have you ever wondered what happens inside those little seeds as they prepare to emerge? Understanding the stages of germination is crucial for any gardener or plant enthusiast, as it sets the foundation for successful growth and development.
In this article, we’ll delve into the five key stages of germination: seed stratification, radicle emergence, hypocotyl elongation, cotyledon emergence, and finally, photosynthesis kick-start. By learning about these critical milestones, you’ll be able to optimize your seed-planting process and maximize your chances of successful seedling establishment. Whether you’re a seasoned green thumb or just starting out, this article will provide you with the knowledge you need to give your seeds the best possible start in life.
Understanding Germination Basics
Germination is a complex process that requires patience and understanding, but don’t worry, we’ll break it down for you into its simplest forms. Let’s explore what happens in those crucial first few days after sowing a seed.
What is Germination?
Germination is the initial stage of plant growth where a seed begins to sprout and develop into a seedling. It’s an essential process that marks the beginning of a new life cycle for plants. Without germination, seeds would remain dormant indefinitely, unable to grow or produce fruit.
As an important milestone in plant development, germination sets the stage for subsequent growth stages, including root formation, stem elongation, and leaf expansion. During this critical period, seeds absorb water and nutrients from the surrounding environment, triggering a series of biochemical reactions that stimulate cell division and growth.
Germination is significant because it determines the overall health and vigor of the plant. A healthy germination process ensures that the seedling develops strong roots, a sturdy stem, and robust leaves. Conversely, inadequate or incomplete germination can hinder further growth, leading to weakened or stunted plants.
In practical terms, understanding germination helps gardeners and farmers optimize growing conditions for seeds, such as providing adequate moisture, temperature control, and light exposure. By recognizing the importance of germination, individuals can take proactive steps to promote healthy seedling development, ultimately boosting crop yields and plant productivity.
Importance of Germination in Plant Growth
Germination is more than just a phase in plant growth; it’s a vital process that sets the stage for a healthy and productive life. When seeds germinate correctly, they send down strong roots and grow robust stems, preparing them to absorb essential nutrients and water from the soil. This initial growth phase lays the foundation for the plant’s overall health, resilience, and ability to withstand stressors like pests, diseases, and environmental changes.
The importance of proper germination cannot be overstated. Seeds that don’t germinate well may struggle to develop properly, leading to weakened immune systems, reduced yields, and lower quality produce. In contrast, seeds that germinate efficiently are better equipped to tackle the challenges they’ll face as mature plants. As a gardener or farmer, investing time and effort into ensuring optimal germination conditions can significantly impact your crop’s success. This includes providing adequate moisture, maintaining suitable temperatures, and ensuring sufficient light exposure.
Proper germination also influences plant productivity. Seeds that germinate well tend to produce more robust growth, resulting in higher yields and better-quality harvests. In fact, research has shown that optimal germination rates can increase crop yields by up to 20% in certain varieties. By prioritizing proper germination, you’re not only ensuring the health of your plants but also maximizing their potential for productivity.
Stage 1: Seed Stratification and Imbibition
Let’s dive into the first stage of germination, where seeds begin to awaken from their dormant state through a process called stratification and imbibition. This is where life begins to take hold!
Seed Stratification Process
When seeds are collected from their parent plant, they often require a period of hardening to prepare them for germination. This process is known as seed stratification. It’s an essential step that helps the seeds transition from a dormant state to a viable one.
During stratification, the seeds undergo physiological changes that mimic the natural conditions they would experience in their native environment. The length and intensity of this process vary depending on the type of seed. Some seeds, like those of deciduous trees, need a period of cold temperatures (around 35-45°F or 2-7°C) to break dormancy. Others, such as tropical seeds, require shorter periods or no stratification at all.
If you’re planning to grow plants from seeds, it’s crucial to research the specific requirements for each species. For example, if you’re growing tomatoes, which are typically warm-season crops, they may need 30-60 days of warm temperatures (around 70°F or 21°C) followed by a brief period of cooler temperatures to stimulate germination.
In addition to temperature control, seed stratification also involves maintaining high humidity levels and providing adequate moisture. This helps the seeds absorb water without risking rot or fungal infections.
If you’re new to seed starting, it’s essential to understand that not all seeds require stratification. Some species, like lettuce and radish, can be directly sown into the soil without any special treatment. However, for most seeds, a period of stratification will significantly improve their chances of germination and successful growth.
To give you an idea of just how long some seeds need to be stratified, consider this: a few examples include:
* Corn: 30-60 days
* Wheat: 1-2 months
* Apple trees: 4-6 weeks
By following the specific requirements for your seed type, you’ll be well on your way to successful germination and healthy plant growth.
Water Absorption and Imbibition
As water absorption begins during imbibition, it’s like a wake-up call for the seed. The dry seed coat starts to swell and rehydrate, breaking down the dormancy that has been holding it back. This is made possible by the unique properties of seeds, which have evolved to withstand long periods without water.
Inside the seed, specialized enzymes called hydrolases are waiting patiently. These enzymes play a crucial role in initiating germination by breaking down complex molecules into simpler ones. As water seeps into the seed, these enzymes spring into action, catalyzing chemical reactions that ultimately lead to the breakdown of seed dormancy.
Think of it like unlocking a door: the water acts as the key, and the enzymes are the lockpick. Together, they work in harmony to unlock the seed’s potential, paving the way for germination. This process is essential, as it allows the seed to begin its journey towards growth and development.
Stage 2: Seed Breakdown and Hydrolysis
Now that we’ve discussed the seed’s initial response to water, let’s dive into the fascinating process of seed breakdown and hydrolysis. This is where enzymes start to break down stored nutrients, releasing energy for growth.
Enzymatic Activation and Cell Wall Breakdown
During stage 2 of germination, seed breakdown and hydrolysis occur as enzymes are activated to break down storage compounds within the seed. These compounds, such as proteins, carbohydrates, and lipids, provide sustenance for the developing plant but must be released from their tightly packed cellular structures.
The key enzyme responsible for this process is amylase, which breaks down starches into simpler sugars that can be absorbed by the growing embryo. Similarly, proteases dissolve stored proteins into individual amino acids, while lipases split fats into fatty acids and glycerol. As these enzymes break down storage compounds, they also initiate cell wall degradation.
This breakdown is crucial for root growth to begin, as it allows the seedling’s roots to anchor itself in the soil while its shoots reach towards light. The release of nutrients from the breakdown process feeds the developing embryo, fueling its rapid growth and development.
In a typical scenario, this process can take anywhere from several hours to several days, depending on factors such as water availability, temperature, and seed type. For example, some seeds may require longer periods of cold stratification before they are triggered into germination.
Nutrient Release and Cellular Uptake
As the seed coat is broken down and hydrolysis occurs, the stored nutrients within the seed are released into the surrounding water. This process, called nutrient release, allows the developing plant to access the energy and building blocks it needs to grow. The primary sources of these nutrients are starches, proteins, and oils stored in the seed’s endosperm.
The breakdown products of these compounds, such as sugars, amino acids, and fatty acids, are then absorbed by the growing plant through a process called cellular uptake. This occurs primarily through specialized transport mechanisms found on the surface of root cells and leaf tissues. Two key types of transport mechanisms facilitate nutrient uptake: facilitated diffusion and active transport.
Facilitated diffusion involves the use of carrier proteins to aid in the movement of nutrients across cell membranes, while active transport uses energy from ATP to pump nutrients against their concentration gradient into the cell. Understanding these transport mechanisms can help you optimize your seed germination conditions, ensuring that your plants receive the essential nutrients they need to thrive.
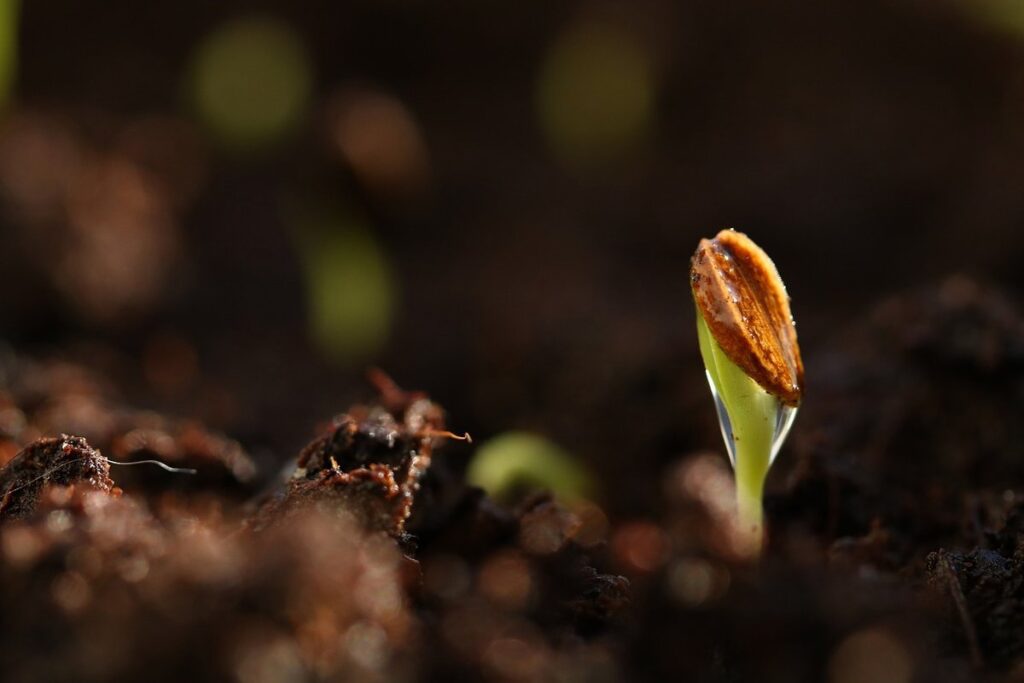
Stage 3: Radicle Emergence and Primary Root Development
Now that the seed coat has cracked, it’s time to explore how a radicle emerges from the embryo and begins developing its primary root system. This delicate process is crucial for water and nutrient uptake.
Breaking Through Seed Coats
As the seed absorbs water and swells, the radicle (primary root) begins to push through the seed coat. This process is crucial for the plant’s survival, as it marks the transition from a dormant embryo to an actively growing organism. The radicle emerges through a small opening called the micropyle, which is often visible on the surface of the seed.
Several factors influence the radicle’s ability to emerge successfully. For example, soil temperature can impact the speed and vigor of germination. A consistent moisture level is also essential, as water scarcity or excess can hinder radicle growth. Additionally, seed size and type can affect emergence rates, with larger seeds often taking longer to break through their coats.
To encourage healthy radicle emergence, gardeners can provide optimal growing conditions, such as well-draining soil and adequate moisture. By understanding the factors that influence this stage of germination, you’ll be better equipped to support your seedlings’ development and ensure a strong start to their growth.
Primary Root Growth and Development
As the radicle emerges and breaks through the seed coat, it begins to grow downwards into the soil, marking the start of primary root growth. This is a critical phase in the germination process, as the primary root will eventually anchor the plant firmly in place, providing stability and support for further development.
The primary root grows by elongation at its tip, a process known as apical dominance. As it pushes through the soil, it encounters various obstacles such as sand, clay, or other particles that can slow its progress. However, this growth is not without direction – the root is drawn towards water and nutrient-rich areas in the soil, guided by positive chemotropism.
To optimize primary root development, ensure your seeds are planted at a sufficient depth to allow for unhindered growth. A general rule of thumb is to plant seeds 2-3 times deeper than their own length. Providing adequate moisture and nutrients will also encourage healthy root growth, so make sure to water and fertilize accordingly. By creating an optimal environment, you can give your seedlings the best chance at developing a strong, robust primary root that sets them up for success in the next stages of germination.
Stage 4: Cotyledon Emergence and Seedling Establishment
As your seeds continue to grow, we’ll now explore the critical process of cotyledon emergence and seedling establishment in Stage 4. This is where your plants start to look like real babies.
Leaf Expansion and Photosynthesis Initiation
As the seed coat breaks open, the cotyledons begin to emerge, and with them comes the initiation of photosynthesis. These tiny leaves are the primary source of energy for the young seedling, and their expansion is crucial for the continuation of growth.
The cotyledons stretch outwards from the seed, slowly unfurling like a tiny umbrella. This process allows them to capture sunlight, which they use to undergo photosynthesis – converting light energy into chemical energy in the form of glucose. This essential process fuels the development of the seedling’s roots, stem, and leaves.
During this stage, it’s essential to provide your seedlings with adequate light and water to support their rapid growth. Make sure to keep the soil consistently moist but not waterlogged, as this will promote healthy root development. A balanced fertilizer can also be introduced at this point to give your seedlings an extra boost of nutrients.
As the cotyledons expand, they start to produce chlorophyll, which is vital for photosynthesis. It’s a remarkable sight to watch your seedling transform from a small, compact bundle into a vibrant green sprout, ready to take on the world!
Seedling Establishment and Adaptation
As your seedling emerges from the soil, it’s adapting to its new environment at an incredible rate. The delicate balance of light intensity, temperature, and water availability will either nurture or stress out your young plant. Let’s take a closer look at how seedlings respond to these critical factors.
When it comes to light, seedlings are like sensitive sun-worshippers. Too little light can lead to weak and spindly growth, while too much can scorch those tender leaves. Aim for 12-14 hours of indirect light per day, or move your seedlings under a grow light with adjustable intensity.
Temperature fluctuations can also impact seedling establishment. Most plants prefer daytime temperatures between 65-75°F (18-24°C) and nighttime temperatures around 55-65°F (13-18°C). Avoid placing your seedlings near heating vents or drafty windows, as this can cause sudden drops in temperature that shock the plant.
Water availability is another key factor in establishing a healthy root system. Keep the soil consistently moist but not waterlogged – overwatering can lead to rot and other problems. Check the soil daily by inserting your finger into it up to the knuckle; if it feels dry, it’s time for a drink!
Stage 5: Further Development and Growth Stages
As you’ve navigated through the initial stages of germination, it’s now time to explore how your seedling will continue to grow and mature into a healthy plant. This next stage is crucial for its development.
True Leaf Emergence and Expansion
As seedlings progress from the cotyledon stage to true leaf emergence and expansion, one of the most significant developments is the transition from bracts to leaves. True leaves are characterized by their expanded photosynthetic capabilities, allowing them to perform a greater amount of photosynthesis than cotyledons. This increased capacity enables young plants to produce more energy and support accelerated growth.
The first true leaf, typically larger and more complex in structure compared to its predecessor, begins to unfurl from the stem. Following this initial emergence, additional true leaves continue to develop and expand, gradually taking over from bracts as the primary photosynthetic organs. In some species, like certain varieties of lettuce, the transition from cotyledons to true leaves can be quite rapid, while in others it may take a few days longer.
In general, it’s essential to provide adequate light and nutrient support during this stage to facilitate optimal growth. By ensuring sufficient illumination and maintaining consistent moisture levels, you’ll help your seedlings develop robust and healthy photosynthetic tissues.
Root System Development and Maturation
As the seedling continues to grow, its primary root system undergoes significant development. At this stage, you can expect to see an increase in lateral root growth, where smaller roots branch off from the main root. These lateral roots help to anchor the plant and absorb water and nutrients from a larger area.
Over time, the complex root network becomes more extensive, allowing the seedling to tap into deeper soil layers for essential resources. This is especially crucial during periods of drought or when the plant requires a surge of energy for growth. To support healthy root development, ensure that your seedling receives adequate water and nutrients. Avoid overwatering, which can lead to weak, shallow roots.
A well-developed root system also enables the plant to better withstand environmental stressors like extreme temperatures, pests, or diseases. By fostering a strong root foundation, you’ll set your seedling up for long-term success and robust growth. Keep in mind that different species have varying root development rates, so be patient and observe your specific plant’s needs.
Conclusion: Harnessing Germination Potential
Now that you’ve walked through the stages of germination, it’s time to explore how to maximize your seed’s potential and unlock its full growth capacity. Let’s discuss ways to harness this incredible energy.
Maximizing Germination Rates
To maximize germination rates, it’s essential to provide optimal conditions for different plant species. Temperature plays a crucial role, with most seeds germinating between 65°F and 75°F (18°C and 24°C). For example, tomato seeds require a warmer temperature of around 70°F (21°C), while lettuce prefers cooler temperatures at 60-65°F (16-18°C).
Moisture is also critical, as seeds need consistent water to break dormancy. Use a seed starting mix with excellent water-holding capacity and maintain a humid microclimate by covering the container with plastic wrap or a cloche. Aim for daily watering, but make sure not to overwater, which can lead to rot and poor germination.
Light exposure is another vital factor, especially for seeds that require light to break dormancy. Place seed trays near an east- or west-facing window or use grow lights for optimal results. Some plants, like radishes and beans, can tolerate direct sunlight, while others, such as lettuce and herbs, prefer indirect light. By providing the right temperature, moisture, and light conditions, you can significantly boost your germination rates and set your seedlings up for success.
Successful Plant Establishment Strategies
For successful plant establishment, it’s essential to consider both transplanting techniques and environmental factors that support young seedlings. When transplanting seedlings, avoid disturbing the roots as much as possible, and use a well-draining potting mix to prevent waterlogged soil. Hardening off is also crucial before moving plants outdoors; gradually expose them to sunlight and wind over 7-10 days to acclimate.
To ensure optimal environmental conditions for young plants:
* Provide adequate light: Most seedlings require at least 12 hours of indirect light per day, but some species have specific needs.
* Maintain a consistent temperature between 65°F to 75°F (18°C to 24°C), as fluctuations can cause stress.
* Monitor watering closely; overwatering is common and often fatal for young plants.
Consider the specific growing requirements for your plant type. Some species prefer partial shade or high humidity, while others need full sun exposure. Keep in mind that seedlings have limited root systems and require gentle handling to prevent shock and promote healthy establishment.
Frequently Asked Questions
How do I know if a seed is still viable after germination has failed?
Yes, there are several ways to determine if a seed is still viable. You can perform the “paper towel test” by soaking the seed for 24-48 hours and then observing its response. If it sprouts, it’s likely still viable. Alternatively, you can try planting multiple seeds from the same batch and see which ones germinate.
What are some common mistakes that can hinder germination rates?
Some common mistakes that can affect germination include inadequate watering, incorrect temperature, insufficient light, and poor seed storage. To optimize germination, make sure to provide your seeds with the right conditions for growth, including adequate moisture, optimal temperatures between 65-75°F (18-24°C), and sufficient light.
Can I speed up or slow down the germination process?
Yes, you can manipulate the germination rate by controlling environmental factors such as temperature, humidity, and light exposure. However, it’s essential to be gentle with seeds, as excessive stress can harm them. Avoid sudden changes in conditions, and ensure consistent moisture levels.
How long does it take for seeds to germinate under optimal conditions?
Under ideal conditions, seeds typically begin to germinate within 1-3 weeks after sowing. However, this timeframe can vary greatly depending on the specific seed type, species, and environmental factors. Be patient and allow your seeds sufficient time to develop.
What happens if I accidentally expose my seeds to freezing temperatures during germination?
If you’ve exposed your seeds to freezing temperatures, it’s likely that they’ll be damaged or killed. However, some seeds are more resilient than others. If the temperature drop was short-lived, try placing the affected seeds in a warm location (around 75-85°F/24-29°C) for several hours to see if they recover.
Can I use artificial lighting to enhance germination rates?
Yes, you can use supplemental lighting, such as LED grow lights, to promote seed germination. However, be cautious not to overdo it, as excessive light exposure can cause damage or stress to the seeds. Opt for gentle, consistent illumination and maintain a balance between light and darkness.
How do I handle seeds with special requirements, such as scarification or stratification?
Handle seeds with special needs according to their specific instructions. Some seeds require scarification (scratching) to break seed coats, while others need cold stratification to simulate winter conditions. Follow the recommended procedures for each seed type to ensure successful germination.
Can I use hydroponics or other soilless mediums for germination?
Yes, you can use hydroponics or other soilless mediums for germination. These systems provide excellent control over water and nutrient delivery, which is crucial during this delicate stage of development. However, be aware that some seeds may require specific adaptations to thrive in these environments.
What are the most critical factors to consider when selecting seeds for germination?
When choosing seeds for germination, prioritize factors such as seed quality, freshness, and compatibility with your environment. Select seeds from reputable suppliers or breeders, and follow proper storage procedures to maintain their viability.