Potted calla lilies are one of the most striking additions to any indoor space, bringing elegance and sophistication with their stunning blooms. If you’re new to growing potted plants or looking for expert advice on how to keep yours thriving, this article is for you! With a little care and attention, these beautiful flowers can provide months of stunning color and fragrance indoors.
But what sets calla lilies apart from other houseplants? Their unique, trumpet-shaped blooms are incredibly long-lasting and require minimal maintenance. However, they can be finicky if not cared for properly. In this article, we’ll cover the ins and outs of choosing, planting, caring for, and even propagating potted calla lilies. We’ll also share expert tips on troubleshooting common issues and keeping your plants healthy and blooming beautifully all year round.
Introduction to Potted Calla Lilies
Welcome to our guide on potted calla lilies, where we’ll start by explaining what these beautiful flowers are and how they thrive in pots. Let’s get started with the basics of growing a stunning potted calla lily!
What are Calla Lilies?
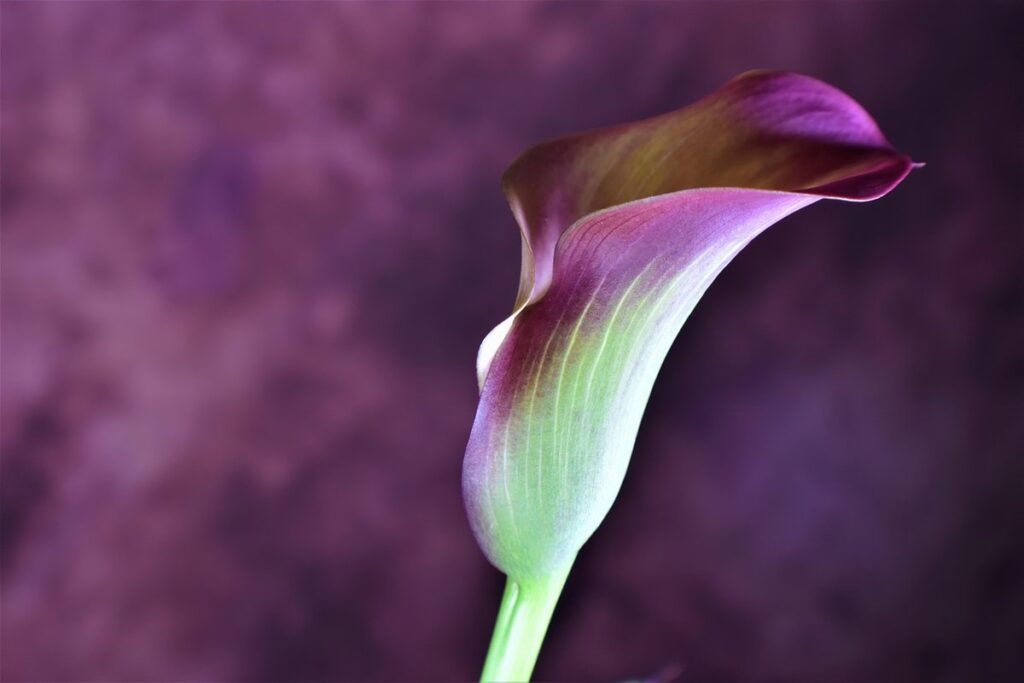
Calla lilies are one of the most stunning and elegant flowers you can add to your home decor. But what exactly is a calla lily? Originating from South Africa, these beautiful flowers have been prized for centuries for their unique appearance and versatility. They’re a popular choice among florists, event planners, and even interior designers due to their striking white trumpet-shaped blooms that resemble the shape of a bell.
Their popularity can be attributed to their adaptability in various settings – from weddings and events to home decor and arrangements. Calla lilies come in an array of sizes, from compact varieties perfect for indoor pots to larger ones ideal for outdoor gardens. Their ability to thrive in a range of conditions has made them a favorite among flower enthusiasts.
Whether you’re a seasoned gardener or a beginner, calla lilies are relatively easy to care for and maintain. With proper care, they can bloom repeatedly throughout the year, providing months of beauty and elegance.
Benefits of Growing Calla Lilies in Pots
Growing potted calla lilies is an excellent way to bring elegance and sophistication to your indoor space. One of the primary reasons potted calla lilies are a great choice for indoor decoration is that they offer flexibility and ease of care. By growing them in pots, you can easily move them around to suit the changing lighting conditions in your home.
Another significant benefit of potted calla lilies is their ability to thrive in containers with good drainage. This allows you to control the soil mix and ensure that excess water doesn’t collect in the pot, reducing the risk of root rot. Additionally, potting calla lilies gives you the freedom to choose from a wide range of varieties, each with its unique characteristics and blooming periods.
When grown in pots, calla lilies also require less space compared to their outdoor counterparts. This makes them perfect for small balconies or indoor areas where floor space is limited. With proper care, potted calla lilies can bloom year after year, providing you with a continuous display of beautiful flowers to enjoy.
Choosing the Right Pot and Soil for Your Calla Lily
When choosing a pot for your calla lily, consider one that’s slightly larger than the plant’s current container to give it room to grow. Selecting the right soil is also crucial for your lily’s health and thriving beauty.
Selecting the Perfect Pot Size
When selecting the perfect pot size for your calla lily, it’s essential to consider its root growth and water retention needs. A general rule of thumb is to choose a pot that is at least 6-8 inches deep to accommodate the plant’s taproot, which can grow quite long in search of nutrients. However, don’t opt for too large of a pot, as this can lead to excessive water retention and cause root rot.
A good starting point is to think about the mature size of your calla lily. If you have a compact variety, a smaller pot (around 8-10 inches in diameter) will suffice. For larger varieties, a slightly bigger pot (12-14 inches in diameter) will be necessary. Keep in mind that pots with built-in saucers can help prevent waterlogged soil and root rot.
To ensure your calla lily gets the right amount of moisture, check the soil daily during hot summer months by inserting your finger into the soil up to the first knuckle. If the soil feels dry, it’s time for a watering.
Soil Requirements for Healthy Calla Lilies
When it comes to potted calla lilies, the right soil can make all the difference between a thriving plant and one that’s struggling to survive. These beautiful flowers have specific requirements when it comes to soil type, pH level, and fertilizer needs.
In terms of soil type, calla lilies prefer well-draining potting mixes that are rich in organic matter. A mix specifically designed for tropical plants or orchids works well, as these soils tend to retain moisture but also drain excess water quickly. Avoid using regular garden soil, as this can compact and prevent proper drainage.
The ideal pH level for calla lilies is slightly acidic to neutral, ranging from 6.0 to 7.0 on the pH scale. Most potting mixes are already pH-balanced, so you don’t need to worry about adjusting the pH of your soil.
In terms of fertilizer, calla lilies are heavy feeders and benefit from regular applications of balanced fertilizers during the growing season (spring-fall). A 10-10-10 formula works well, but be sure to follow the instructions carefully to avoid over-fertilizing. Over-fertilization can damage roots and lead to weak or deformed blooms.
By using a high-quality potting mix and following these guidelines for soil pH and fertilization, you’ll be well on your way to growing healthy, thriving calla lilies in pots.
Planting and Caring for Your Potted Calla Lily
When it comes to enjoying your potted calla lily, proper planting and care are crucial to its continued health and stunning beauty. In this section, we’ll guide you through the process of creating a thriving environment for your plant.
Step-by-Step Planting Instructions
When planting your potted calla lily, it’s essential to handle the bulb and potting mix with care. First, choose a location with bright, indirect light and a temperature between 65-70°F (18-21°C). Water your calla lily well before handling, as this will make the process easier.
To start, gently remove any old potting mix from the bulb’s rhizome, taking care not to damage the roots. Next, place a layer of fresh potting mix at the bottom of a new container, making sure it’s slightly larger than the original one. This will give your calla lily room to grow.
Now, carefully position the bulb in the center of the new pot, ensuring its rhizome is buried in the fresh mix. Fill the rest of the container with potting mix, leaving enough space for watering. Avoid over-handling or compacting the soil, as this can cause damage to the roots. Finally, water your calla lily thoroughly and provide bright, indirect light until new growth appears.
Watering and Humidity Requirements
When it comes to watering and humidity requirements for your potted calla lily, understanding the optimal levels is crucial for its survival. Calla lilies prefer well-draining soil and should be watered thoroughly until water drains out of the bottom of the pot. However, overwatering can lead to root rot, a common issue in these plants. To avoid this, check the soil moisture by inserting your finger into the soil up to the first knuckle. If it feels dry, it’s time for watering.
Maintaining humidity levels is also essential for optimal growth. Since calla lilies thrive in tropical environments, a humid atmosphere will help them flourish. You can achieve this by placing the pot on a tray filled with water and pebbles or using a humidifier nearby. This will keep the air around your plant consistently moist without drowning it.
The ideal humidity range for calla lilies is between 50-70%. Monitoring your home’s humidity levels can be done with a hygrometer, ensuring you’re providing an optimal environment for your potted calla lily to thrive. By striking the right balance of water and humidity, you’ll enjoy vibrant blooms and robust growth from your potted calla lily.
Common Problems and Solutions for Potted Calla Lilies
Potted calla lilies can be finicky, so it’s not uncommon to encounter some issues when caring for them. Let’s tackle some common problems and their solutions together!
Identifying Common Issues like Yellow Leaves or Wilting
One of the most common issues potted calla lily owners face is identifying and resolving problems before they lead to more severe consequences. Yellow leaves on a potted calla lily can be caused by overwatering, which may seem counterintuitive considering these plants thrive in humid environments. However, when the roots are consistently waterlogged, oxygen cannot reach them effectively, causing cell death and resulting in yellow or wilted leaves.
To address this issue, check the moisture level of your soil before watering. Stick your finger into the soil up to the first knuckle, and if it feels dry, it’s time for a drink. Avoid getting water on the leaves or crown to prevent rot and other diseases.
In addition to yellow leaves, potted calla lilies can also fall victim to pests like spider mites, mealybugs, or scale. Inspect your plant regularly, looking for any tiny white dots, cottony patches, or hard bumps on the stems and leaves.
Wilting in a potted calla lily is often a sign of underwatering or poor drainage. To avoid this issue, use well-draining potting mix and ensure the pot has sufficient holes to prevent waterlogged soil.
Troubleshooting Tips and Fixes
If you’re experiencing problems with your potted calla lily, don’t worry – it’s not uncommon for these beautiful plants to encounter issues. One common issue is yellowing leaves, which can be caused by overwatering or underwatering. To address this problem, check the soil moisture by sticking your finger into the soil up to the first knuckle. If the soil feels dry, it’s time to water; if it’s already damp, wait another day before watering again.
Another issue that may arise is leaf drop, which can be caused by temperature fluctuations or drafts. To prevent this, keep your calla lily in a spot with consistent temperatures between 65-75°F (18-24°C), away from any air conditioning or heating vents. You can also wrap the pot in a towel or cloth to protect it from cold winds.
If you notice brown tips on the leaves, it’s likely due to too much salt buildup in the soil. To fix this, repot your calla lily in fresh potting mix and trim off any damaged leaves with clean scissors. With these simple troubleshooting tips, you can keep your potted calla lily healthy and thriving for months to come.
Propagation and Repotting Potted Calla Lilies
To keep your potted calla lily thriving, it’s essential to know when and how to propagate and repot these beautiful plants, which we’ll cover in more detail below.
Propagating Calla Lily Bulbs for New Plants
Propagating calla lily bulbs is an excellent way to multiply these stunning plants and share them with friends and family. When done correctly, propagation can be a rewarding experience that ensures the continuation of your favorite variety. The best time for bulb propagation is during the summer months when the mother plant has finished flowering. This allows you to separate the offsets (small bulbs) from the main plant before they begin to sprout new leaves.
To propagate calla lily bulbs, start by carefully digging up the entire plant, making sure not to damage any of the offsets. Gently brush away excess soil and examine the roots. Cut back the top growth to about 6 inches from the base to encourage new growth from the offset bulbs. Allow the separated bulbs to dry for a few days to prevent rotting before potting them in a well-draining mix.
For optimal results, plant the offsets at least 2-3 times deeper than they were originally, and water thoroughly. Keep the soil consistently moist but not waterlogged. Within 6-8 weeks, new leaves should emerge from the offset bulbs, signaling that your propagation efforts have been successful.
When and How to Repot Your Calla Lily
When your potted calla lily has outgrown its container, it’s time to repot. Check the roots by gently removing the plant from its pot. If you see roots circling around the inside of the pot or growing out of the drainage holes, it’s a sign that the plant needs more room to expand.
Typically, calla lilies need to be repotted every 2-3 years in the spring when they’re actively producing new growth. However, this frequency can vary depending on factors like the size of the pot and the rate at which your calla lily is growing. If you’ve been keeping your plant in a small pot for an extended period, it may be time to upgrade even if it doesn’t look like it’s grown much.
Use a pot that is only one to two sizes larger than the original one, as this will prevent the soil from becoming too wet or dry. Add fresh potting mix and gently place the plant in its new home. Water thoroughly after repotting and keep an eye on your calla lily as it adjusts to its new environment.
Remember that over-repotting can be stressful for potted plants, so only repot when necessary to give your calla lily the best chance of thriving. By following these simple guidelines, you’ll be able to provide your plant with the right amount of space to continue producing its beautiful blooms.
Pests and Diseases Affecting Potted Calla Lilies
Pests and diseases can be a major problem for potted calla lilies, causing damage to leaves and flowers if left untreated. Regularly inspect your plants for signs of infestation or infection to keep them healthy.
Common Pests Like Aphids or Spider Mites
One common issue that potted calla lily growers face is pest infestations. Among the most notorious culprits are aphids and spider mites. These tiny insects may seem harmless at first, but they can cause significant damage to your plant’s leaves and flowers.
To identify these pests, look for curled or distorted leaves, sticky honeydew droplets on the leaves or stems, and fine webbing between the leaves or on the soil surface. Aphids are usually small, soft-bodied insects with long legs, while spider mites are tiny, eight-legged creatures that feed on plant sap.
To prevent pest infestations, it’s essential to maintain good hygiene in your greenhouse or indoor growing space. Inspect your plants regularly for signs of pests and treat promptly if you notice any issues. Keep your potted calla lilies away from other plants that may be carrying pests, and avoid overwatering, which can create an ideal environment for pest growth.
Some effective natural methods to control pest infestations include introducing beneficial insects like ladybugs or lacewings, which feed on aphids and spider mites. You can also use neem oil or insecticidal soap to control pest populations without harming the plant.
Fungal Infections and Bacterial Leaf Spot
Fungal infections are one of the most common problems affecting potted calla lilies. These microorganisms can spread through water, soil, and even human contact, making it essential to maintain a clean environment for your plants. One of the primary signs of fungal infection is the appearance of white, cottony growths on the leaves or stems. If left untreated, these infections can cause significant damage to the plant’s overall health.
Bacterial leaf spot is another issue that may arise in potted calla lilies. Characterized by small, yellow or brown spots on the leaves, this bacterial infection thrives in humid environments and high temperatures. In severe cases, bacterial leaf spot can lead to the death of individual leaves or even the entire plant.
To prevent fungal infections and bacterial leaf spot, ensure that your plants receive adequate air circulation and avoid overwatering. If you do notice any signs of these issues, treat them promptly with a fungicide specifically designed for houseplants. Prune infected areas carefully, making sure to disinfect your tools between cuts.
Conclusion: Enjoying Your Potted Calla Lilies
Now that you’ve learned how to grow and care for your potted calla lily, it’s time to enjoy its beauty and longevity in your home. With these tips, you’ll be a pro at keeping them thriving!
Tips for Long-Term Health and Beauty
As you’ve grown to love your potted calla lily, it’s essential to remember that their beauty is not just a fleeting moment. With proper care and attention, these stunning flowers can thrive for months to come. To keep your potted calla lily healthy and radiant long-term, follow these final tips.
Firstly, continue to provide your plant with bright, indirect light. Avoid direct sunlight, which can cause the leaves to become scorched and discolored. East- or west-facing windows are perfect for calla lilies, as they offer gentle, filtered light.
Maintaining optimal temperatures is also crucial. Keep your potted calla lily in a spot with temperatures between 65°F to 75°F (18°C to 24°C) during the day and no lower than 55°F (13°C) at night. Avoid placing them near heating vents or drafty windows.
Watering is another key aspect of long-term care. Make sure the soil feels dry to the touch before watering, but avoid letting it become too dry for an extended period. Water thoroughly, allowing excess water to drain from the pot to prevent root rot.
Fertilize your potted calla lily sparingly throughout its lifespan. Feed with a balanced, water-soluble fertilizer during the growing season (spring and summer), following the manufacturer’s instructions.
Lastly, repot your calla lily every 1-2 years as it outgrows its container or when the soil becomes packed. Choose a pot that is only slightly larger than the previous one to prevent the soil from becoming too wet.
By following these tips, you’ll be able to enjoy your potted calla lily for months to come and witness their regal beauty continue to thrive under your care.
Frequently Asked Questions
How Often Should I Water My Potted Calla Lily?
Water your potted calla lily when the top inch of soil feels dry to the touch, typically once a week during spring and summer months, and less often during fall and winter. However, be cautious not to overwater, as this can lead to root rot.
What Causes Yellow Leaves on My Calla Lily?
Yellow leaves on your calla lily may indicate overwatering, underwatering, or exposure to extreme temperatures. Check the soil moisture, adjust your watering schedule accordingly, and ensure your plant is in a spot with stable temperatures between 65-75°F (18-24°C).
Can I Propagate Calla Lilies from Seed?
Unfortunately, calla lilies are typically propagated through division of rhizomes or bulbs, not seeds. This method ensures the new plants retain their unique characteristics and blooming patterns.
How Do I Repot My Calla Lily After it Finishes Blooming?
Repot your calla lily after it finishes blooming in late spring or early summer, using a well-draining potting mix and a slightly larger pot to accommodate the plant’s growing roots. Prune the rhizome and refresh the soil to promote new growth.
Are Calla Lilies Susceptible to Pests?
Yes, calla lilies can be affected by pests like aphids, spider mites, and mealybugs. Regularly inspect your plants for signs of infestation, use neem oil or insecticidal soap to control outbreaks, and maintain good hygiene practices when handling the plants.