If you’re a gardener or plant enthusiast, you’ve probably encountered those pesky little critters that can wreak havoc on your beloved plants: spider mites. These microscopic arachnids are notorious for causing damage to leaves, stems, and roots, leading to stunted growth, yellowing foliage, and even plant death. But the good news is that with proper knowledge and management techniques, you can prevent infestations and keep your garden thriving. In this article, we’ll delve into the causes of spider mite damage, explore its effects on plants, and discuss effective prevention methods to maintain healthy growing conditions. We’ll also cover how to identify an infestation and take action to manage it before it’s too late. By the end of this post, you’ll be equipped with the tools to protect your plants from these sneaky pests and enjoy a lush, vibrant garden all season long.
Understanding Spider Mites
To tackle spider mite damage, it’s essential to understand what these tiny pests are and how they reproduce, which is crucial for effective prevention. Let’s dive into their life cycle and habits.
What are Spider Mites?
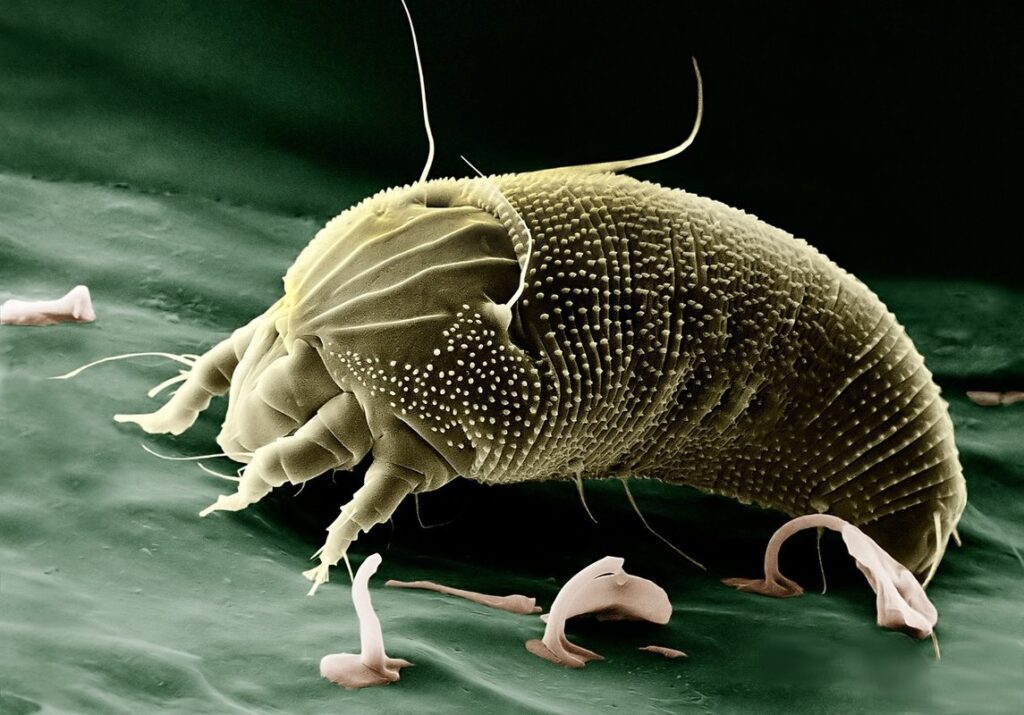
Spider mites are among the most common and insidious pests that can affect plants in both indoor and outdoor settings. These tiny arachnids are part of the Acari order, which includes all species of mites. Spider mites have a spider-like appearance, with eight legs and a small body that is barely visible to the naked eye.
To give you an idea of just how small they are, consider this: adult spider mites are about 1/20th of an inch in length. That’s roughly the size of a pinhead! Despite their tiny size, however, spider mites can cause significant damage to plants by feeding on their sap. This is because plant sap contains essential nutrients that spider mites need to survive.
When spider mites feed on plant sap, they leave behind a trail of damage that can be difficult to spot at first glance. Leaves may develop yellow or white patches, and the plant’s overall appearance may become disfigured. In severe cases, spider mite infestations can lead to the death of the plant if left unchecked.
To prevent spider mites from taking over your plants, it’s essential to monitor them regularly for signs of infestation. Look out for fine webbing between leaves or on stems, as this is a common indicator of a spider mite problem. If you do spot any evidence of spider mites, take action immediately by treating the plant with an insecticidal soap or neem oil solution.
Life Cycle of Spider Mites
Understanding the life cycle of spider mites is essential to effectively manage these pests. The life cycle consists of four stages: egg, larva, protonymph, and adult.
The first stage is the egg stage, where female spider mites lay their eggs on the underside of leaves or on stems. These eggs are usually white, oval-shaped, and about 0.1 mm in length. They can hatch within 3-5 days depending on temperature and humidity conditions.
After hatching, the larva emerges, which is also known as a deutonymph. This stage lasts for several hours to a few days, during which the mite will molt twice before reaching the protonymph stage. The protonymph stage typically lasts around 2-3 days and involves another molting process before the adult stage.
Adult spider mites are usually smaller than their protonymph counterparts and can reproduce within just a few days after emergence. Female adults lay eggs continuously, contributing to the rapid population growth of spider mites. Understanding these stages allows you to target specific areas for management, such as controlling egg-laying females or removing protonymphs before they reach adulthood.
Causes of Spider Mite Infestation
To understand how to prevent spider mite damage, it’s essential to know what causes these pests to infest your plants in the first place. Let’s explore some common reasons why spider mites thrive.
Poor Air Circulation
When it comes to spider mites, one of the most critical factors that can contribute to an infestation is poor air circulation around plants. Without adequate airflow, a buildup of dust and debris on leaves and stems creates an ideal breeding ground for these pesky pests.
Think of it like a humid greenhouse: when air doesn’t circulate freely, moisture accumulates on surfaces, fostering the perfect environment for spider mites to multiply rapidly. It’s not just dusty plants that are at risk – stagnant air can also trap fungal spores and other pathogens that feed the spider mite population.
To prevent this issue, ensure your indoor growing space has adequate ventilation. Consider installing a fan or adjusting your heating and cooling systems to maintain a gentle breeze around your plants. For outdoor gardens, prune nearby foliage to allow for better airflow and sunlight penetration. By keeping air circulating and surfaces clean, you’ll make it much harder for spider mites to thrive – and reduce the risk of infestation in the first place.
Maintaining good air circulation also helps prevent other pests from taking hold, making it a crucial aspect of integrated pest management strategies.
High Humidity
When it comes to spider mites, high humidity is their best friend. In fact, these pesky pests thrive in humid environments, making it essential to maintain optimal humidity levels if you want to prevent an infestation. You see, spider mites can’t survive for long without water, and humid conditions allow them to stay hydrated and multiply rapidly.
The ideal humidity range for most plants is between 40% to 60%. However, some plants like orchids and African violets prefer even higher humidity levels. If the air is too dry, spider mites will quickly dehydrate and die off. But when the humidity is just right, they can feed on your plant’s sap, causing damage and discoloration.
To prevent spider mite infestations in humid environments, make sure to provide good air circulation around your plants. You can use fans or open windows to keep the air moving and prevent moisture from accumulating. Regularly monitoring the humidity levels in your growing space will also help you catch any issues before they get out of hand. By keeping a close eye on the humidity, you’ll be better equipped to prevent spider mite infestations and protect your plants.
Temperature Extremes
When plants are exposed to extreme temperatures, it can cause significant stress. This stress makes them more susceptible to spider mite infestations. In fact, research has shown that temperatures above 90°F (32°C) can increase the likelihood of spider mites attacking your plants by up to 300%.
High temperatures can also disrupt the plant’s natural defense mechanisms, making it easier for spider mites to feed on its sap. Conversely, extremely low temperatures can also cause stress, leading to weakened immune systems and a higher risk of infestation.
To prevent this issue, monitor your greenhouse or indoor growing space closely during periods of extreme weather. Keep your plants in an area with consistent temperatures between 65°F (18°C) and 75°F (24°C). Avoid placing them near heating vents, radiators, or air conditioning units that can cause temperature fluctuations. By maintaining a stable environment, you can reduce the risk of spider mite infestations and protect your crops from potential damage.
Signs and Symptoms of Spider Mite Infestation
As you inspect your plants, it’s essential to know what signs and symptoms to look for to identify a spider mite infestation early on. Check for tiny webs and stippled leaves, which are classic indicators of an issue.
Leaf Discoloration
Leaf discoloration is one of the earliest signs of spider mite infestation. As these tiny pests feed on the sap of the plant, they can cause the leaves to turn yellow or bronze due to a lack of essential nutrients. This discoloration can start with a subtle change in color, often accompanied by a reduction in leaf size and a general decline in overall plant health.
As the infestation progresses, the affected areas may develop a characteristic bronzy or golden hue, particularly on the upper surfaces of the leaves. In severe cases, entire leaves may turn yellow or drop off altogether. If you notice any unusual discoloration or changes in your plants’ appearance, inspect them carefully for spider mites and their eggs.
To prevent leaf discoloration caused by spider mite infestations, keep a close eye on your plants’ overall health and take action early if you spot any signs of mites. Regularly inspect the undersides of leaves, where mites often hide, and remove any heavily infested or damaged areas to prevent further spread.
Fine Webbing
One of the most distinctive signs of a spider mite infestation is the fine webbing they produce on plant surfaces. These delicate webs are actually strands of silk that mites use to protect themselves and their eggs from environmental stressors, predators, and even the elements. As the mite population grows, so does the webbing, making it increasingly difficult to miss.
Take a closer look at your plants, especially if you suspect an infestation: spider mite webbing appears as fine, cottony threads or tufts on leaves, stems, or even flower buds. It’s not uncommon for the webs to be so thin and delicate that they blend in with the plant itself, making detection tricky. However, in severe cases, the webbing can become more pronounced and noticeable.
If you spot any of these fine webs on your plants, it’s essential to act quickly: inspect the surrounding areas, check other plants nearby for similar signs, and begin researching control methods to mitigate the damage.
Silken Eggsacs
When inspecting plants for signs of spider mite infestation, it’s essential to keep an eye out for silken eggsacs. Female spider mites typically lay their eggs in these sacs, which are usually attached to the leaf undersides or stems. These sacs can be difficult to spot, especially if they’re small or well-hidden.
To locate silken eggsacs, gently lift the leaves and inspect the undersides, as this is where most of them tend to stick. You may need to use a magnifying glass or a hand lens to get a closer look. Silken eggsacs can vary in size, but they usually resemble small white or yellowish sacs with a sticky thread-like material surrounding them.
When you spot silken eggsacs, it’s likely that the plant is already infested with spider mites. This means that the damage has been ongoing for some time, and prompt action is necessary to prevent further harm. If left unchecked, spider mite populations can explode, causing severe damage to your plants. Regularly inspecting your plants and catching infestations early on can help you prevent extensive damage and save your plants from suffering the consequences of a spider mite infestation.
Managing Spider Mite Infestations
If you suspect a spider mite infestation, don’t panic – we’ll walk you through effective methods to manage and prevent these pesky pests from taking over your garden.
Chemical Controls
Chemical controls can be an effective way to manage spider mite populations, but they must be used judiciously and with caution. When selecting a pesticide for spider mites, look for products that contain neem oil, pyrethrin, or sulfur as active ingredients. These are the most commonly recommended chemicals for controlling spider mites.
Before applying any chemical control, carefully read the label instructions to ensure you’re using the product correctly. Follow the recommended dosage and application schedule to avoid harming your plants or causing environmental damage. It’s also essential to identify the specific type of pesticide required for your situation. For example, if you have a severe infestation, a more potent insecticide may be necessary.
Some popular chemical controls for spider mites include:
* Horticultural oil sprays
* Pyrethrin-based pesticides
* Neem oil products
* Sulfur dust or powder
When using chemical controls, it’s also crucial to consider the potential risks to beneficial insects, such as bees and butterflies. To minimize these risks, try to apply chemicals during cooler parts of the day, when beneficial insects are less active.
Cultural Controls
Maintaining good hygiene is crucial when it comes to managing spider mite infestations. Regularly inspect your plants for signs of infestation and isolate them if you notice any white cottony webs or tiny moving dots on the leaves. Disinfect all tools, pots, and trays with soap and water to prevent the spread of spider mites.
Pruning infested areas is another effective way to control spider mite populations. Remove any severely damaged or infested leaves and dispose of them immediately. This will not only help reduce the number of spider mites on your plant but also prevent them from spreading to other parts of the plant.
Using physical barriers can also help manage spider mites. Cover your plants with fine mesh or fine netting to prevent adult spider mites from laying eggs and reaching your plant. This is a particularly effective method for young seedlings that are more susceptible to infestation. By combining these methods, you can effectively manage spider mite populations and prevent further damage to your plants.
Biological Controls
Encouraging natural predators to control spider mite populations is an effective alternative to chemical treatments. One of the most popular biological controls for managing spider mites are lady beetles. These tiny insects feed on spider mite eggs and larvae, reducing their numbers significantly. By introducing a few dozen lady beetles into the affected area, you can create a natural balance that suppresses spider mite populations.
Another option is to use predatory mites specifically designed to target spider mites. Some popular species include Neoseiulus californicus and Phytoseiulus persimilis. These beneficial mites hunt down and feed on adult spider mites, preventing them from reproducing. When introducing these predators, it’s essential to ensure they are well-suited for your specific climate and crop type.
To effectively use biological controls, it’s crucial to maintain a healthy ecosystem in your garden or indoor space. This includes providing adequate food sources, shelter, and water for beneficial insects. Regular monitoring is also necessary to identify any issues with the introduced predators or their effectiveness in controlling spider mite populations.
Prevention and Monitoring
Now that we’ve discussed the causes and effects of spider mite damage, let’s focus on how to prevent it from happening in the first place and monitor for early signs of infestation.
Regular Inspections
Regularly inspecting plants for signs of spider mite damage is crucial for early detection and management. When it comes to monitoring for spider mites, the key is to catch them before they multiply and cause significant harm. This means setting aside dedicated time each week to inspect your plants carefully.
Start by looking for signs of webbing or fine threads on the undersides of leaves, particularly around the veins. Check for tiny eggs or eggshells that may be present in these areas as well. White or yellowish dots on leaves can also indicate spider mite feeding damage. Be sure to inspect both the upper and lower surfaces of leaves, as spider mites often prefer the underside.
Regular inspections will help you detect any issues early on, allowing for prompt action to prevent further damage. If you’re new to monitoring for spider mites, consider setting up a weekly inspection schedule and taking notes on what you find. This will help you track any changes or trends over time. Remember, it’s always better to err on the side of caution and inspect your plants frequently rather than waiting until damage has already occurred.
Maintaining Optimal Growing Conditions
Providing optimal growing conditions is crucial to preventing spider mite infestations. This involves proper watering techniques, balanced fertilization, and effective pest management strategies. When it comes to watering, overwatering can lead to ideal conditions for spider mites to thrive. To avoid this, ensure the soil has good drainage and water your plants when the top inch of soil feels dry to the touch.
Fertilizing your plants is also essential, but excessive fertilization can create an environment that’s conducive to pest infestations. Use a balanced fertilizer that meets the nutritional needs of your plants without overloading them with nutrients. Regularly inspecting your plants for signs of nutrient deficiencies and adjusting your fertilization schedule accordingly will help prevent spider mite damage.
Effective pest management involves monitoring for early signs of infestation, using integrated pest management (IPM) techniques, and implementing preventative measures such as releasing beneficial insects or using organic pest control methods when necessary.
Using Physical Barriers
When it comes to preventing spider mites from infesting your plants, one effective method is using physical barriers. These barriers work by blocking adult spider mites from reaching your plants in the first place.
Fine mesh or fine netting are great options for creating a barrier around your plants. You can drape these materials over planters, greenhouses, or entire gardens to prevent spider mite infestations. For example, if you have a greenhouse with potted plants, you can cover each pot with fine mesh to prevent adult spider mites from reaching the soil and starting an infestation.
When selecting a physical barrier, consider factors such as mesh size, durability, and ease of installation. A mesh size of 150-200 microns is effective in keeping out most adult spider mites, while being gentle on plants. Be sure to inspect your barriers regularly for any signs of damage or wear, replacing them as needed to maintain their effectiveness.
By incorporating physical barriers into your pest management strategy, you can significantly reduce the risk of spider mite infestations and prevent costly damage to your plants.
Frequently Asked Questions
How can I identify the early signs of a spider mite infestation before it’s too late?
Early detection is key to managing spider mites effectively. Look for fine webbing on leaves, stems, or between nodes, as well as tiny, moving dots (spider mites) on the undersides of leaves. Yellowing foliage or stunted growth can also indicate an infestation. Regularly inspect your plants under a magnifying glass or loupe to catch issues early.
What are some common mistakes people make when trying to prevent spider mite damage?
One common mistake is relying solely on chemical controls, which can harm beneficial insects and the environment. Another error is neglecting regular inspections and monitoring for signs of infestation. Remember that prevention involves a holistic approach: maintaining optimal growing conditions, using physical barriers, and encouraging beneficial insects.
How do I choose between cultural, biological, and chemical controls for managing spider mite infestations?
The choice depends on the severity of the infestation, your garden’s specific needs, and local regulations. Cultural controls (like improving air circulation) are often the most effective and least damaging method. Biological controls can provide long-term solutions, while chemical controls should be used as a last resort.
Can spider mites infest plants in containers or only outdoors?
Spider mites can infest plants in both indoor and outdoor settings, including containers. They thrive in warm temperatures (above 65°F/18°C), high humidity, and poor air circulation – conditions common in greenhouses, conservatories, or indoor gardens with inadequate ventilation.
How often should I inspect my plants for spider mite damage?
Regular inspections are crucial to managing infestations effectively. Set aside time each week to inspect your plants under a magnifying glass or loupe, especially during peak growing seasons or in areas prone to spider mites. Early detection allows you to take prompt action and prevent widespread damage.