Spider mites are one of the most common and frustrating pests to infest your plants. These tiny, almost microscopic arachnids can wreak havoc on even the healthiest-looking leaves, sucking sap and causing damage that’s hard to ignore. If you’re a gardener or plant enthusiast, chances are you’ve dealt with spider mite infestations at some point. But don’t worry – identifying, preventing, and controlling these pesky pests is easier than you think. In this comprehensive guide, we’ll walk you through everything you need to know about spider mites, from how to spot them to how to get rid of them for good. Whether you’re a seasoned green thumb or just starting out, our expert tips will help you keep your plants healthy and spider mite-free.
What are Spider Mites?
Let’s start with the basics: spider mites are tiny, eight-legged arachnids that feed on plant sap, causing damage to leaves and stems. Understanding what they look like is key to identifying an infestation.
Characteristics of Spider Mites
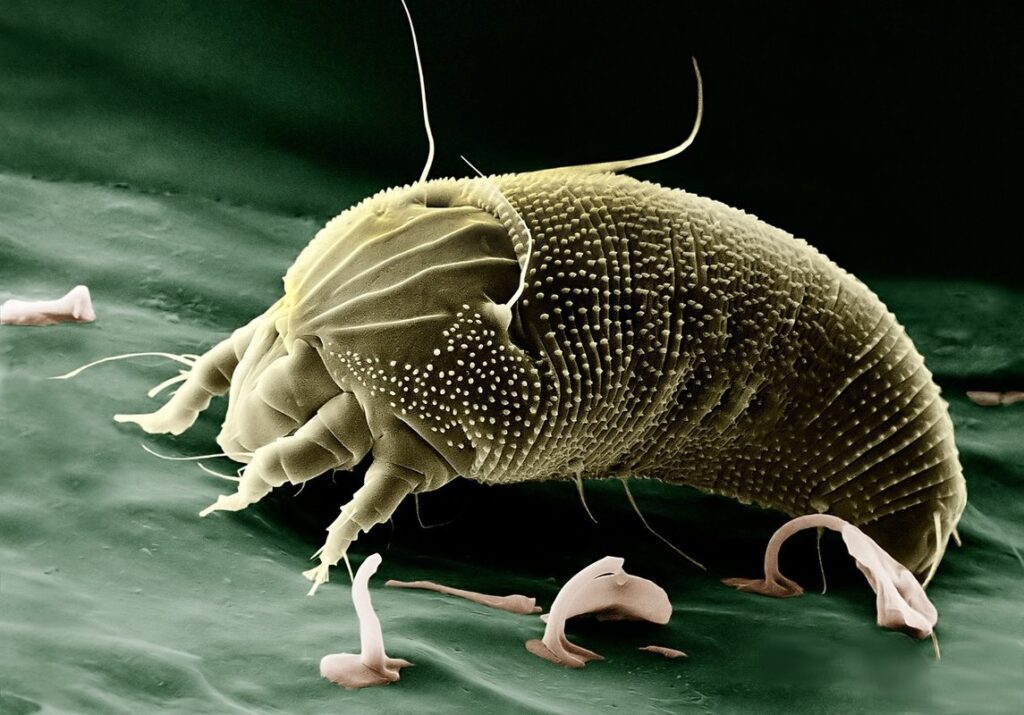
Spider mites are incredibly small, but their physical characteristics can be a giveaway of their presence. These tiny pests typically measure between 0.1 to 0.5 millimeters in length, making them almost invisible to the naked eye. They have an oval or rounded body shape, often with eight legs and a distinctive rounded abdomen.
However, spider mites can easily be mistaken for dust particles or other small debris due to their minuscule size. This is especially true when they are present on leaf surfaces in large numbers, appearing as a fine white powder or film. To accurately identify spider mites, it’s essential to use a hand lens or magnifying glass to get a closer look.
One of the most distinctive features of spider mites is their pale yellowish color, which often turns reddish-brown as they feed on plant sap. This change in coloration can be an indicator that your plants are under attack. Keep in mind that it’s not uncommon for spider mites to be mistaken for other pests or even beneficial insects, such as thrips or scale insects, so close inspection is crucial when attempting to identify them.
Life Cycle of Spider Mites
The life cycle of spider mites is a crucial aspect to understand when it comes to managing these pests. Female spider mites can lay up to 20 eggs at a time, which hatch into six-legged larvae after just two days. These larvae then go through three nymph stages, molting their skin each time as they outgrow it.
During this process, the mites are still vulnerable and more susceptible to predators or pesticides. As they progress from one stage to the next, they start to develop their characteristic spider-like legs. Adult female spider mites can lay up to 300 eggs in a single month, ensuring the population continues to grow rapidly.
Understanding the life cycle of spider mites is essential for effective control measures. For instance, targeted applications of insecticidal soap or neem oil during the nymph stages can significantly reduce populations before they reach adulthood and start reproducing again. Regular monitoring of plants and timely intervention can help prevent infestations from becoming severe and reduce the need for more drastic measures.
Types of Spider Mites
There are several types of spider mites, each with unique characteristics and habits that can help you identify them and determine the best course of action for control. Let’s explore some of these common varieties together!
Two-Spotted Spider Mite
The two-spotted spider mite (Tetranychus urticae) is one of the most common and widespread species of spider mites. These tiny pests are found on every continent except Antarctica, and their distribution ranges from tropical to temperate regions. They thrive in warm temperatures above 15°C (59°F), making them a significant threat to crops grown in greenhouses and indoor gardens.
Two-spotted spider mites have a voracious appetite for plant sap, feeding on over 1,000 species of plants, including many popular garden fruits and vegetables like tomatoes, peppers, cucumbers, and strawberries. They prefer hosts with tender leaves or stems, which they pierce using their piercing-sucking mouthparts.
The two-spotted spider mite is economically important due to its ability to cause significant damage to crops, particularly in regions where integrated pest management (IPM) strategies are not widely adopted. To manage this species, farmers and gardeners can employ a combination of physical removal, biological control using natural predators or parasites, and chemical controls as a last resort. Regular monitoring for early signs of infestation and practicing good agricultural practices can also help prevent outbreaks.
Spider Mite Species: Red, Yellow, and others
In addition to the two-spotted spider mite, there are several other common species of spider mites that can infest plants. One such species is the Red Spider Mite (Panonychus ulmi), which is recognized by its bright red color and distinctive oval-shaped eggs. These pests prefer warmer temperatures and high humidity, often thriving in greenhouses or indoor growing spaces.
The Yellow Spider Mite (Eurytetranychus bundari) is another species that can cause significant damage to plants. With a yellowish-green body and long, thin legs, they are easily identifiable under a microscope. Pacific Spider Mites (Tetranychus pacificus) are known for their ability to adapt quickly to different environments, making them particularly difficult to control.
All three of these species share similar habits with the two-spotted spider mite, feeding on plant sap and excreting sticky honeydew that attracts other pests. To prevent infestations, it’s essential to keep plants clean and inspect for signs of spider mites regularly. By monitoring temperature and humidity levels, gardeners can also create an environment less conducive to their survival.
Identification and Monitoring
To accurately identify spider mites, you’ll need to know what to look for on your plants and how to monitor their presence effectively. Let’s dive into the key signs of an infestation and monitoring strategies.
Signs and Symptoms of Infestation
When you first notice signs of spider mite infestation on your plants, it’s essential to catch the issue early to prevent further damage. One of the most common indicators is webbing. These tiny spiders create silk threads that form a fine mesh on the undersides of leaves and stems. The webbing might be white or yellowish in color and often has a sticky quality to it.
Another sign of infestation is discoloration. Spider mites feed on plant sap, which can cause a range of color changes depending on the plant species. Some plants may exhibit pale green or yellowish leaves, while others may develop brown or bronze patches. Discoloration might be localized or widespread across the plant, and in severe cases, it could even turn into scorching.
Stippling is another distinctive symptom associated with spider mite infestation. These tiny insects inject their saliva into the plant’s cells during feeding, causing them to swell up and create small white spots on the leaves’ surface. The stippled appearance can be quite disfiguring and may also lead to a weakened immune system in the affected plants.
To identify these signs, inspect your plants closely, paying attention to the undersides of leaves and stems. Start at the top and work your way down, as spider mites often spread downwards from their initial entry points. If you notice any of these symptoms, it’s crucial to act quickly to prevent further infestation.
Using Damp Cloths for Inspection
Using damp cloths to inspect for spider mites is a simple yet effective method that can help you detect infestations early on. This technique allows you to visualize the tiny spider mites and their webbing more clearly, making it easier to identify them.
To use this method effectively, start by gently wetting a soft, lint-free cloth with water. You can also add a small amount of mild dish soap to help loosen any debris or residue on the leaves. Gently wipe each leaf with the damp cloth, paying close attention to the underside and any crevices where spider mites tend to congregate.
As you inspect the leaves, look for tiny, moving dots (the spider mites) and fine webbing that may be visible in the cloth’s path. Be sure to examine multiple areas of each leaf and inspect several leaves per plant. This technique is particularly useful when inspecting delicate or tender foliage where spider mites are more likely to cause damage.
Prevention and Control Methods
To effectively manage a spider mite infestation, you need to understand the prevention and control methods that can help prevent future outbreaks. This includes identifying risks and taking proactive steps to keep your plants safe.
Cultural Controls: Temperature, Humidity, and Pruning
Maintaining optimal temperature and humidity levels is crucial in preventing spider mite infestations. These pests thrive in warm and dry environments, typically between 65°F to 85°F (18°C to 30°C) and a relative humidity of 50% to 80%. To keep your plants healthy, ensure that the temperature and humidity levels are within this range. You can use a humidifier or dehumidifier to regulate the environment.
Pruning infested areas is another essential cultural control method. Remove any heavily infested leaves or branches from the plant to prevent the spider mites from spreading further. Dispose of the infested material immediately, and disinfect your pruning tools with soap and water to prevent re-infestation. Additionally, provide good air circulation around your plants by keeping them at least 6-8 inches apart.
Remember, cultural controls are just as effective as chemical treatments in preventing spider mite infestations. By maintaining a healthy environment and pruning infested areas, you can significantly reduce the risk of an outbreak.
Chemical Controls: Pesticides and Biological Agents
When it comes to controlling spider mite infestations, chemical control methods can be effective, but they also come with their own set of challenges. One common approach is using pesticides, which can quickly kill spider mites on contact. However, this method has several drawbacks: pesticides can harm beneficial insects, contaminate soil and water, and even pose health risks to humans if not handled properly.
A more targeted approach is introducing biological agents like predatory mites into the infested area. These natural predators feed on spider mites, breaking the cycle of infestation without harming other beneficial organisms. To use this method effectively, you’ll need to identify a suitable species of predatory mite and release it in sufficient numbers to control the population.
Before using either pesticide or biological agents, it’s essential to assess the severity of the infestation and weigh the pros and cons of each approach. Always follow local regulations and safety guidelines when handling chemicals, and consider consulting with a pest management professional if you’re unsure about how to proceed.
Some species of predatory mites can be purchased online or through local nurseries, but it’s crucial to ensure that they are suitable for your specific climate and the type of plants being infested. Research reputable suppliers and follow instructions carefully when releasing these beneficial organisms into your garden.
Biological Control Methods
When it comes to controlling spider mites, biological control methods offer a natural and often effective way to manage infestations without harming your plants. We’ll explore these gentle yet potent approaches in more detail below.
Introducing Predatory Mites
Introducing predatory mites into an infested area can be a game-changer for controlling spider mite populations. These beneficial insects feed exclusively on spider mites, providing a natural and long-term solution to this pest problem.
One of the benefits of using predatory mites is their ability to target specific pests while leaving other beneficial insects and plants unharmed. For example, Phytoseiulus persimilis (P. persimilis) is a highly effective predator species that specializes in feeding on spider mites. It’s estimated that P. persimilis can consume up to 20-30 spider mite eggs or nymphs per day.
To release predatory mites effectively, it’s essential to understand their life cycle and habitat preferences. Typically, these mites thrive in temperatures between 65°F to 75°F (18°C to 24°C) and humidity levels above 60%. When releasing P. persimilis, introduce them near the base of infested plants or areas where spider mite eggs are most concentrated. It’s also crucial to ensure a sufficient food supply for these beneficial mites, as they will eventually die off if their primary food source is depleted. By following proper release procedures and providing optimal conditions, you can harness the power of predatory mites to effectively control spider mite populations.
Other Biological Agents: Nematodes, Parasitic Wasps
When it comes to biological control methods for spider mites, there are several other agents that can be used in addition to predatory mites. One such option is nematodes, microscopic worms that feed on insect larvae and eggs. These tiny predators have a unique life cycle that allows them to penetrate the soil or plant tissue where they can target their hosts.
Some species of nematodes, like Heterorhabditis bacteriophora, are particularly effective against spider mite populations. They work by injecting bacteria into the spider mite’s body, killing it within hours. To use nematodes effectively, apply them to the soil or plant surface and ensure adequate moisture for the nematodes to survive.
Another biological agent that can be used to control spider mites is parasitic wasps. These tiny insects lay their eggs inside spider mite eggs or larvae, where the wasp larvae then feed on the host’s internal organs. Some species of parasitic wasps are highly specific to spider mites and can provide a long-term solution to pest management.
For example, the genus Trichogramma has been successfully used to control spider mite populations in greenhouses. By introducing these tiny wasps into the growing area, growers can reduce the need for chemical pesticides and create a more balanced ecosystem.
Case Studies and Success Stories
Real-life examples of spider mite infestations and how others have successfully prevented and controlled these pests on their plants. You’ll learn from their successes and failures.
Examples of Effective Management Strategies
Effective management of spider mite infestations requires a combination of good agricultural practices, precise monitoring, and timely intervention. Let’s take a look at some real-life examples that demonstrate successful strategies for controlling these pests.
In the case of a California strawberry farm, introducing natural predators like lady beetles and lacewings significantly reduced spider mite populations. The farm also implemented strict sanitation measures, including regular cleaning of equipment and removal of weeds, which helped prevent mites from spreading. By monitoring their crops closely, the farmers were able to catch infestations early on and apply targeted treatments using neem oil.
Similarly, a small-scale horticulturist in Florida successfully controlled spider mite infestation on her indoor plants by adopting an integrated pest management (IPM) approach. This included releasing beneficial insects like phytoseiulus persimilis, which preyed upon the spider mites, as well as using neem oil and diatomaceous earth to control populations.
In another instance, a home gardener in Australia successfully eradicated a spider mite infestation on her roses by adopting an aggressive pruning strategy, removing heavily infested leaves and stems.
Lessons Learned: Challenges and Failures
Managing spider mites can be a challenging task, even for experienced gardeners. One common pitfall is a lack of persistence in treatment. Spider mite infestations often require repeated applications of control methods, making it easy to get discouraged and give up too soon. To avoid this, it’s essential to establish a monitoring schedule to track the effectiveness of your treatments.
Another critical mistake is inadequate monitoring. Without regular checks on your plants’ condition, you may miss early signs of an infestation, allowing the problem to escalate. Make sure to inspect your plants thoroughly every week, looking for telltale webbing or fine threads on the undersides of leaves. Regular monitoring also helps you catch any issues before they spread.
Effective control methods can be just as important as persistence and monitoring. Using chemical pesticides too frequently can harm beneficial insects in your garden. Instead, try introducing natural predators like lady beetles or lacewings to help control spider mite populations. If you do need to use chemicals, always follow the instructions carefully and choose products specifically labeled for managing spider mites.
Some examples of ineffective methods include overwatering, which can attract more pests, or using homemade remedies that are untested and may not be effective. It’s also crucial to address root causes like poor air circulation or extreme temperatures, which can contribute to spider mite infestations. By learning from these common mistakes and taking a proactive approach, you’ll be better equipped to manage spider mites effectively.
Frequently Asked Questions
Can I prevent spider mites from infesting my plants if they’re already present nearby?
Yes, it’s essential to implement cultural controls, such as maintaining a clean environment, monitoring temperature and humidity levels, and pruning infested areas. Regularly inspecting your plants with a damp cloth can also help detect early signs of infestation.
What are some common mistakes people make when trying to control spider mites?
One common mistake is using chemical pesticides, which can harm beneficial insects and even contribute to the development of pesticide-resistant spider mite populations. Instead, focus on introducing predatory mites or other biological agents to control the population naturally.
How long does it take for spider mite infestations to become apparent?
Infestations can progress rapidly, often within 1-2 weeks of initial infestation. However, some species may take longer to show noticeable signs of damage. Regular monitoring and prompt action are crucial in preventing widespread damage.
Can I use a single biological control method to eliminate spider mites entirely?
While introducing predatory mites or nematodes can be effective in controlling spider mite populations, it’s often more successful to combine multiple methods, such as using multiple biological agents and cultural controls. This approach can help prevent re-infestation and ensure long-term control.
What are some signs that my spider mite treatment isn’t working?
If you notice the infestation persists or even worsens after treatment, it may be a sign of pesticide resistance or an insufficient treatment strategy. Be prepared to adjust your approach, possibly incorporating new biological agents or cultural controls, and monitor your plants closely for signs of improvement.