As a gardener, you’re probably no stranger to the joy of watching pollinators like bees flit from flower to flower. But have you ever stopped to think about how your garden’s design might be impacting these busy little creatures? If you’re looking for ways to create a bee-friendly oasis in your own backyard, look no further than seed bombs – small balls of clay and compost that contain seeds specifically chosen to attract pollinators.
In this article, we’ll show you how to create a low-maintenance, high-impact garden using these simple yet effective seed bombs. We’ll cover everything from choosing the right types of plants to ensure a steady supply of nectar and pollen, to the best ways to scatter your seed bombs for maximum effect. By following our tips, you can create a thriving bee-friendly habitat that’s not only beautiful but also supports local biodiversity – all with minimal fuss or upkeep.
What are Bee Seed Bombs and Their Importance
Bee seed bombs are a simple yet effective way to attract pollinators to your garden, and understanding their importance can help you create a thriving ecosystem. Let’s dive into what they’re all about!
Definition and History of Bee Seed Bombs
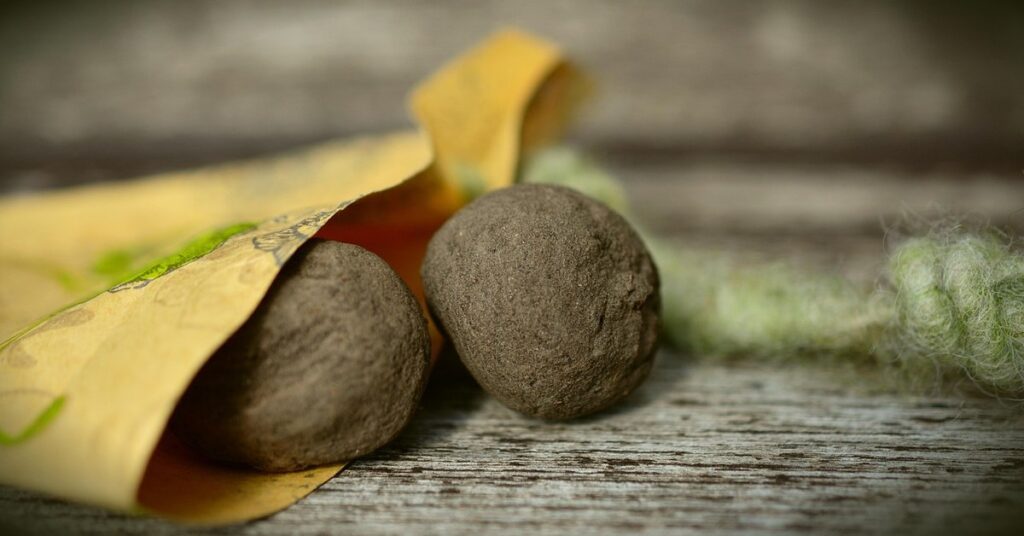
Bee seed bombs have become an increasingly popular tool for gardeners and environmentalists looking to support local pollinators. But what exactly are they? In simple terms, bee seed bombs are small balls made from a mixture of clay, soil, and seeds that are designed to be thrown into areas where you’d like wildflowers or herbs to grow. The idea is that the seed ball will absorb water, germinate, and begin growing in its new location.
The concept of seed bombs has been around for centuries, with ancient cultures using similar methods to disperse seeds in areas where they were needed most. However, modern bee seed bombs have evolved from traditional seed balls by incorporating specific plant species that are known to attract pollinators like bees and butterflies. By using these specialized seeds, gardeners can create “bee-friendly” zones within their gardens, providing a crucial source of food for these vital insects. Today, bee seed bombs come in a variety of sizes and mixes, catering to different regions and climates.
Benefits of Using Bee Seed Bombs in Gardens
Using bee seed bombs in your garden can have a significant impact on its ecosystem. One of the most notable benefits is attracting pollinators like bees and butterflies, which are essential for plant reproduction. By dispersing seeds that produce flowers rich in nectar and pollen, you’re creating an instant source of food for these beneficial insects.
Promoting biodiversity is another advantage of using bee seed bombs. As different species of flowers bloom, they provide a constant supply of fresh nectar and pollen, supporting various pollinators throughout the growing season. This variety also helps to increase crop yields and improves overall garden health.
Reducing maintenance needs is a significant benefit for busy gardeners. Bee seed bombs require minimal care after planting – simply scatter them across your garden or in areas with poor soil, water lightly, and watch as they germinate and grow. This low-maintenance approach allows you to focus on other aspects of gardening while still enjoying the benefits of increased pollinator activity.
In addition, bee seed bombs can also help to combat invasive species by introducing native flowers that outcompete non-native plants for resources.
Choosing the Right Flowers for Your Bee Seed Bombs
When selecting flowers for your bee seed bombs, consider the types that provide the most nectar and pollen for pollinators. This will help attract a thriving community to your garden!
Selecting Bee-Friendly Plants for Your Seed Bombs
When selecting plants for your bee-friendly seed bombs, it’s essential to choose flowers that not only attract bees but also thrive in the environment you plan to plant them in. Here are some top picks for bee-friendly flowers that are perfect for seed bomb creation:
Consider including plants like Sunflower (Helianthus annuus), Zinnia (Zinnia spp.), and Cosmos (Cosmos bipinnatus) in your seed bombs. These annuals are easy to grow, require minimal maintenance, and provide a rich source of nectar and pollen for bees. For example, sunflowers can grow up to 12 feet tall and have large, bright yellow petals that attract bees from afar.
Some perennial options include Bee Balm (Monarda didyma), Lavender (Lavandula spp.), and coneflowers (Echinacea spp.). These plants provide a longer blooming period and can be used in seed bombs to create a more sustained source of food for bees. When selecting plants, make sure to choose varieties that are suitable for your climate and growing conditions.
Be mindful of the specific growing requirements for each plant, such as sunlight, watering needs, and soil preferences. By choosing plants that thrive in their environment, you’ll be creating seed bombs that will not only attract bees but also establish healthy gardens.
Considerations for Plant Selection Based on Climate and Region
When it comes to choosing the perfect flowers for your bee seed bombs, it’s essential to consider the climate and region where they’ll be planted. This might seem obvious, but many gardeners overlook this crucial step, which can lead to plants struggling or even dying.
Firstly, think about the temperature fluctuations in your area. If you live in a scorching hot desert, for instance, you’ll want to choose flowers that are heat-tolerant and drought-resistant. Conversely, if you’re in a cooler region with plenty of rainfall, you can opt for plants that thrive in moist conditions.
Additionally, local flora should also influence your plant selection. What grows naturally in your area? Incorporating native species will not only attract more pollinators but also make maintenance easier. For example, if you live near the coast, consider planting salt-tolerant flowers like beach sunflowers or sea lavender.
Consider the growing season too – choose plants that bloom at different times to provide a constant source of nectar and pollen for your bees. And don’t forget about companion planting! Some flowers repel pests that can harm your seeds, while others attract beneficial insects. By carefully selecting plants based on climate and region, you’ll create a thriving bee-friendly ecosystem in no time.
How to Make Your Own Bee Seed Bombs at Home
Creating your own bee seed bombs is easier than you think, and it’s a great way to attract pollinators to your garden while having fun getting creative. Let’s get started on making these tiny packets of nature!
Materials Needed for Making Seed Bombs
To make seed bombs at home, you’ll need to gather some essential materials. Start by collecting a mix of clay and soil. You can use air-dry clay or terra cotta clay, as both work well for this purpose. If you’re using store-bought clay, be sure to choose a type that’s free from additives and chemicals.
Next, prepare the seeds you want to include in your seed bombs. Choose varieties native to your region and suitable for bees. Some popular options include wildflowers like lavender, coneflowers, and black-eyed susans.
You’ll also need water to mix with the clay and soil mixture. Aim for a consistency similar to wet sand. Add a few drops of water at a time until you achieve the desired texture.
Other materials you may want to have on hand include biodegradable packaging material (like paper or cloth) for wrapping your seed bombs, and a tray or plate for assembling them. When gathering seeds and soil, consider using locally sourced and organic options to promote biodiversity in your garden.
Step-by-Step Guide to Creating Seed Bombs
To create seed bombs, you’ll need to mix the right combination of ingredients. Start by filling a bowl with 2-3 tablespoons of clay powder. Next, add 1 tablespoon of compost or potting soil and 1/4 teaspoon of wildflower seeds. Mix the ingredients together until they form a sticky dough.
To ensure uniformity, aim for a consistency similar to playdough. If the mixture is too dry, add a small amount of water. Conversely, if it’s too wet, sprinkle in some more clay powder. Use your hands or a spoon to knead the mixture until it’s well combined.
Now, shape the mixture into balls, about 1 inch in diameter. You can also create smaller seed bombs for easier planting. To maintain quality control, inspect each seed bomb for cracks or imperfections that could affect germination. If necessary, reform the seed bombs and re-inspect them before storing them in an airtight container. Store the seed bombs in a cool, dry place until you’re ready to plant them.
Planting and Caring for Bee Seed Bombs in Your Garden
Now that you have your bee seed bombs, it’s time to get planting! Learn how to create the perfect conditions for these tiny balls of goodness to flourish.
Preparing the Soil for Seed Bomb Planting
Before planting bee seed bombs, it’s essential to prepare the soil properly. This involves considering three crucial factors: drainage, sunlight, and nutrient needs. Start by checking the drainage of your garden bed. Bee-friendly plants prefer well-draining soil that can absorb excess water without becoming waterlogged. If your soil tends to retain too much moisture, mix in some organic matter like compost or well-rotted manure to improve its structure.
Next, assess the sunlight levels in your garden. Most bee-friendly plants require at least 6 hours of direct sunlight per day. Make sure the area receives sufficient light by pruning nearby trees or shrubs if necessary. Additionally, consider the nutrient needs of your soil. Bee seed bombs contain a mix of wildflower seeds that are adapted to poor soil conditions, but they’ll still benefit from a balanced fertilizer application.
For optimal results, test your soil pH and adjust it if necessary. Most bee-friendly plants thrive in slightly acidic to neutral soils (pH 6.0-7.0). By preparing the soil correctly, you’ll create an ideal environment for your bee seed bombs to germinate and grow into healthy, blooming wildflowers that will attract pollinators to your garden.
Tips for Successful Germination and Growth of Seed Bombs
To ensure successful germination and growth of seed bomb-planted flowers, it’s essential to provide them with the right conditions. Start by keeping the area consistently moist during the first few weeks after planting. Water gently but thoroughly, making sure the soil is neither too dry nor waterlogged. You can also use a drip irrigation system or soaker hose to deliver water directly to the roots.
As the seed bombs germinate and grow, prune them regularly to encourage bushy growth and prevent them from becoming leggy. Remove any weak or spindly stems, and trim back overgrown branches by about one-third. This will not only improve the plant’s appearance but also promote healthy growth and increase its chances of blooming.
Keep an eye out for pests like aphids, whiteflies, and slugs, which can quickly spread disease and damage your seed bombs. Use organic pest control methods whenever possible, such as introducing beneficial insects or using neem oil to deter pests. By following these simple tips, you’ll be well on your way to enjoying a vibrant and thriving array of wildflowers in your garden.
Encouraging Pollinators in Your Garden with Bee Seed Bombs
Now that you’ve got your bee seed bombs, let’s talk about how to use them to attract a variety of pollinators to your garden. With these simple steps, you can create a haven for bees and butterflies!
Attracting a Diverse Range of Pollinators with Bee-Friendly Plants
Attracting a diverse range of pollinators to your garden is crucial for its overall health and biodiversity. By incorporating bee seed bombs into your gardening strategy, you can contribute significantly to this goal. While bees are the most obvious beneficiaries, other vital pollinators like butterflies, hummingbirds, and even bats rely on nectar-rich plants to thrive.
To create a welcoming haven for these diverse pollinators, consider planting a mix of flowers that cater to their varying needs. For instance, sunflowers and cosmos attract hummingbirds with their long, tube-shaped flowers, while lavender and coneflowers draw in butterflies with their rich fragrance and nectar-rich blooms. Meanwhile, bees adore flowers with dense clusters of tiny blooms like zinnias, marigolds, and nasturtiums.
When selecting bee seed bombs, choose varieties that are native to your region and suitable for your garden’s climate. This will not only ensure the seeds’ success but also attract local pollinators. To make the most of your bee seed bombs, scatter them throughout your garden, allowing for easy access to a variety of nectar-rich flowers. With a little planning and creativity, you can create a vibrant pollinator haven that attracts a diverse range of visitors.
Strategies for Creating a Bee-Friendly Garden Ecosystem
Creating a bee-friendly garden ecosystem is crucial for attracting and supporting pollinators. To start, focus on planting a diverse range of flowers that cater to different species of bees and other pollinators. This includes incorporating native plants, herbs, and wildflowers into your garden design. A good rule of thumb is to include at least 10-15 different plant species that bloom throughout the growing season.
Consider using a mix of annuals and perennials, as well as plants with varying levels of nectar and pollen production. For example, sunflowers are rich in nectar, while lavender and coneflower are high in pollen. Avoid relying on a single type of plant or flower bed, as this can attract pests and create an unhealthy environment.
When it comes to pest management, reduce your use of pesticides as much as possible. Instead, opt for natural methods such as hand-picking weeds, using physical barriers, or introducing beneficial insects like ladybugs and lacewings. By creating a balanced ecosystem with minimal chemical inputs, you’ll be well on your way to attracting and supporting pollinators in your garden.
Troubleshooting Common Issues with Bee Seed Bombs
If you’re experiencing problems with your bee seed bombs, such as failure to germinate or low pollinator activity, don’t worry – we’ve got some solutions for you! This section tackles common issues and offers practical advice.
Addressing Poor Germination Rates or Seed Bomb Failure
Poor germination rates or seed bomb failure can be frustrating, especially if you’ve put in the effort to create and plant bee-friendly habitats. There are several common reasons why this might happen. For one, the seeds may not have received adequate moisture during the creation process, causing them to dry out before they even get a chance to germinate. Alternatively, the soil mix used for seed bombs might be too dense or lacking in nutrients, hindering seed growth.
Another possible issue is that the seed bomb was planted too deeply, making it difficult for the seeds to access water and light. This can lead to slow or failed germination rates. To improve germination rates and prevent seed bomb failure, make sure to use high-quality seeds that are suitable for your climate and region. Also, ensure that your soil mix is well-balanced and contains essential nutrients like nitrogen, phosphorus, and potassium.
When creating seed bombs, keep an eye on their moisture levels and avoid over-mixing the soil, which can lead to density issues. Plant the seed bombs at a suitable depth, about 1-2 inches below the surface, and provide adequate water after planting. By addressing these common pitfalls, you can increase your chances of successful germination and enjoy the benefits of bee-friendly habitats in your garden.
Managing Pests and Diseases in Your Seed Bomb-Planted Flowers
When it comes to maintaining healthy flowers after planting bee seed bombs, pest and disease management is crucial. As your plants grow, they may attract unwanted visitors like aphids, whiteflies, and spider mites. These pests can spread diseases like powdery mildew and leaf spot, which can weaken the plant’s immune system.
To manage pests naturally, try introducing beneficial insects like ladybugs or lacewings to your garden. These natural predators feed on pests, keeping their populations in check. You can also use neem oil or insecticidal soap as a control method. For example, neem oil can be mixed with water and sprayed on the affected area to repel pests.
In terms of cultural practices, make sure to maintain good garden hygiene by removing weeds, which can harbor pests and diseases. Water your plants at the base instead of getting their leaves wet, which can spread fungal diseases. Regularly inspect your plants for signs of disease or pest infestation and take action promptly. By adopting these natural control methods and cultural practices, you’ll be able to keep your bee seed bomb-planted flowers healthy and thriving.
Frequently Asked Questions
Can I use bee seed bombs in containers or do they require direct soil contact?
You can use bee seed bombs in containers, but make sure the container has good drainage to prevent waterlogged soil. Also, ensure that the seeds receive sufficient light and temperature for germination.
How often should I water my seed bomb-planted flowers, especially during dry spells?
Water your seed bomb-planted flowers when the top 1-2 inches of soil feel dry to the touch. During hot or dry weather, you may need to water more frequently, but avoid overwatering which can lead to poor germination and root rot.
Can I mix different types of seeds in a single seed bomb, or is it best to stick with one type?
While it’s technically possible to mix different types of seeds in a single seed bomb, it’s generally recommended to use a single species per seed bomb. This ensures that the seeds receive optimal growing conditions and reduces competition for resources.
How do I ensure that my bee-friendly plants attract a diverse range of pollinators beyond just bees?
To attract a variety of pollinators, choose plants with different flower shapes, sizes, colors, and scents. Consider adding native plants to your garden, which are more likely to attract local pollinator species.
Can I use bee seed bombs in areas with poor soil quality or heavy shade?
While bee seed bombs can be effective in a variety of conditions, they may not thrive in extremely poor soil or deep shade. In such cases, consider amending the soil or using supplemental lighting to create a more hospitable environment for your seed bombs.