Mulching is one of those gardening secrets that can make all the difference in your vegetable patch. Not only does it retain moisture, reducing the need for frequent watering, but it also suppresses weeds and keeps the soil cool – a must-have for tender veggies like lettuce and spinach. But did you know that not all mulches are created equal? When it comes to choosing between organic and inorganic options, there’s more at play than just aesthetics. In this article, we’ll break down the benefits of each type, provide expert tips on application and maintenance, and share some game-changing techniques for using mulch to enhance vegetable growth. Whether you’re a seasoned gardener or just starting out, these mulching tips will help you grow healthier, more productive veggies with ease.
Choosing the Right Mulch
When it comes to mulching for your vegetables, choosing the right type is crucial – not all mulches are created equal, and some can even harm your plants if used incorrectly. Let’s take a closer look at what works best.
Organic vs. Inorganic Mulches
When it comes to mulching vegetables, one of the most important decisions you’ll make is choosing between organic and inorganic mulches. Organic mulches, such as wood chips, straw, and bark, are derived from natural sources and can provide a range of benefits for your vegetable garden. They help retain moisture, suppress weeds, and regulate soil temperature. However, they also require regular replenishment, which can be time-consuming.
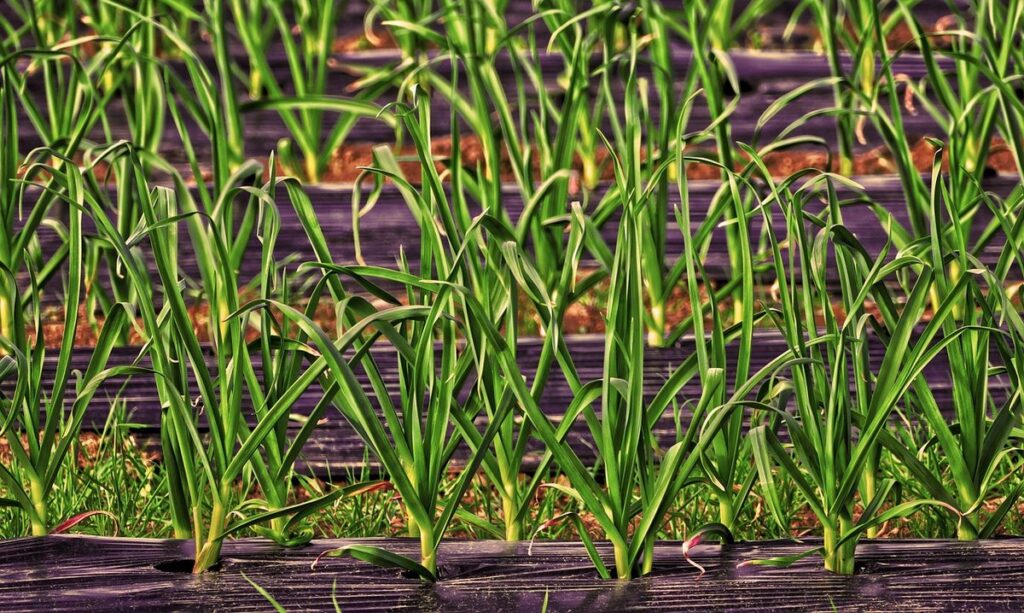
On the other hand, inorganic mulches like plastic sheeting and landscape fabric offer long-lasting results with minimal maintenance. They create an impenetrable barrier that prevents weeds from growing and conserves moisture. But, these materials can retain heat and dry out surrounding soil if not used carefully.
A good rule of thumb is to use organic mulches for plants that prefer cooler temperatures, such as lettuce and spinach, and inorganic mulches for warmer-season crops like tomatoes and peppers. By understanding the pros and cons of each option, you’ll be better equipped to make an informed decision about which type of mulch suits your vegetable garden best.
Mulch Material Options
When it comes to choosing the right mulch material for your vegetable garden, you have several organic options to consider. One popular choice is bark chips or shavings, which are easy to find and can be quite effective at retaining moisture and suppressing weeds. However, they do tend to break down quickly, so you may need to replenish them more frequently.
Leaves, on the other hand, make an excellent free mulch option. Simply collect fallen leaves from your yard or gather some from a nearby park (just be sure to check with local authorities first). They’re rich in nutrients and can help regulate soil temperature. When using leaves as mulch, keep in mind that they may take longer to break down than other materials.
Grass clippings are another great option for vegetable gardens. They add nitrogen to the soil and help retain moisture, but be sure to let them dry out slightly before applying them as mulch. Avoid using fresh grass clippings, as they can lead to an overabundance of nitrogen in the soil, which can cause problems.
Other materials like straw, hay, and pine needles also make great organic mulches for vegetable gardens. Just be aware that some of these options may attract pests or harbor diseases if not used properly. Always choose clean, dry materials free of debris and weeds to ensure your garden stays healthy and thriving.
Preparation is Key: Before Applying Mulch
Before you start applying mulch, it’s essential to prepare your vegetable garden properly. This involves clearing weeds and debris from the area where you’ll be mulching.
Soil Preparation
Before applying mulch to your vegetable garden, it’s essential to prepare the soil. This may seem like an obvious step, but it’s crucial for creating a healthy environment for your plants to thrive.
Testing pH levels is one of the most critical aspects of soil preparation. Vegetables have varying pH requirements, and some may not grow well in acidic or alkaline conditions. For example, tomatoes prefer a slightly acidic to neutral soil pH (around 6.0-7.0), while carrots can tolerate more alkalinity (pH 7.5-8.5). Check your local nursery or extension office for specific guidelines on testing and adjusting the pH levels in your area.
Removing weeds is another vital step in preparing the soil. Weeds compete with vegetables for water, nutrients, and light, which can weaken your plants’ growth. Take the time to manually remove any weeds, roots and all, before applying mulch. This will give your vegetables a head start on healthy growth and development.
Clearing the Garden Bed
Before starting to mulch, it’s essential to clear the garden bed of any debris, tools, and existing mulch. This process may seem tedious, but it sets the stage for a healthy and thriving vegetable garden.
Begin by removing weeds, dead plants, and any other unwanted vegetation from the area. Use a rake or hoe to loosen the soil and make it easier to remove the debris. Be thorough in this step, as leftover weeds can compete with your vegetables for water and nutrients.
Next, take out any tools, such as gardening gloves, trowels, or watering cans, that may be scattered around the bed. This will give you a clean slate to work with and prevent any damage to new mulch or plants.
If there’s existing mulch in the bed, remove it completely before applying new mulch. Old mulch can be reused as compost or added to your garden pathways for decorative purposes. However, if it’s rotten or moldy, discard it immediately to avoid contaminating your garden soil.
Application Techniques for Maximum Effectiveness
Now that you’ve mastered the basics of mulching, let’s dive into the application techniques to ensure you get maximum effectiveness from your efforts. We’ll cover the ideal times and methods for applying mulch around your veggies.
Mulching Depth and Frequency
When it comes to mulching depth and frequency, there are some general guidelines you can follow for optimal results. A good rule of thumb is to maintain a 2-3 inch layer of organic mulch around your vegetable plants. This thickness provides adequate protection against weeds and moisture loss while allowing air to circulate freely.
However, the ideal mulch depth may vary depending on the type of vegetables you’re growing. For example, for seedlings or small herbs, a shallower 1-2 inch layer is often sufficient to prevent overheating without hindering growth.
In terms of application frequency, it’s generally recommended to replenish your mulch layer as needed throughout the growing season. This can be done by adding fresh layers every few weeks, depending on how quickly weeds grow in your garden and how much water your plants require.
Some experts suggest applying a new 1-2 inch layer after every rain event or when your soil feels dry to the touch, helping retain moisture and suppress weed growth.
Mulching Around Plants vs. Underneath
When it comes to mulching around plants versus underneath them, there are several factors to consider. Mulching around plants can help retain moisture and suppress weeds, but it’s essential to leave some space between the mulch and the plant stems to prevent rot and fungal diseases.
Mulching underneath plants is a different story altogether. By covering the soil with a layer of organic matter like wood chips or straw, you’re creating an environment that promotes healthy root growth. This type of mulching helps regulate soil temperature, reduces water evaporation, and prevents weeds from germinating.
The key to effective mulching underneath plants lies in the depth of application. A general rule of thumb is to keep the mulch layer about 2-3 inches thick. Any deeper than that can cause roots to suffocate or become trapped.
Consider this: if you’re growing vegetables like carrots or beets, which have taproots that grow deep into the soil, it’s crucial to mulch underneath them to prevent root damage and promote healthy growth. On the other hand, plants with shallow roots like lettuce or herbs can benefit from mulching around them to conserve moisture and suppress weeds.
By choosing the right mulching technique for your specific vegetables, you’ll be creating an optimal environment that fosters healthy growth and maximum yields.
Managing Moisture with Mulch
Mulching can be a game-changer for vegetable gardens, but it’s not just about adding a layer of protection – managing moisture is also crucial to prevent root rot and overwatering. Let’s explore how mulch can help regulate soil moisture.
Water Retention and Reduction
When you use mulch around your vegetable plants, it not only helps retain soil moisture but also reduces evaporation and runoff. Mulch acts as a protective barrier that prevents the top layer of soil from drying out quickly, keeping the roots hydrated for longer periods.
This is especially beneficial in areas with low rainfall or high temperatures. By reducing water loss through evaporation, mulch minimizes the need for frequent watering. As a result, you’ll save time and energy on maintaining your vegetable garden.
Mulch also prevents soil erosion caused by runoff. When it rains, excess water can wash away topsoil, leading to nutrient depletion and decreased crop yields. Mulch holds the soil in place, ensuring that water is absorbed slowly, reducing the risk of erosion.
To make the most of mulching for moisture retention, apply a 2-3 inch layer of organic mulch around your plants. Keep it at least an inch away from the stems to prevent rot and promote healthy growth. Regularly replenish the mulch as needed to maintain its effectiveness in retaining soil moisture.
Preventing Overwatering
When using mulch to retain moisture and suppress weeds, it’s easy to overwater your vegetables. This can lead to a range of problems, from root rot to nutrient deficiencies. To prevent overwatering when mulching, it’s essential to monitor soil moisture levels regularly.
Start by inserting a finger into the soil up to the first knuckle, or use a moisture meter for more accurate readings. Check the soil daily during hot weather and every other day in cooler conditions. If the top inch of soil feels dry, it’s time to water your vegetables. Conversely, if the soil is consistently wet, consider adjusting your irrigation schedule.
Some signs that you’re overwatering include yellowing leaves, droopy stems, and a soft or squishy texture to the soil. To prevent these issues, avoid watering in the middle of the day when the sun can cause water to evaporate quickly from the surface. Instead, water early morning or evening for more efficient absorption.
Mulch also plays a role in moisture retention; it helps retain water and reduce evaporation. However, keep in mind that mulch doesn’t store water – it only slows down its loss. Check your mulch depth regularly to ensure it’s not accumulating too much moisture.
Maintaining a Healthy Garden with Mulch
Mulching is not just about aesthetics, but it also plays a crucial role in maintaining a healthy garden by retaining moisture and suppressing weeds. In this section, we’ll dive into its benefits for your vegetable garden.
Weeding and Pest Control
When it comes to maintaining a healthy vegetable garden, controlling weeds and pests is an essential aspect. Mulch plays a significant role in this process by suppressing weed growth and preventing pest infestations.
Mulch acts as a physical barrier that prevents weed seeds from germinating, reducing the need for frequent weeding. It also helps retain soil moisture, reducing the stress on plants and making them less susceptible to pests. For example, using a 2-inch layer of organic mulch such as straw or bark chips around your vegetables can suppress weeds by up to 90%.
To further enhance weed suppression and pest control, you can use additional methods. For instance, you can mix a small amount of compost into the top 6-8 inches of soil before adding mulch. This will improve soil fertility and structure, making it less conducive to weed growth.
Some popular mulching materials for vegetable gardens include wood chips, straw, and leaves. When choosing a mulch, consider its durability, availability, and carbon-to-nitrogen ratio. A good mulch should be able to suppress weeds for at least six months without breaking down too quickly or becoming a food source for pests.
Mulch Renewal and Replacement
When it comes to maintaining a healthy garden with mulch, one of the most important tasks is renewing and replacing the mulch as needed. Mulch can lose its effectiveness over time due to decomposition and weather conditions, which can lead to weed growth and moisture loss.
A general rule of thumb is to replace or renew mulch every 2-3 years, depending on the type of mulch used and the climate in your area. For example, if you live in a dry climate, you may need to replenish mulch more frequently to retain moisture. On the other hand, if you live in an area with high rainfall, you may be able to go longer between renewals.
Signs that it’s time to replace or renew mulch include a significant increase in weed growth, a decrease in soil temperature, and a noticeable loss of moisture retention. To check on the condition of your mulch, simply dig into the top layer with your finger. If it feels dry and crumbly, it’s likely time for a refresh.
In general, it’s best to apply 2-3 inches of new mulch to maintain its effectiveness in controlling weeds and retaining moisture.
Troubleshooting Common Mulching Issues
We all experience mulching mishaps from time to time, so let’s tackle common issues together and get your garden back on track. Whether it’s poor weed suppression or uneven moisture distribution, we’ve got you covered.
Mulch Burning and Other Problems
Mulch burning and other problems can arise when mulching vegetables, which is why it’s essential to be aware of these potential issues. Mulch burning occurs when the mulch gets too hot due to direct sunlight, drying winds, or temperature fluctuations. This can cause damage to the plants beneath the mulch.
Fungal growth can also be a concern, particularly in humid environments where moisture accumulates under the mulch. Regularly inspect your mulched beds for signs of fungal diseases like powdery mildew or leaf spot. To prevent fungal growth, ensure good air circulation and maintain a moderate level of moisture.
Pest infestations can also occur when using organic mulches, as they may attract pests that are attracted to the mulch’s nutrients. Keep an eye out for slugs, snails, and rodents, which can be drawn to decaying plant matter. Regularly inspect your plants and remove any debris or weeds that might harbor pests.
To mitigate these issues, choose a breathable mulch like straw or bark chips instead of heavier options like wood shavings. Also, maintain a moderate thickness (about 2-3 inches) to allow for air circulation under the mulch.
Identifying Causes and Solutions
When encountering common mulching issues, it’s essential to first identify the root cause of the problem. Is your mulch drying out due to inadequate moisture retention? Or perhaps it’s being washed away by heavy rainfall? Take a closer look at your garden conditions and ask yourself these questions:
* Are you using the right type of mulch for your specific climate and soil type?
* Is the mulch layer too thick or too thin, affecting its effectiveness?
* Have you taken into account the optimal mulching depth for your particular plants?
Once you’ve pinpointed the cause, it’s time to implement a solution. If you’re struggling with moisture retention, consider adding organic matter like compost or manure to improve soil structure and water-holding capacity. For areas prone to heavy rainfall, try using a more stable and durable mulch material, such as coconut coir or polypropylene fabric.
Remember, addressing the root cause is crucial in resolving common mulching issues. By making adjustments to your mulching strategy and incorporating practical solutions, you can maintain a healthy and thriving vegetable garden despite these challenges.
Frequently Asked Questions
What are some signs that my mulch is not retaining moisture effectively?
Yes, if you notice water evaporating quickly after application or plants drying out despite regular watering, it may be a sign of inadequate mulch material or improper application techniques. Check the thickness and type of mulch you’re using, and consider adjusting your watering schedule to ensure optimal moisture retention.
Can I mix different types of mulches together for my vegetable garden?
While it’s technically possible to combine organic mulches like wood chips and straw, it can lead to uneven effects on soil temperature and weed suppression. For best results, stick with a single type of mulch or use multiple layers of the same material to achieve consistent benefits.
How often should I replenish my mulch in areas with high foot traffic?
Mulch renewal is essential in high-traffic zones where it can break down quickly due to compaction and erosion. Replenish your mulch every 2-3 weeks or as needed, taking care to spread a uniform layer of fresh material over the existing mulch.
What are some organic alternatives to bark chips for mulching?
If you’re concerned about the potential toxicity of bark chips or prefer an eco-friendly option, consider using coconut coir, leaves, or grass clippings as natural mulches. These materials can provide similar benefits to bark chips while minimizing environmental impact.
Can I use mulch in areas with poor drainage, such as near slopes or waterways?
While mulch can help regulate soil moisture and temperature, it’s not ideal for areas with poor drainage. In these cases, consider using alternative methods like raised beds or terracing to improve soil structure and reduce erosion risks.