Red spider mites are one of the most common and destructive pests that can wreak havoc on your garden or agricultural operation. These tiny, almost invisible creatures can cause significant damage to plants, reducing their yields and even leading to their demise. As a gardener or farmer, it’s essential to be aware of these pesky mites and take necessary steps to manage them effectively.
In this article, we’ll delve into the world of red spider mites, covering everything from identification and life cycle to the damage they cause and effective management strategies. We’ll explore the characteristics that make them so destructive, how to recognize infestations, and most importantly, provide you with practical tips on how to keep your garden or farm pest-free. Whether you’re a seasoned pro or just starting out, this guide will equip you with the knowledge needed to tackle these tiny terrors and protect your crops.
What are Red Spider Mites?
Red spider mite is one of the most common and destructive pests affecting gardens and plants worldwide, so let’s dive into what makes them so problematic.
Introduction to Red Spider Mites
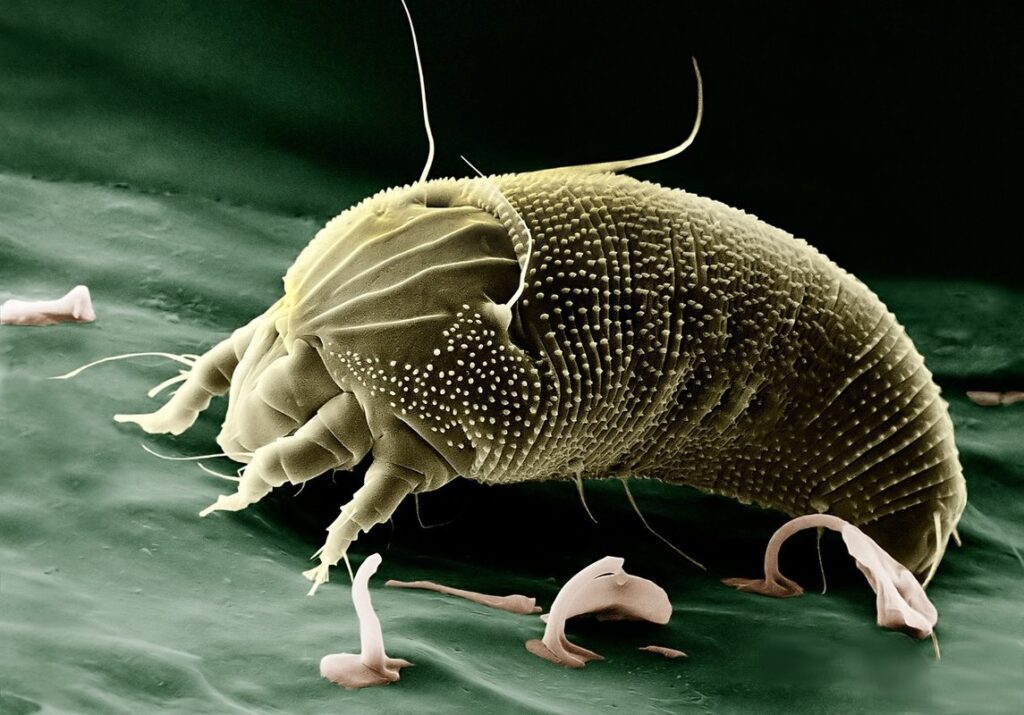
The red spider mite is one of the most common and destructive pests affecting plants worldwide. To understand this tiny creature better, let’s start with its scientific classification. The red spider mite belongs to the genus Tetranychus, specifically identified as Tetranychus urticae. This species falls under the broader category of arachnids, a group that also includes spiders and ticks.
As an arachnid, the red spider mite has eight legs, which it uses for crawling, walking, and even climbing up plant stems in search of food or shelter. These tiny creatures are incredibly small, with adult females typically measuring about 0.5 millimeters in length. Despite their minuscule size, they can cause significant damage to plants, especially when infestations occur.
The classification of red spider mites is crucial for understanding their behavior and how to manage them effectively. By knowing their scientific name and category, gardeners, farmers, and pest control professionals can develop targeted strategies to prevent and control these pests.
Identifying Red Spider Mite Infestations
Identifying red spider mite infestations can be a challenge, but there are some telltale signs that will help you catch the problem early on. One of the most common indicators is the presence of fine webbing on the underside of leaves or stems. This silk thread-like material is spun by the female mites as they lay eggs and protect their young.
Another symptom to look out for is yellowing leaves, which can be a sign that the mites are sucking sap from the plant’s veins. Leaves may also become distorted, curled, or develop pale patches. In severe cases, entire branches can turn yellow and die back.
To confirm an infestation, inspect your plants carefully, especially on the underside of leaves and stems where mites tend to hide. Look for small, moving dots – this is usually a sign that the mites are present. Be sure to examine multiple areas of the plant as mites can be dispersed throughout the foliage.
Don’t wait until it’s too late; early detection is key to preventing further damage and treating your plants effectively.
Life Cycle and Reproduction
Let’s take a closer look at how red spider mites thrive, including their remarkable life cycle and unique reproduction habits that have made them such successful pests.
The Four Stages of Development
The red spider mite’s development process is divided into four distinct stages: egg, larva, protonymph, and adult. Each stage plays a crucial role in the mite’s life cycle.
Egg stage begins when an adult female mite lays her eggs on the underside of leaves or other plant parts. These tiny oval-shaped eggs are usually laid in clusters and can hatch within 3-5 days, depending on temperature and humidity levels. The newly hatched larvae emerge and start feeding on the surrounding plant sap.
As they grow, the larvae molt into protonymphs, which have a more distinctive appearance than their larval counterparts. Protonymphs continue to feed and grow before molting again into adult mites. Adult red spider mite females can lay up to 20 eggs at a time, perpetuating the cycle of infestation.
Understanding these stages is crucial for effective management strategies. Recognizing the signs of each stage can help you target the right approach for control and prevention.
Factors Influencing Red Spider Mite Reproduction
The red spider mite’s reproductive rate is heavily influenced by its environment. Temperature plays a significant role, with optimal reproduction occurring between 25°C to 30°C (77°F to 86°F). Temperatures above 35°C (95°F) can be detrimental, reducing egg-laying capacity and potentially killing the mites.
Humidity also affects red spider mite reproduction. High humidity levels, typically above 60%, promote optimal development, while dry conditions can impede it. This is why infestations often thrive in environments with high relative humidity, such as greenhouses or humid climates.
Host plant quality significantly impacts reproductive success. Red spider mites prefer tender shoots and young leaves, which provide ample nutrients for growth and reproduction. High-quality host plants support rapid population growth, while stressed or poor-quality plants can slow it down.
When managing red spider mite infestations, it’s essential to consider these environmental factors. By controlling temperature and humidity levels, maintaining optimal host plant quality, and promoting a balanced ecosystem, you can reduce the likelihood of infestation and limit population growth.
Damage Caused by Red Spider Mites
When it comes to infesting your plants, red spider mites can cause a significant amount of damage that affects their overall health and appearance. We’ll explore these effects in more detail.
Economic Impact on Agriculture
The economic impact of red spider mite infestations is a significant concern for farmers and agricultural industries worldwide. In citrus fruits, for instance, studies have shown that a severe red spider mite infestation can lead to yield losses of up to 30%. This translates to substantial financial losses, especially considering the high demand for fresh citrus fruits.
In vegetables, such as tomatoes and cucumbers, red spider mites can cause significant damage to leaves and stems, resulting in reduced fruit production. According to a study published in the Journal of Economic Entomology, the average loss per hectare of tomato crop due to red spider mite infestation is estimated at $1,200.
Ornamental plants are also affected by red spider mites, leading to aesthetic losses and decreased plant value. In some cases, severe infestations can even render plants unsalable, resulting in total economic loss. To mitigate these losses, farmers should adopt integrated pest management strategies that include monitoring for early signs of infestation, using resistant varieties, and applying targeted control measures when necessary.
How Red Spider Mites Affect Plant Health
When red spider mites feed on plant sap, they drain the nutrients from the leaves, causing a range of problems that can have serious consequences for plant health. One of the primary effects is nutrient deficiency, particularly a lack of nitrogen, iron, and magnesium. As these essential micronutrients are depleted, plants may exhibit symptoms such as yellowing leaves, stunted growth, and reduced fruit production.
In severe cases, red spider mite infestations can lead to reduced yields, with some studies showing that infested crops can suffer up to 50% yield loss compared to uninfested controls. Furthermore, weakened plants are more susceptible to disease, creating a perfect storm for the spread of fungal and bacterial pathogens.
To mitigate these effects, it’s essential to monitor your plants regularly for signs of red spider mite infestation and take prompt action if you spot any eggs or adults on your leaves. Regularly inspecting your plants under a magnifying glass can help catch infestations early, allowing you to prevent the damage before it becomes severe.
Identification and Monitoring Methods
To effectively manage red spider mite infestations, it’s crucial you know how to identify these tiny pests and monitor their presence on your plants. Let’s dive into the key identification and monitoring methods.
Visual Inspection Techniques
When conducting a visual inspection for signs of red spider mite infestations, it’s essential to know what to look for and where. Start by examining the undersides of leaves, stems, and branches, as these areas are often preferred habitats for the mites. Use a hand lens or microscope to get up close and personal – you’ll be looking for tiny, moving dots that are usually about 1/5 inch long.
Some key signs of infestation include yellowing or bronzing of leaves, distorted growth patterns, and sticky substance on the leaves (this is actually honeydew produced by the mites). Check for eggs, which are typically spherical and white, often attached to the underside of leaves. Also, keep an eye out for webs – while not always present, red spider mite can create a silky webbing that’s easy to spot.
When inspecting plants under magnification, move slowly and deliberately, observing the undersides of leaves and stems carefully. A good way to detect mites is to gently tap a leaf over a white sheet of paper – if you see tiny dots moving across the surface, it could be a sign of infestation.
Sampling Protocols and Tools
When it comes to monitoring and detecting red spider mites, having the right tools and sampling protocols is crucial for effective management. To start, you’ll need a hand lens or magnifying glass to visually inspect plants for signs of infestation. For larger areas, a stereo microscope can be useful in identifying mite eggs, nymphs, and adults on leaves, stems, and soil.
Regular monitoring involves collecting plant samples from different locations within the greenhouse or field. This can be done using a sterile brush to gently sweep away debris and collect mites for examination under a microscope. For larger areas, use a vacuum sampler to collect mite-infested plants or debris without spreading the pest further.
It’s essential to follow proper sampling protocols to ensure accurate results. Collect multiple samples from different parts of the area, and take note of any variations in infestation levels. This information can help you identify hotspots and develop targeted management strategies.
Management Strategies
Now that you know how to identify and prevent red spider mite infestations, let’s explore effective management strategies for tackling these pesky pests.
Integrated Pest Management (IPM) Approaches
When it comes to managing red spider mites effectively, Integrated Pest Management (IPM) approaches are crucial for a holistic and sustainable solution. IPM is not just about using chemicals; rather, it’s an approach that incorporates physical barriers, biological controls, and chemical treatments to minimize harm to the environment and human health.
To implement an effective IPM strategy against red spider mites, start by removing weeds and debris around plants, which provide shelter for these pests. Next, use physical barriers like fine mesh or row covers to prevent them from reaching your plants in the first place. Introduce biological controls such as ladybugs, lacewings, or predatory mites that feed on red spider mite eggs and young ones.
Chemical treatments should be used sparingly and only when necessary. Always follow label instructions and take necessary precautions to avoid harming beneficial insects. For example, neem oil can be used to control red spider mite populations by suffocating them. However, ensure you mix it with water according to the recommended ratio and spray it on both sides of leaves to minimize drift.
By combining these approaches, you’ll not only manage red spider mites effectively but also promote a balanced ecosystem in your garden or indoor space.
Cultural Controls and Prevention Methods
Crop rotation and soil amendments are two crucial cultural controls that can help prevent red spider mite infestations. By rotating crops, you can break the life cycle of these pests and reduce their population over time. For example, if you’re growing roses that are susceptible to red spider mite, consider planting a non-host crop like marigolds or nasturtiums in between rose rotations. These flowers repel nematodes, which in turn helps keep red spider mites at bay.
Soil amendments can also play a significant role in preventing infestations. Adding organic matter like compost or manure to your soil can improve its structure and fertility, making it less conducive for red spider mite populations to thrive. Moreover, certain nutrients such as sulfur can help reduce the alkalinity of your soil, which is often associated with an increase in red spider mites.
When choosing resistant plant varieties, look for those that have built-in resistance or tolerance to red spider mite infestations. Some examples include varieties of roses, geraniums, and succulents. By planting these varieties, you can significantly reduce the risk of infestation.
Conclusion and Future Research Directions
As we conclude our exploration of the red spider mite, it’s essential to acknowledge that there is still much to be learned about this tiny but formidable pest. While we’ve covered its life cycle, symptoms, and control methods, further research can help us develop more targeted and effective strategies for managing infestations. To address this need, scientists may investigate new chemicals or biological agents that specifically target the red spider mite’s unique vulnerabilities. For example, researchers might explore the potential of using natural predators or parasites to regulate mite populations, reducing our reliance on chemical pesticides.
In your own garden or greenhouse, consider incorporating integrated pest management (IPM) techniques to minimize damage from these pesky invaders. By combining physical barriers, cultural controls, and targeted treatments, you can create a holistic defense system against the red spider mite. Don’t wait until it’s too late – stay vigilant and take proactive steps to protect your plants from this insidious pest.
Frequently Asked Questions
How Can I Tell If Red Spider Mites Are Actually Present on My Plants?
After identifying the symptoms of red spider mite infestation, it’s essential to confirm their presence through a reliable method. To do this, you can use a hand lens or a magnifying glass to inspect individual plants more closely. Alternatively, take a leaf sample and examine it under a microscope for evidence of eggs, egg sacs, or actual mites.
Can Red Spider Mites Damage Plants That Are Already Stressed?
Red spider mites are opportunistic feeders and can thrive on stressed plants. However, their damage is most severe when they infest healthy, vigorous plants. If your plant is already under stress due to disease, nutrient deficiencies, or pests, it’s crucial to address these underlying issues first before attempting to manage the red spider mite population.
What Are Some Common Mistakes People Make When Trying to Get Rid of Red Spider Mites?
One common mistake is using broad-spectrum pesticides that can harm beneficial insects and even contribute to pesticide resistance. Another error is failing to maintain good hygiene practices, such as regularly cleaning equipment and disinfecting surfaces, which can inadvertently spread the mite infestation.
How Can I Prevent Red Spider Mites from Returning to My Garden?
To prevent re-infestation, it’s crucial to adopt a long-term approach that combines physical controls with cultural and biological methods. This includes monitoring your plants regularly, maintaining good garden hygiene, introducing beneficial insects like lady beetles or lacewings, and practicing crop rotation.
Can I Use Neem Oil to Manage Red Spider Mites Effectively?
Neem oil is a popular natural insecticide that can be used to manage red spider mite populations. However, it’s essential to use neem oil judiciously and in combination with other management strategies, as excessive use can lead to resistance development. Always follow the product label instructions and start with lower concentrations to avoid harming your plants.