Growing your own bean sprouts indoors is not only a fun and rewarding experience, but it’s also incredibly easy. By doing so, you’ll have access to a constant supply of fresh, nutritious greens all year round, without having to worry about seasonal availability or transportation hassles. Plus, growing indoor bean sprouts allows you to control the entire process from start to finish, ensuring that your produce is free of pesticides and other unwanted chemicals. In this article, we’ll walk you through the basics of selecting the right variety, preparing a suitable growing space, and providing optimal care for your indoor bean sprout garden. With our comprehensive guide, you’ll be well on your way to enjoying delicious and healthy homemade bean sprouts in no time!
Choosing the Right Variety
When growing bean sprouts indoors, selecting the right variety is crucial for optimal flavor and growth. We’ll walk you through the key characteristics to look for in a suitable bean sprout variety.
Understanding Mung Bean vs Adzuki Bean
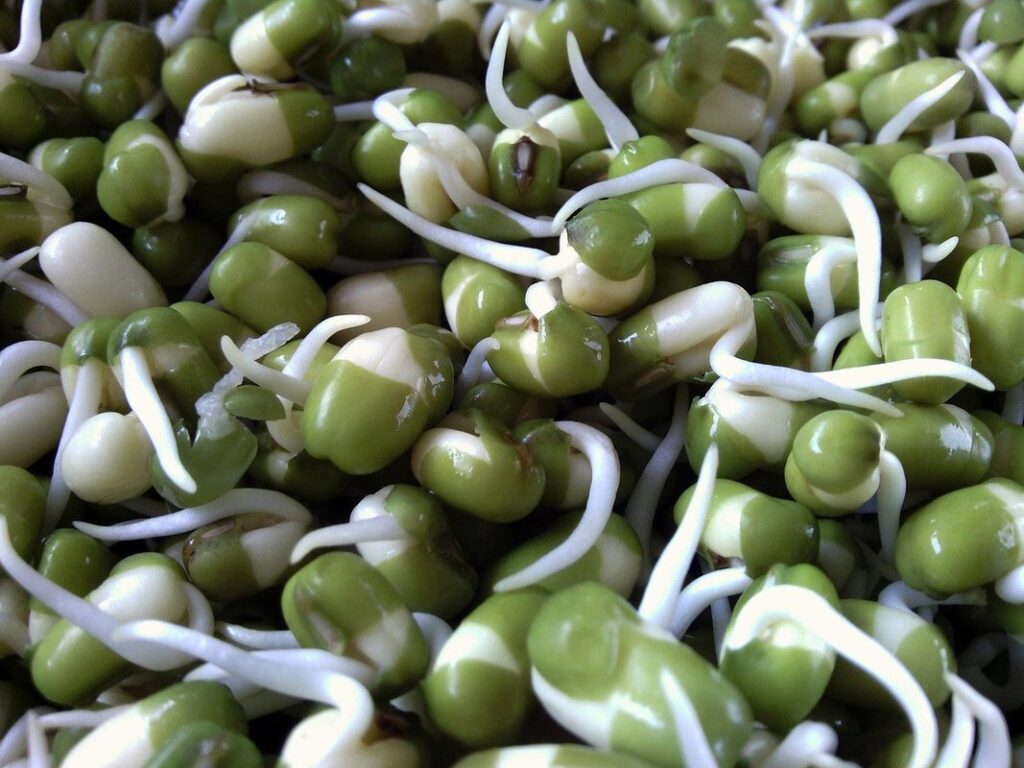
When it comes to growing bean sprouts indoors, you’ll often come across two popular varieties: mung beans and adzuki beans. While they share some similarities, they also have distinct differences that can impact the taste, texture, and overall quality of your sprouts.
Mung bean sprouts are generally considered to be sweeter and more delicate in flavor compared to their adzuki counterparts. They’re also shorter in height, typically reaching around 2-3 inches after 7-10 days of growth. Mung beans prefer cooler temperatures between 60°F to 70°F (15°C to 21°C) for optimal sprouting.
Adzuki bean sprouts, on the other hand, are often described as nuttier and slightly sweet. They tend to be longer in height, reaching up to 4-5 inches after a similar growth period of 7-10 days. Adzuki beans prefer warmer temperatures between 70°F to 80°F (21°C to 27°C) for successful sprouting.
If you’re new to growing bean sprouts indoors, starting with mung beans is often recommended due to their ease of cultivation and rapid germination rate. However, both varieties can thrive in indoor environments as long as they receive proper care, including adequate water supply, humidity control, and filtered light.
Selecting High-Quality Beans
When selecting beans for indoor sprouting, it’s essential to choose high-quality ones that will yield optimal results. Freshness is key, so look for beans with a vibrant color and minimal signs of aging. You can often find these qualities in specialty stores or online retailers that sell organic and heirloom varieties.
Avoid using old or stale beans as they may contain low viability rates, which can hinder the sprouting process. Check the packaging for any visible damage or moisture absorption, as this can lead to mold growth during sprouting. Opt for dry beans with a rich aroma, as they will be more likely to germinate successfully.
It’s also worth noting that some bean varieties are better suited for indoor sprouting than others. Look for compact, bush-type beans like mung beans or adzuki beans, which have been bred specifically for ease of cultivation indoors. These varieties tend to produce fewer pods and require less space, making them ideal for indoor growing conditions.
Preparing Your Growing Space
Before you start growing bean sprouts, it’s essential to prepare your indoor space properly. This includes selecting a suitable location and making sure you have all the necessary equipment ready to go.
Setting Up a Sprouting Station
Setting up a dedicated area for growing bean sprouts indoors is crucial for their healthy development. This station will be exposed to specific lighting and temperature requirements that support the growth of these tiny greens.
Start by selecting an area with sufficient natural light, ideally south-facing or near an east-west oriented window. If direct sunlight is not possible, consider investing in a grow light specifically designed for seedlings and microgreens. Aim for 12-14 hours of continuous light per day to promote optimal growth.
Next, ensure the temperature remains between 60°F to 75°F (15°C to 24°C). Avoid placing your sprouting station near heating vents, radiators, or drafty windows that could compromise this delicate temperature range.
Keep in mind, bean sprouts don’t require extensive space; a small shelf or countertop will suffice. Arrange the growing containers and any necessary equipment within easy reach, making it simple to tend to your plants daily. By dedicating a specific area for growth, you’ll be better equipped to monitor and maintain the perfect conditions for thriving bean sprouts.
Essential Equipment for Indoor Sprouting
To grow bean sprouts indoors successfully, you’ll need some essential equipment. This includes jars or containers, trays, and lids that provide the perfect environment for your sprouts to thrive.
For jar-based sprouting, look for wide-mouthed glass jars with a capacity of at least 1 quart (liter). These allow for easy rinsing and handling of the sprouts. A good option is a Mason jar with a wire mesh lid or a similar type of container with multiple drainage holes.
If you prefer to use trays, opt for shallow plastic or stainless steel containers that hold about 2-4 inches (5-10 cm) of water. This will be your watering tray. Choose a tray that’s at least 6-8 inches (15-20 cm) deep and has a built-in drainage system to prevent waterlogged conditions.
In addition to these, you’ll need some sort of lid or cover to maintain humidity and keep pests out. A wire mesh lid or a breathable cloth can work well. Make sure the lid allows for adequate airflow to prevent fungal growth.
When selecting equipment, consider the space available in your growing area and how easy it will be to clean and maintain the setup.
Soaking and Germinating Your Beans
Now that you’ve got your beans, let’s get them started on their journey to sprouting. This next step is crucial: soaking and germinating your beans correctly ensures optimal growth.
The Importance of Proper Soaking
Proper soaking is often overlooked but it’s a crucial step in growing healthy and nutritious bean sprouts indoors. Without adequate soaking, beans may not absorb enough water to initiate germination, leading to weak and leggy sprouts.
When you soak beans correctly, you allow the water to penetrate the seed coat, kickstarting the germination process. This is especially important for hard seeds like kidney beans or black beans that can be resistant to moisture absorption. To soak your beans properly, submerge them in a bowl of lukewarm water (around 80°F to 90°F) and let it sit for 8-12 hours. Change the water at least once during this period to prevent bacterial growth.
Some gardeners make the mistake of soaking their beans too long or using hot water, which can damage the seed embryo and delay germination. Others don’t soak them enough, resulting in slow or incomplete sprouting. By following the right soaking technique, you’ll be off to a great start with your bean sprout growth indoors.
Keep in mind that soaking time may vary depending on the type of beans and desired level of sprout development. Harder seeds like lentils might require longer soaking periods while softer seeds like mung beans can get away with shorter soaking times. Experiment with different soaking techniques to find what works best for your specific bean variety.
Creating an Ideal Germination Environment
To create an ideal germination environment for your bean sprouts, you’ll want to pay attention to three crucial factors: temperature, humidity, and light. Temperature plays a significant role in seed germination, with optimal ranges varying between 65°F (18°C) to 75°F (24°C), depending on the type of beans you’re growing.
Maintaining high humidity is also essential during this period as it prevents seeds from drying out. You can cover your sprouting container or place a damp towel over it to maintain an environment with 70-80% relative humidity. Avoid direct sunlight, which can cause overheating and drying out of the seeds, instead opt for indirect light.
In ideal conditions, you should ensure that your germination area is consistently warm but not hot to the touch. Keep in mind that some bean varieties require a short period of cold stratification before they will germinate. Research specific requirements for the type of beans you’re growing to achieve optimal results.
Caring for Your Sprouts
Now that your sprouts are growing, it’s time to focus on providing them with the right care and attention to ensure they reach their full potential. Proper care will help prevent common issues like mold, pests, and nutrient deficiencies.
Monitoring Temperature and Humidity
Maintaining optimal temperatures and humidity levels is crucial for healthy sprout growth. Bean sprouts prefer a consistent temperature between 65°F to 75°F (18°C to 24°C), with an ideal range of 70°F to 72°F (21°C to 22°C). Avoid placing your sprouting container near direct sunlight, radiators, or air conditioning vents, as these can cause extreme fluctuations in temperature.
To monitor the temperature and humidity levels, you can invest in a thermometer and hygrometer. These devices will allow you to track the environment’s conditions and make adjustments as needed. You should aim for a relative humidity level of 50-70%. If the air is too dry, use a humidifier to maintain an optimal level.
It’s also essential to note that bean sprouts thrive in a slightly humid environment, which can be achieved by placing the container on top of a damp towel or a tray filled with water. Keep an eye on your sprouts’ growth and adjust the humidity levels accordingly to ensure they receive the perfect conditions for healthy development.
Providing Adequate Light and Watering
Providing adequate light and water is crucial for healthy bean sprout growth. Direct sunlight can be too intense for sprouts, so it’s best to provide them with indirect light. A south-facing window or a grow light specifically designed for indoor plants is ideal. Aim for 12-14 hours of light per day to promote healthy growth.
Watering schedules are also vital. Check the soil daily by inserting your finger into the top inch of the growing medium. If it feels dry, it’s time to water. Water gently but thoroughly until water drains from the bottom of the pot. Avoid overwatering, which can lead to root rot and other problems. Aim for a consistent moisture level, keeping the soil slightly damp.
Some general guidelines are: 1-2 inches of water per week during cooler months (60-70°F) and 2-3 inches during warmer months (70-80°F). Monitor your sprouts’ response to the watering schedule and adjust as needed. Keep in mind that bean sprouts require more moisture than some other plants, so be mindful of their needs. By following a proper lighting and watering plan, you’ll be well on your way to growing healthy and delicious indoor bean sprouts.
Common Challenges and Solutions
Growing bean sprouts indoors can be a breeze, but you might encounter some obstacles along the way. In this section, we’ll tackle common challenges and provide practical solutions to help you succeed.
Dealing with Mold and Fungal Growth
Mold and fungal growth can be a major concern when growing bean sprouts indoors. These microorganisms thrive in humid environments, which is exactly what you’re creating when cultivating bean sprouts. To prevent mold from taking over your sprouting jar, ensure that it’s clean and sanitized before use. A solution of 1 part white vinegar to 9 parts water can be an effective disinfectant.
If you do notice mold starting to grow, don’t panic! Remove the affected bean sprouts immediately and discard them. Thoroughly rinse the jar with fresh water, then refill it with clean water and add new seeds. Keep a close eye on your sprouting setup, making sure the water level stays below the recommended maximum. Overwatering is one of the main causes of mold growth.
Regular monitoring can help you catch any issues early on. Check your bean sprouts daily for signs of mold or fungal growth. If you notice any discoloration or slimy texture, take action promptly to prevent the problem from spreading. By being proactive and taking preventive measures, you can enjoy a healthy batch of indoor-grown bean sprouts with minimal risk of contamination.
Troubleshooting Poor Germination Rates
Poor germination rates can be frustrating for even the most seasoned sprouting enthusiasts. To identify and address the issue, start by examining the conditions under which you’re growing your bean sprouts. Check that the seeds are at an optimal temperature of around 75°F to 85°F (24°C to 30°C). If the environment is too cold or too hot, it can impede germination.
Next, ensure that the seeds have adequate moisture and oxygen. Overwatering can be detrimental, causing the seeds to rot rather than sprout. On the other hand, underwatering can lead to poor hydration. Make sure to maintain a consistent moisture level, aiming for a slightly damp environment.
Another potential cause of low germination rates is the quality of your seeds. Old or low-quality seeds may not have the viability to sprout properly. Consider sourcing fresh seeds from reputable suppliers. By addressing these common issues, you should be able to troubleshoot poor germination rates and get your bean sprouts growing in no time.
Harvesting and Storage
Now that you’ve coaxed those delicate sprouts into growth, it’s time to learn how to harvest and store them to keep your bean sprout crop fresh for as long as possible.
Timing Your Harvest
Timing is everything when it comes to harvesting your bean sprouts. While it may be tempting to leave them on the counter for a few extra days, waiting too long can lead to over-maturity and a decrease in quality.
The optimal time to harvest your bean sprouts depends on their size and color. For most varieties, they’re ready to eat when the leaves are around 2-3 inches tall. At this stage, the sprouts should be a vibrant green color with a slight yellow tint. If you notice any signs of wilting or yellowing, it’s likely time to harvest.
To check for readiness, gently pull on one of the larger leaves. If it comes off easily, your sprouts are ready. If not, give them another day or two and try again. Harvesting too early can result in weak and underdeveloped roots, while waiting too long can cause over-maturity and spoilage.
Typically, bean sprouts take between 5-7 days to reach harvestable size after soaking the beans. Keep an eye on their progress and plan accordingly. With a little practice, you’ll get a feel for when your sprouts are at their peak flavor and texture.
Storing Your Fresh Sprouts
Proper storage of harvested sprouts is crucial to maintain their freshness and prevent spoilage. After harvesting, transfer the bean sprouts to a clean container with adequate ventilation. This can be a plastic bag, paper bag, or even a breathable mesh bag.
To keep them fresh for an extended period, store them in the refrigerator at a consistent temperature of around 40°F (4°C). You can also use a salad keeper or a specialized sprout storage container to maintain humidity and prevent moisture buildup. Avoid washing the sprouts before storing them, as excess water can lead to mold growth.
For long-term storage, consider freezing your harvested sprouts. Rinse them in cold water, then dry them thoroughly with paper towels. Place the dried sprouts in an airtight container or freezer bag, making sure to remove any air pockets before sealing. Frozen sprouts can be stored for up to 3 months and are perfect for adding to soups, salads, or stir-fries.
Keep in mind that even when properly stored, bean sprouts have a relatively short shelf life of about 5-7 days. It’s essential to inspect them daily for signs of spoilage and use them before they go bad.
Frequently Asked Questions
Can I grow bean sprouts indoors with minimal lighting?
Yes, you can still grow healthy bean sprouts indoors even with limited natural light. To do so, consider using LED grow lights specifically designed for indoor growing. These will provide the necessary spectrum and intensity to promote healthy growth and development.
How often should I water my bean sprouts during germination?
Keep in mind that overwatering is a common mistake when growing bean sprouts indoors. Water your beans 2-3 times a day, but make sure the growing medium remains consistently moist but not waterlogged. Check for moisture by gently pressing on the soil – if it feels dry to the touch, it’s time for another watering.
What happens if I notice mold or fungal growth on my bean sprouts?
Act quickly! Remove any affected areas and disinfect your equipment with a mild bleach solution. To prevent future occurrences, ensure good air circulation, maintain optimal humidity levels (around 60-70%), and avoid overcrowding your growing space.
Can I use a variety of beans other than mung or adzuki for indoor sprouting?
While mung and adzuki beans are popular choices due to their high germination rates and nutritious profiles, you can experiment with other varieties like lentils, chickpeas, or even black beans. However, keep in mind that some bean types may require specific growing conditions or have different nutritional needs.
How do I store my harvested bean sprouts to maintain freshness?
Store your freshly harvested bean sprouts in a sealed container lined with paper towels or cloth to absorb excess moisture. Keep them refrigerated at a consistent temperature below 40°F (4°C) to slow down spoilage. Use within 3-5 days for optimal flavor and texture.