If you’re anything like me, you love experimenting with new ways to grow your own food at home or in a commercial setting. But have you ever stopped to think about the differences between sprouts and microgreens? These two popular options are often lumped together, but they actually require different growing conditions, offer varying nutritional benefits, and need distinct harvesting techniques. In this article, we’ll dive into the world of sprouts vs microgreens, exploring everything from how to grow them to which is best for your needs. Whether you’re a seasoned gardener or just starting out, understanding the differences between these two options will help you make informed decisions about which ones to plant and how to maximize their potential. Let’s get started on this journey into the wonderful world of sprouts and microgreens!
Understanding the Basics of Sprouts and Microgreens
When it comes to growing your own greens, understanding the basics of sprouts and microgreens is essential for success. Let’s dive into the fundamental differences between these two popular varieties.
What are Sprouts?
So, you’re curious about sprouts and want to know what they’re all about? Well, let’s dive right in! Sprouts are the edible shoots of plants that have been allowed to germinate in a controlled environment. This means that instead of letting them grow into full-fledged plants, we harvest them while still in their seedling stage.
There are many types of sprouts you can grow at home, including alfalfa, broccoli, mung bean, and even radish! Each type has its unique flavor and texture, so feel free to experiment and find your favorites. Alfalfa sprouts, for example, have a mild, nutty taste and are packed with nutrients like vitamin K and folate.
But what makes sprouts truly special is their nutritional profile. They’re bursting with vitamins, minerals, and antioxidants that can boost energy levels, support immune function, and even help reduce inflammation. In fact, alfalfa sprouts contain up to 20 times more vitamin C than a fresh orange! So go ahead, get creative in the kitchen, and start growing your own sprouts today – your taste buds (and body) will thank you!
Some popular sprout varieties include:
• Alfalfa: Known for its mild flavor and rich nutrient profile
• Broccoli: Offers a slightly bitter taste and is packed with cancer-fighting compounds
• Mung bean: Has a sweet, earthy flavor and is high in fiber and protein
• Radish: Adds a spicy kick to salads and sandwiches
When choosing which sprouts to grow, consider your personal preferences for flavor and nutrition. Experiment with different types and find the ones that become your new favorite snacks!
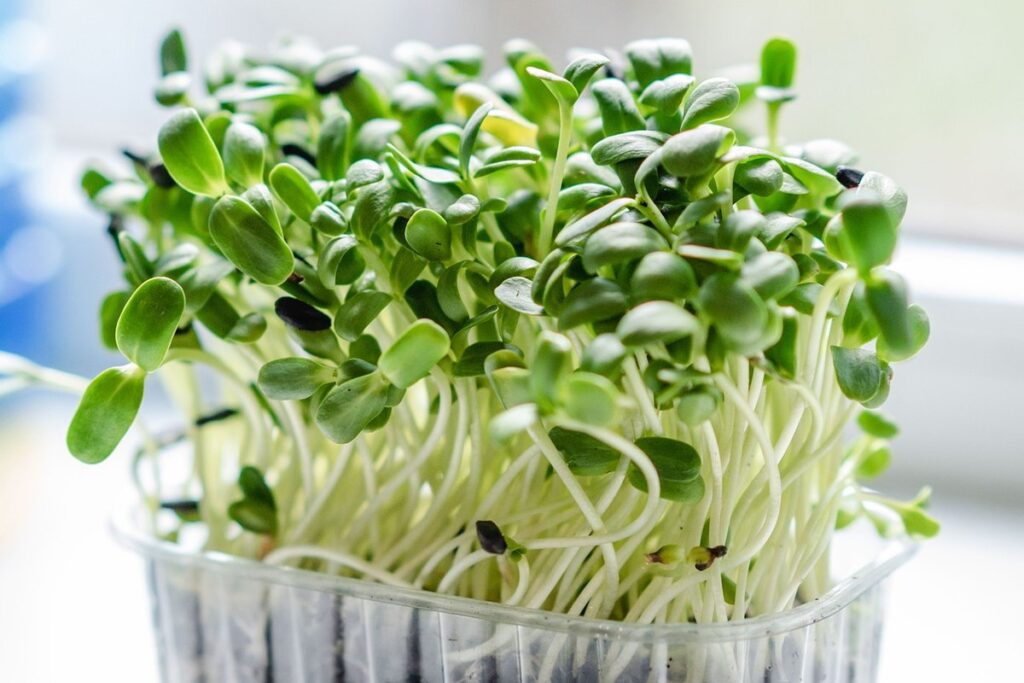
What are Microgreens?
Microgreens are the young versions of leafy greens and herbs that are harvested within 1-3 weeks after germination. This is significantly shorter than the time it takes for mature greens to reach full size, which can be anywhere from a few months to over a year.
There are many different types of microgreens available, each with its own unique characteristics. Some popular varieties include salad mix, kale, radish, and arugula. Salad mix is a blend of baby leaves from various lettuces, such as romaine, butter lettuce, and red leaf lettuce. Kale microgreens have a milder flavor than mature kale and are packed with nutrients.
Radish microgreens have a spicy kick and can be used to add heat to salads or sandwiches. Arugula microgreens have a peppery flavor and are often used in Italian cuisine. When choosing which type of microgreen to grow, consider the space you have available, as some varieties require more light than others. For example, radish microgreens prefer bright light, while arugula microgreens can tolerate partial shade.
In addition to their unique flavors and textures, microgreens are also incredibly nutrient-dense. They contain up to 20 times more vitamins and minerals than mature greens, making them a great choice for health-conscious gardeners.
Growing Conditions for Sprouts and Microgreens
To successfully grow sprouts and microgreens, it’s essential to understand their unique growing conditions, including temperature, humidity, and light requirements. Let’s dive into these specifics together.
Ideal Temperature and Lighting for Sprouts
When it comes to growing sprouts, temperature and lighting play crucial roles in determining their quality and yield. Most sprout varieties thrive in temperatures between 65°F to 75°F (18°C to 24°C), with some exceptions like alfalfa and mung beans, which can tolerate warmer conditions up to 80°F (27°C). Be mindful that temperatures above 85°F (29°C) can lead to mold growth and reduced sprout quality.
Lighting is equally important, as it promotes healthy photosynthesis. Sprouts require indirect light, especially during the early stages of germination. Direct sunlight can be too intense and may cause them to become leggy or even wilt. A bright, north-facing window or a grow light with a gentle spectrum (around 400-500 μmol/s) is ideal.
To achieve optimal conditions, ensure your sprouting area maintains consistent temperatures within the recommended range. You can use a thermometer to monitor the temperature and take steps to adjust it if necessary. Additionally, consider using grow lights specifically designed for seedlings or low-wattage LED bulbs to provide the right amount of light without overheating your sprouts.
Optimal Growing Conditions for Microgreens
To achieve optimal growing conditions for microgreens, it’s essential to understand the ideal temperature, lighting, and humidity levels. Microgreens typically thrive in temperatures between 65°F to 75°F (18°C to 24°C), with some varieties tolerating temperatures as low as 55°F (13°C) or as high as 80°F (27°C). However, temperatures above 85°F (29°C) can lead to bolting and reduced flavor.
Proper lighting is also crucial for microgreen growth. Most varieties require indirect light, especially in the first few days after germination. Direct sunlight can cause overheating and reduce leaf density. Aim for a south-facing window or use grow lights with a 12-14 hour photoperiod.
Maintaining optimal humidity levels is also vital for healthy microgreen growth. Keep the growing area between 40% to 60% relative humidity, adjusting as needed based on temperature fluctuations. This can be achieved using a humidifier or by placing the growing tray in a covered container with a breathable material like a paper towel or coffee filter.
Keep in mind that some microgreens are more sensitive than others, so research specific requirements for your chosen variety. By providing optimal conditions, you’ll not only promote healthy growth but also enhance flavor and texture.
Nutritional Comparison of Sprouts and Microgreens
When it comes to nutritional value, sprouts and microgreens are often compared, but which one takes the crown? Let’s dive into a side-by-side comparison.
Nutrient Density of Sprouts vs. Microgreens
When it comes to nutrient density, both sprouts and microgreens are powerhouse foods, but they have some key differences. Sprouts are germinated seeds that have been allowed to grow for a short period of time, typically 1-3 days. During this process, they undergo rapid cell division, which makes them an excellent source of vitamins A, C, and E, as well as minerals like potassium and iron.
Microgreens, on the other hand, are young versions of leafy greens that have been harvested within 1-3 weeks of germination. They tend to be higher in antioxidants than sprouts and contain a broader spectrum of vitamins and minerals. For example, pea shoots microgreens contain high levels of vitamin K, while radish microgreens are rich in vitamin C.
In terms of antioxidant content, microgreens often come out on top. A study published in the Journal of Food Science found that broccoli microgreens contained 20 times more antioxidants than mature broccoli florets. This is likely due to the fact that microgreens are harvested before they reach full maturity and have a higher concentration of nutrients.
When it comes to growing your own greens, consider starting with sprouts for their ease of cultivation and high vitamin content. However, if you’re looking to pack an extra nutritional punch into your salads or smoothies, microgreens may be the better choice.
Macronutrients in Sprouts and Microgreens
When it comes to macronutrient composition, both sprouts and microgreens offer unique profiles that cater to various dietary needs. Sprouts, being the young shoots of plants, tend to be higher in carbohydrates and fiber due to their rapid growth phase. For instance, alfalfa sprouts contain approximately 6-8% carbohydrates, while broccoli sprouts have about 7-10%. This makes them a great choice for those following high-fiber diets or seeking natural sources of energy.
Microgreens, on the other hand, are more protein-dense and tend to be lower in fat. For example, pea shoots contain around 30-40% protein by weight, while radish greens have approximately 20-25%. This makes them an attractive option for vegetarians and vegans looking to boost their protein intake. When choosing between sprouts and microgreens, consider your individual macronutrient needs and select the one that best aligns with your dietary goals.
Harvesting and Storage Techniques for Maximum Freshness
Now that you’ve harvested your sprouts and microgreens, it’s essential to store them properly to maintain their freshness and extend their shelf life. We’ll walk you through expert techniques for optimal storage.
Best Practices for Harvesting Sprouts
Harvesting sprouts at the right time is crucial to preserve their delicate flavor and texture. Generally, you can harvest sprouts 7-14 days after sowing, depending on the variety. For instance, alfalfa and broccoli sprouts are ready within a week, while mung bean and lentil sprouts take about 10-12 days.
To determine if your sprouts are ready, gently grasp them by the roots and give them a gentle tug. If they come out easily, it’s time to harvest. Use clean scissors or a sharp knife to cut off the sprout just above the soil line, taking care not to damage the roots.
Handling harvested sprouts requires finesse – avoid washing them before storing as excess moisture can lead to spoilage. Instead, gently pat them dry with paper towels and store them in an airtight container or plastic bag in the refrigerator. Keep them away from direct sunlight and heat sources. You can also blanch or steam your sprouts for 30 seconds to 1 minute to extend their shelf life.
For long-term storage, consider freezing your sprouts – simply place them in an airtight container or freezer bag, label, and store in the freezer at 0°F (-18°C) or below.
Storing Microgreens for Optimal Flavor and Texture
When it comes to storing microgreens for optimal flavor and texture, attention to detail is crucial. To maintain their quality, you’ll want to use airtight containers that allow for airflow, such as glass jars with mesh lids or plastic bags with tiny holes punched in them. This will help regulate humidity levels, which can quickly become too high if the container is sealed too tightly.
For optimal storage conditions, keep your microgreens refrigerated at a consistent temperature between 32°F and 40°F (0°C to 4°C). Avoid storing them near strong-smelling foods, as they can absorb odors easily. You can also store microgreens in the crisper drawer of your refrigerator, which typically maintains a higher humidity level than other areas.
In terms of specific storage methods, you can either place the entire container in the fridge or transfer the greens to a separate container for storage. If you choose the latter, use a moist paper towel to wrap around the base of the stems and secure it with a clip. This will help maintain humidity levels without making the microgreens too soggy.
Tips and Tricks for Growing Sprouts and Microgreens at Home
Want to grow your own sprouts and microgreens but don’t know where to start? This next part of our guide shares essential tips for success.
Common Challenges Faced by Beginners
As you embark on growing sprouts and microgreens at home, you may encounter some common challenges that can be frustrating if not addressed promptly. One of the most prevalent issues is mold growth, which can quickly spread and ruin your entire crop. To prevent this, ensure your growing area has good air circulation and maintain a consistent temperature between 60-75°F (15-24°C). Regularly inspect your sprouts or microgreens for signs of mold, such as white patches or a musty smell.
Another common obstacle is pests like aphids, spider mites, and thrips. These tiny insects can cause significant damage to your plants in no time. To keep them at bay, use neem oil or insecticidal soap according to the product’s instructions. You can also introduce beneficial insects like ladybugs or lacewings into your growing area to act as natural pest controllers.
In addition to these issues, you may encounter problems with slow germination rates or uneven growth. To overcome this, ensure your seeds are fresh and of high quality, and follow the recommended soaking time. Also, keep your growing medium consistently moist but not waterlogged, as this can hinder root development and lead to weak stems. By being aware of these potential pitfalls and taking preventative measures, you’ll be well on your way to successfully cultivating healthy sprouts and microgreens at home.
Advanced Techniques for Commercial Growers
For commercial growers looking to take their sprouts and microgreens game to the next level, it’s time to explore advanced techniques that can significantly boost yields and efficiency. Hydroponics, aeroponics, and LED grow lights are three cutting-edge methods worth considering.
Hydroponics involves growing plants in a nutrient-rich solution rather than soil, allowing for precise control over water and nutrient delivery. This method can increase yields by up to 30% and reduce water consumption by as much as 90%. Aeroponics takes hydroponics to the next level by suspending roots in the air and delivering nutrients through fine mists, resulting in even more efficient water use.
LED grow lights offer a high-intensity light source that can be tailored to specific plant needs. This allows growers to optimize light spectrum and intensity for maximum growth. By using LED grow lights, commercial growers can save up to 40% on energy costs while increasing yields by up to 20%. For optimal results, consider using a combination of these advanced techniques – the possibilities are endless!
Conclusion: Choosing the Right Option for Your Needs
Now that you’ve weighed your options and considered the pros of each, it’s time to think about how to choose the best option for your growing needs. Let’s break down the key considerations.
Recap of Key Differences Between Sprouts and Microgreens
When it comes to growing your own greens, understanding the differences between sprouts and microgreens is crucial for making informed decisions. As we’ve discussed throughout this article, each option has its unique characteristics and benefits.
Sprouts, as we’ve seen, are germinated seeds that are grown in a controlled environment, typically in water or a specialized grow medium. They have a milder flavor and higher nutritional value compared to microgreens. On the other hand, microgreens are young versions of leafy greens and other vegetables that are harvested within 1-3 weeks of germination. They pack a punch with intense flavors and high nutrient content.
In terms of growth, sprouts require minimal space and can be grown in small containers, making them ideal for indoor growing spaces. Microgreens, however, need more space to spread out and receive adequate light. When it comes to harvest time, microgreens are typically ready within 1-3 weeks, while sprouts take around 7-10 days.
By understanding these differences, you can choose the right option for your needs, whether it’s a compact sprout garden or a more substantial microgreen crop. This knowledge will also help you optimize growing conditions, ensure proper harvesting times, and maximize yields.
Final Thoughts on Growing Sprouts or Microgreens at Home
As you’ve made it through this comprehensive guide, we hope you’re now more confident and excited to start growing your own sprouts or microgreens at home. Congratulations! You’ve taken the first step towards enjoying fresh, nutritious greens all year round.
Remember, both sprouts and microgreens are relatively easy to grow, but they do require some basic knowledge and care. To successfully cultivate either option, be sure to provide them with adequate light, water, and air circulation. Keep your growing area clean and free of pests, and don’t overwater – this is a common mistake that can lead to mold and other issues.
If you’re just starting out, consider beginning with a small batch of sprouts or microgreens. This will help you get a feel for the process and make adjustments as needed. With practice, you’ll soon be harvesting fresh greens in no time! Don’t be discouraged if your first attempts don’t yield perfect results – it’s all part of the learning process.
Frequently Asked Questions
What are the ideal growing mediums for sprouts and microgreens?
The choice of growing medium depends on your specific needs and preferences. For sprouts, a fine-mesh bag or a breathable cloth is often used to allow for air circulation and moisture control. For microgreens, a shallow tray with a layer of potting mix or a coconut coir-based growing medium can provide the necessary support.
Can I grow both sprouts and microgreens in the same environment?
While it’s technically possible to grow both types of greens in the same space, they have distinct requirements for temperature, lighting, and moisture. It’s generally more efficient to dedicate separate areas or containers for each type of crop to ensure optimal growing conditions.
How do I troubleshoot common issues with sprouts and microgreens?
Common challenges like mold, pests, or nutrient deficiencies can often be addressed by adjusting the growing environment or using targeted solutions. Regularly monitoring your crops’ temperature, humidity, and light levels can help you catch potential problems early on.
What are some creative ways to use sprouts and microgreens in my kitchen?
Sprouts add a burst of flavor and nutrition to salads, sandwiches, and stir-fries, while microgreens offer a peppery kick and can be used as garnishes or added to soups. Consider experimenting with different recipes and applications to find the best uses for your homegrown harvest.
Can I scale up my sprout or microgreen production for commercial purposes?
For larger-scale growing, consider investing in hydroponic systems or vertical planters that allow for more efficient use of space and resources. You’ll also want to research local regulations and guidelines for commercial growing operations to ensure compliance.