Are you tired of wondering why your seeds just won’t sprout? It can be frustrating, especially when you’ve carefully selected the perfect spot and provided all the right conditions. But the truth is, seed germination is a delicate process that requires precision and attention to detail.
In this article, we’ll dive into expert advice on optimizing seed germination for healthy plant growth. From choosing high-quality seeds that are more likely to thrive to troubleshooting common issues like poor soil or inadequate moisture, we’ll cover it all. We’ll also explore the importance of selecting the right conditions for your specific type of plants and how even small adjustments can make a big difference in getting those seeds to germinate successfully. With these tips, you’ll be well on your way to growing vibrant, thriving plants that bring joy and beauty to your space.
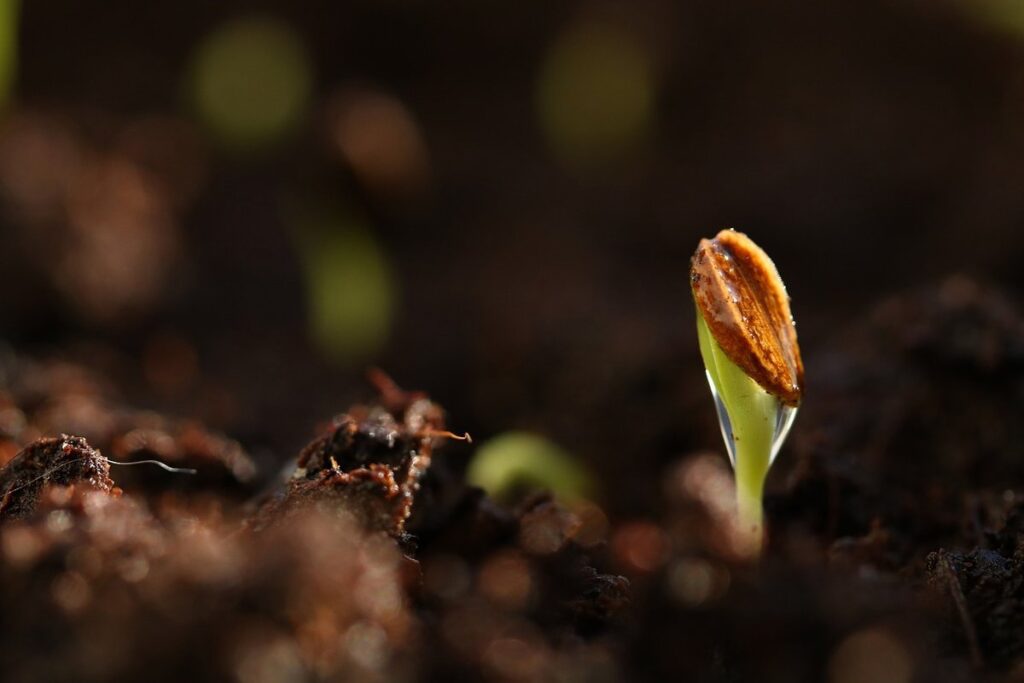
Understanding Seed Germination
Understanding how seeds germinate is crucial for successful plant growth, and it all starts with providing the right conditions for sprouting to occur. Let’s dive into the science behind seed germination.
What is Seed Germination?
So, you want to know what seed germination is all about? Well, let me break it down for you. Seed germination is the process by which a seed begins to grow into a new plant. It’s a crucial stage that sets the foundation for the entire growth cycle of your plants.
During this process, a seed absorbs water and responds to environmental stimuli, leading to the activation of enzymes and the breakdown of stored nutrients. This marks the beginning of root development and shoot emergence, eventually giving rise to a sprouting seedling. Seed germination is essential because it allows seeds to break dormancy and start their journey towards maturity.
Think of it like a newborn baby – just as a child needs nourishment and care to grow into a healthy adult, a seed requires the right conditions to germinate successfully. Provide your seeds with optimal temperature, moisture, and light, and you’ll be rewarded with a thriving young plant.
Factors Affecting Seed Germination
When it comes to seed germination, several key factors come into play. Light is one of the most critical elements, as seeds have different light requirements. For example, some seeds like those of cucumbers and squash can be sown directly on the surface without covering them, while others need complete darkness.
Temperature also plays a significant role in seed germination. Most seeds have an optimal temperature range for germination, typically between 65°F to 75°F (18°C to 24°C). Some examples include tomatoes, which germinate best at around 70°F (21°C), and lettuce, which prefers cooler temperatures of around 60°F (16°C).
Moisture is another essential factor. Seeds need adequate water for the germination process but excessive moisture can hinder it. A good rule of thumb is to keep the soil consistently moist during the first few weeks after sowing.
Oxygen availability also affects seed germination. Seeds require oxygen to break down stored food and initiate growth. Providing a well-draining potting mix can help ensure that seeds get the necessary oxygen for healthy germination.
The quality of the seeds themselves is another crucial factor. Fresh, high-quality seeds are more likely to germinate successfully compared to old or low-grade ones.
Preparing Seeds for Germination
Before planting, it’s essential to prepare your seeds properly to ensure optimal germination rates. This involves selecting high-quality seeds and treating them to awaken dormant growth.
Choosing the Right Seeds
When it comes to growing healthy plants, choosing the right seeds is crucial. Not all seeds are created equal, and selecting high-quality seeds that suit your climate and plant type can make a significant difference in your germination success.
First and foremost, check the seed packet or label for information on storage conditions. Seeds can be sensitive to extreme temperatures, humidity, and light exposure, which can affect their viability. Store seeds in a cool, dry place, away from direct sunlight, to maintain their quality.
Also, consider the expiration date of the seeds. Just like any other product, seeds have a shelf life, and older seeds may not germinate as well as newer ones. Check the seed packet or label for the sowing period and ensure you’re using fresh seeds within that timeframe.
Lastly, inspect the seeds themselves before planting. Look for visible signs of damage, mold, or mildew, which can indicate poor storage conditions or age-related degradation. Select seeds with smooth surfaces and intact coats to increase your chances of successful germination.
Seed Soaking and Scarification Techniques
When it comes to preparing seeds for germination, seed soaking and scarification are two crucial techniques that can significantly improve the chances of successful growth. Seed soaking involves placing seeds in water or a nutrient-rich solution to rehydrate them before planting. This method helps to break down dormancy and can be especially beneficial for hard-to-germinate seeds.
Scarification is another technique used to prepare seeds by creating small scratches on their surface. This can help to weaken the seed coat, allowing moisture and nutrients to penetrate more easily. By using a nail file or sandpaper to gently scratch the seed’s surface, you can enhance germination rates.
For example, some seeds like almonds and walnuts require scarification to break down their hard outer shell. Similarly, soaking seeds in water can increase germination by 20-30%. It’s essential to note that not all seeds benefit from soaking or scarification, so it’s crucial to research the specific needs of your seeds before attempting these techniques.
To ensure successful seed germination, experiment with different combinations of soaking and scarification. For instance, you can soak seeds overnight and then use a nail file to create gentle scratches on their surface before planting.
Optimizing Germination Conditions
Let’s dive into optimizing germination conditions, where we’ll explore specific temperature, light, and moisture requirements to kickstart your seeds’ growth. This is crucial for a strong start!
Ideal Temperature and Light Requirements
When it comes to seed germination, temperature and light are two crucial factors that can make all the difference between success and failure. Different plant species have unique requirements when it comes to these conditions, so it’s essential to research specific needs for the type of seeds you’re working with.
In general, most seeds prefer temperatures between 65°F to 75°F (18°C to 24°C) for optimal germination. Some plants, such as tomatoes and peppers, require warmer temperatures above 70°F (21°C), while others like lettuce and spinach do better in cooler temperatures around 60°F (15°C). Be cautious not to let the temperature rise too high, as this can cause seeds to germinate unevenly or even rot.
Light requirements also vary significantly among plant species. Some seeds, such as those from tropical plants, require bright light to germinate, while others prefer low light conditions. For example, lettuce and spinach germinate best in indirect light, whereas beans and peas do better with direct sunlight. To create optimal light conditions, you can use grow lights or place your seed trays near a sunny window. By understanding the specific temperature and light requirements of your seeds, you’ll be well on your way to successful germination.
Watering and Humidity Control
Maintaining proper moisture levels during germination is crucial for successful seed growth. Seeds need to be kept moist but not waterlogged, as this can lead to rot and kill the embryo. To create a humid microclimate around seeds without overwatering, you can use a cloche or a clear plastic bag. Place the seed in the center of the bag and seal it, trapping moisture inside. Check on the seed daily and gently open the bag for 10-15 minutes to allow excess moisture to escape.
Another method is to cover the seed tray with a damp cloth or paper towel. This will create a humid environment without watering the seeds excessively. However, ensure that the cloth or paper towel isn’t too wet, as this can cause the seed to rot.
Watering and humidity control are critical in germination. Overwatering can be detrimental to seed growth, causing fungal diseases to spread rapidly. On the other hand, maintaining optimal moisture levels allows seeds to grow healthily and quickly. Monitor your seed’s needs closely to ensure proper care and successful germination.
Troubleshooting Common Germination Issues
Don’t worry, even with a perfect setup, germination issues can still occur. Let’s troubleshoot common problems that might be hindering your seeds from sprouting.
Delayed or Failed Germination
Delayed or failed seed germination can be frustrating and disheartening, especially when you’ve taken all the right precautions. However, there are common causes that might be hindering the process. Inadequate light is one of them – seeds need a certain amount of light to break dormancy and initiate growth. Make sure your seeds are getting at least 12-14 hours of indirect light per day. Poor soil quality can also lead to delayed germination or failure, so ensure your seed starting mix is well-draining and has the right pH level for your specific plant species.
Another common issue is insufficient water – most seeds require consistent moisture during the germination process. However, overwatering can be just as detrimental as underwatering. Check the soil regularly to avoid this mistake. Insufficient water temperature can also affect germination rates. Most seeds prefer a warm environment between 70-80°F (21-27°C), but some plants like orchids and African Violets require cooler temperatures.
To troubleshoot delayed or failed germination, start by checking these basic requirements. If you’ve done everything right, it might be worth trying a fresh batch of seeds or experimenting with different growing conditions.
Overcoming Challenges with Specialized Seeds
When it comes to seed germination, some types of seeds are more finicky than others. Certain species require specific conditions to break dormancy and initiate growth. One common challenge is overcoming the need for cold stratification.
Some seeds, like those from trees and shrubs, need a period of cold temperatures to simulate winter, allowing them to break their dormancy. Others, such as clematis and hydrangea, may require 30-60 days of stratification at around 35°F (2°C). To overcome this challenge, you can use a refrigerator or a specialized seed starting tray designed for stratification.
Another common issue is dealing with long germination periods. Some seeds, like beans and peas, can take up to three weeks to germinate, while others, such as parsnips and carrots, may require up to 28 days. To speed up the process, you can use a heating mat or grow lights to maintain an optimal temperature range.
It’s essential to research the specific seed requirements for each type of plant you’re trying to grow. By understanding their unique needs, you’ll be better equipped to provide them with the right conditions, resulting in healthy germination and successful growth.
Encouraging Healthy Seedling Growth
To ensure healthy seedlings, it’s essential to provide optimal growing conditions and gentle care during their early stages of development. This allows them to develop strong roots and a sturdy stem.
Providing Nutrient-Rich Soil
When it comes to growing healthy seedlings, providing them with nutrient-rich soil is one of the most critical factors. A high-quality potting mix specifically designed for seedlings will give your young plants a solid foundation for growth and development.
Using regular garden soil or unfortified potting mixes can lead to nutrient deficiencies, which may stunt your seedling’s growth or even cause it to wither away. A specialized seedling potting mix, on the other hand, is formulated to meet the unique needs of young plants during their critical early stages.
These specially designed mixes typically contain a balanced blend of essential nutrients, including nitrogen, phosphorus, and potassium, as well as micronutrients like iron, magnesium, and sulfur. They also often include added beneficial microorganisms that help promote healthy root growth and development.
To provide your seedlings with the best chance at success, look for potting mixes specifically labeled as “seed starting mix” or “starter mix.” Some popular options also contain organic matter like peat moss or coconut coir to retain moisture and suppress diseases.
Pruning and Training Techniques
As your seedlings grow, it’s essential to prune and train them properly to promote strong, balanced growth. Pruning involves removing dead or damaged leaves, stems, or roots, while training refers to guiding the plant’s structure to optimize its growth potential.
Start by pruning weak or spindly growths from your seedlings, which can help redirect energy towards healthier areas. For example, if a stem is growing significantly longer than the others, prune it back to encourage even development. Be cautious not to over-prune, as this can stress the plant and hinder its ability to photosynthesize.
Training techniques include using stakes or trellises to provide support for tall seedlings, or gently tying stems together to promote a bushy habit. This helps prevent damage from wind or water stress and encourages optimal growth patterns. Use soft ties or clips that won’t constrict the plant’s growth. By pruning and training your seedlings properly, you’ll be well on your way to growing robust, healthy plants.
Advanced Seed Germination Techniques
Take your seed germination skills to the next level with our expert guide to advanced techniques, from stratification to cold treatment and more. We’ll walk you through the methods that produce optimal results.
Experimenting with Hydroponics and Aeroponics
Hydroponics and aeroponics have revolutionized the way we think about seed germination. By suspending roots in a nutrient-rich solution rather than soil, these systems provide unparalleled control over the growing environment. For those looking to push the boundaries of controlled environment agriculture (CEA), experimenting with hydroponics and aeroponics can be a game-changer.
One of the primary benefits of hydroponic and aeroponic systems is their ability to optimize water and nutrient delivery. By providing precise amounts of what plants need, these systems reduce waste and minimize the risk of overwatering or under-watering. This leads to faster growth rates, increased yields, and healthier plants.
However, it’s essential to note that hydroponic and aeroponic systems require a significant investment in equipment and infrastructure. They also demand precise monitoring and control to ensure optimal conditions are maintained. For example, pH levels must be carefully calibrated to prevent nutrient deficiencies or toxicity. Nonetheless, for experienced growers looking to refine their craft, the benefits of these systems far outweigh the challenges.
Aeroponic systems, in particular, have shown remarkable promise in CEA. By using a fine mist to deliver nutrients, aeroponics can achieve higher water and nutrient delivery rates than hydroponic systems. This makes them an attractive option for large-scale operations or those with limited space.
To get started with hydroponic or aeroponic seed germination, you’ll need to choose the right equipment and setup. Consider starting small with a DIY system or investing in a commercial unit designed specifically for CEA. Once you’ve set up your system, be prepared to monitor and adjust conditions regularly to optimize plant growth.
When experimenting with hydroponics and aeroponics, remember that consistency is key. Maintain precise control over temperature, humidity, light, and nutrient levels to create an optimal environment for seed germination. With patience and practice, you’ll soon discover the benefits of these cutting-edge systems firsthand.
Exploring Other Seed Germination Methods
If you’re looking for an extra edge in seed germination, it’s time to explore alternative methods. Using grow lights can significantly speed up the germination process, especially during winter months when natural light is scarce. These specialized lighting systems emit specific spectrums of light that mimic daylight conditions, stimulating seeds to germinate faster.
Heated mats are another option for accelerating seed germination. These mats warm the soil to an optimal temperature range (usually between 70-80°F) that promotes healthy growth and development. This can be especially beneficial for sensitive species or those that require a specific temperature range for successful germination.
Some gardeners swear by specialized seed starting equipment, such as propagators with precise temperature control. These devices ensure consistent conditions for optimal germination rates. By investing in one of these gadgets, you’ll enjoy higher success rates and faster growth.
Frequently Asked Questions
What if I’m unsure which seeds to choose for my first-time germination attempt?
When starting out, it’s a good idea to select high-quality seeds that are specifically bred for easy germination and growth. Look for varieties labeled as “easy-to-grow” or ” beginner-friendly.” This will give you the best chance of success and help you build confidence in your seed germination skills.
Can I use seeds from my existing plants, or do I need to purchase new ones?
While it’s technically possible to save seeds from your own plants, using fresh seeds is usually a better option. Saved seeds may not have the same level of viability as commercial seeds, and this can impact their ability to germinate successfully.
How often should I check on my seeds during the germination process?
Regular checks are crucial when it comes to seed germination. Aim to inspect your seeds every 1-2 days, especially in the first week after sowing. This will help you catch any potential issues before they become major problems.
What if my seeds take longer than expected to germinate – is there anything I can do?
Delayed germination can be frustrating, but it’s not uncommon. If your seeds are taking longer than usual to sprout, check the temperature and light conditions in your growing area. Make sure you’re providing the optimal environment for germination, and consider experimenting with different seed soaking or scarification techniques.
Can I use a humidifier to increase humidity levels during germination?
Yes, using a humidifier can be an effective way to maintain high humidity levels during seed germination. This is especially useful if you live in a dry climate or are growing sensitive varieties that require a lot of moisture. Just be sure to monitor the humidity levels closely and adjust as needed to avoid overwatering.