Growing your own loofah plants from seed can be a fun and rewarding experience, especially if you’re looking for a low-maintenance yet sustainable way to have this versatile plant at home. Loofah is not only great for exfoliating skin but also makes for a delicious and nutritious addition to many dishes. However, growing it from seed can seem daunting, especially if you’re new to gardening.
In this article, we’ll walk you through the steps of successfully growing loofah plants from seed, covering essential topics such as soil preparation, sowing techniques, and care tips that ensure a healthy harvest. With these expert tips and tricks, you’ll be on your way to cultivating your very own loofah plant in no time. Whether you’re an experienced gardener or just starting out, this guide is perfect for anyone looking to grow their own loofah from seed.
Understanding Loofah Plants
To grow a thriving loofah plant, it’s essential to first understand its unique characteristics and needs, which can be quite different from other plants. We’ll delve into these specifics in this section.
What is a Loofah Plant?
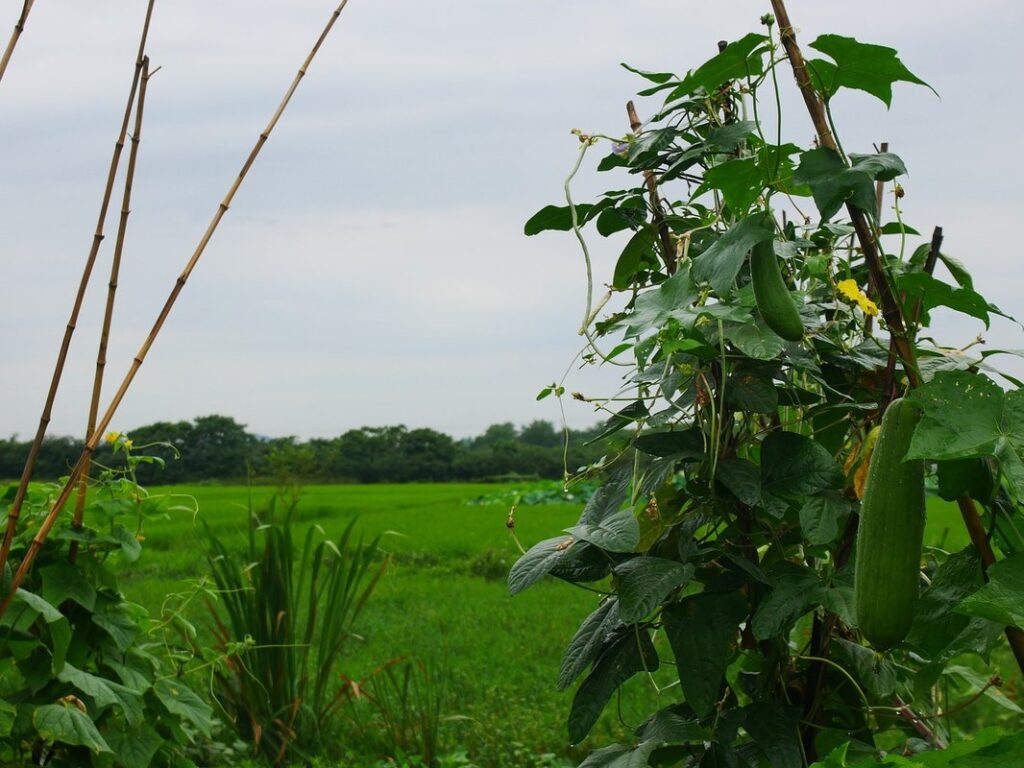
Loofah plants, also known as luffa, are members of the Cucurbitaceae family, which includes cucumbers and squash. The botanical name for loofah plant is Luffa cylindrica, a species native to Asia and southern Europe. This tropical plant has been cultivated for centuries in warm climates, prized for its edible fruits as well as its versatile and eco-friendly byproducts.
The loofah plant is an annual vine that thrives in temperate regions with high humidity and full sun exposure. Its cylindrical fruits can grow up to 3 feet long, containing soft, fibrous seeds and a pulp rich in vitamins A and C. Not only are the fruits edible, but they also contain a unique type of fiber used for exfoliation and cleaning purposes.
In many Asian cultures, loofah has been used as a natural sponge or scrubber to gently cleanse skin without stripping its natural oils. With proper care and cultivation, you can grow your own loofah plant from seed and enjoy the benefits of this incredible plant in various aspects of life – from food to self-care.
Benefits of Growing Your Own Loofah Plant
Growing your own loofah plant can be a rewarding experience that offers numerous benefits. One of the most significant advantages is cost-effectiveness. When you grow your own loofah, you avoid the costs associated with buying store-bought loofahs, which can range from $2 to $5 per unit. With just a few seeds and some basic gardening supplies, you can harvest multiple loofahs at once, making it a more budget-friendly option.
Another benefit of growing your own loofah plant is the freshness of the produce. Store-bought loofahs often sit on shelves for months, losing their natural texture and exfoliating properties over time. In contrast, homegrown loofahs are harvested at peak ripeness, ensuring optimal quality and effectiveness. Plus, you can use them immediately, which means you’ll enjoy a more efficient and satisfying bathing experience.
In addition to its practical uses, the loofah plant also holds potential medicinal value. The loofah’s fibrous interior has been used in traditional medicine for centuries, particularly in Asia, where it’s valued for its anti-inflammatory properties. While further research is needed to confirm these benefits, growing your own loofah plant can provide you with a natural source of this potentially beneficial ingredient.
Preparing the Soil
Before sowing loofah seeds, it’s essential to prepare the soil to give your plants a strong start. This involves creating a suitable environment for germination and healthy growth.
Choosing the Right Soil Mix
When it comes to growing loofah plants from seed, one of the most critical factors is having a well-draining soil mix. Loofah plants are susceptible to root rot and other moisture-related issues if the soil doesn’t allow for proper drainage. To create a suitable mix, you’ll want to focus on ingredients that are high in organic matter but low in density.
A good starting point is to combine perlite or vermiculite with composted manure or peat moss. These materials will help break up compacted soil and improve water penetration without becoming too soggy. Another option is to use a commercial loofah potting mix specifically designed for vining plants like loofah.
If you’re looking to make your own mix, aim for a combination that’s around 60-70% organic matter (compost, manure, or peat) and 30-40% inorganic materials (perlite, vermiculite). This will provide the necessary structure and support for your loofah plant’s extensive root system. Remember to avoid using regular garden soil as it can compact too easily and cause waterlogging issues. By investing in a well-draining mix, you’ll be one step closer to successfully growing your loofah plant from seed.
pH Level Requirements
When it comes to growing loofah plants from seed, getting the soil pH level just right is crucial for optimal growth. Loofah plants prefer a slightly acidic to neutral soil pH, ranging from 6.0 to 7.0. If your soil’s pH falls outside of this range, it can affect nutrient uptake and overall plant health.
To determine your soil’s pH level, you’ll need to test it. You can purchase a DIY soil testing kit or send a sample to a lab for analysis. Once you know your soil’s pH level, you can adjust it if necessary. To lower the pH, add elemental sulfur or peat moss to the soil. To raise the pH, mix in lime or dolomitic limestone.
Keep in mind that loofah plants are sensitive to extreme pH fluctuations, so aim for a stable and consistent reading within the optimal range. A pH level of 6.5-6.8 is ideal for loofah growth. If you’re unsure about testing your soil or making adjustments, consult with a local nursery or gardening expert for guidance.
Sowing Loofah Seeds
To successfully grow a loofah plant from seed, you’ll need to know how to sow them correctly and provide optimal growing conditions for germination. This process requires attention to detail.
Preparing the Seeds
Properly storing and handling loofah seeds is crucial for successful germination. Loofah seeds are relatively small and delicate, making them prone to damage if not handled carefully. To ensure seed viability, store them in a cool, dry place, away from direct sunlight. Airtight containers or envelopes can help maintain the moisture level and keep pests out.
When it comes to sowing time, loofah seeds typically prefer warmer temperatures. Aim for optimal germination between 70°F to 85°F (21°C to 30°C). This allows the seedlings to develop strong roots before moving outdoors. If you live in an area with a long growing season, consider sowing seeds indoors 2-3 weeks prior to the last frost date and then transplant them outside.
Remember that loofah seeds have a relatively short shelf life of about 6-12 months. Old or expired seeds may not germinate well, so make sure to check their viability before planting. With proper storage and handling, you can increase the chances of successful germination and set your loofah plant on its way to growth.
Sowing Techniques
When sowing loofah seeds, it’s essential to get the conditions just right. Loofah seeds are relatively large and easy to handle, but they do require some specific requirements to germinate successfully.
Firstly, make sure you’re planting them at the right depth. Loofah seeds need to be buried about 1-2 inches deep in well-draining soil with a temperature of around 70-80°F (21-27°C). If the soil is too cold or too hot, it can hinder germination.
In terms of spacing, loofah plants prefer to be planted at least 3-4 feet apart from each other. This allows for good air circulation and prevents the risk of fungal diseases that thrive in humid environments.
When sowing your loofah seeds, you can either directly sow them into large containers or seed trays filled with a mix specifically designed for tropical plants. If using individual pots, be sure to transplant the seedlings when they’re about 6-8 inches tall to prevent them from becoming pot-bound.
To ensure optimal germination rates, keep the soil consistently moist but not waterlogged. You can also provide some indirect sunlight or use grow lights to supplement the natural light conditions.
Caring for Young Loofah Plants
Now that you’ve successfully germinated your loofah seeds, it’s time to learn how to care for these young plants to ensure they grow strong and healthy. Proper nurturing is crucial in this early stage.
Watering Needs
As you care for young loofah plants, providing consistent moisture levels is crucial during the seedling stage. This is a critical period where the roots are developing, and inconsistent watering can lead to weak and spindly growth. To prevent overwatering or underwatering, make sure the soil feels moist but not waterlogged. Check the soil daily by inserting your finger into the top 1-2 inches of soil.
Water thoroughly when you first notice that the soil is dry, but avoid getting water on the leaves to prevent fungal diseases. For example, if you’re watering with a hose, use a gentle spray setting and aim for the roots rather than the foliage. It’s also essential to monitor your plants’ response to watering. If you notice yellowing or droopy leaves, it may be a sign that the soil is too dry.
Maintain high humidity around your seedlings by placing them on a tray filled with water and pebbles or using a cloche cover. This will create a microclimate that promotes healthy growth. Remember, young loofah plants need about 1-2 inches of water per week, either from rainfall or irrigation. Keep the soil consistently moist but not soggy to encourage strong root development and prevent pests like fungal infections.
Providing Adequate Light
When it comes to caring for young loofah plants, providing adequate light is crucial during the seedling stage. Loofah plants require bright, indirect light to undergo photosynthesis and develop their delicate leaves. If you’re growing indoors, a south-facing window or a grow light can be an excellent option.
Consider using LED grow lights, which are energy-efficient and produce minimal heat. These lights emit a broad spectrum of light that mimics natural sunlight, promoting healthy growth. For example, the Philips GreenSmart LED Grow Light is a popular choice among gardeners.
During this stage, it’s essential to keep the lights at least 6-8 inches away from the seedlings to prevent scorching their leaves. You can start with 12 hours of light per day and gradually increase the duration as the plants grow. Monitor your seedlings’ response to light levels, adjusting as needed to avoid overexposure or underexposure. By providing bright, indirect light, you’ll be giving your young loofah plant the best chance to thrive and develop into a healthy, productive vine.
Pruning and Training
Now that you have your loofah plant growing strong, learn how to prune it correctly to encourage a healthy and productive growth habit. Proper pruning techniques will also help train the vines to maximize space and promote a bountiful harvest.
When to Prune
Pruning loofah plants at the right time is crucial to encourage bushy growth and promote healthy development. When you notice the seedlings have developed their first set of true leaves, usually around 2-3 weeks after sowing, it’s time to start pruning. This may seem counterintuitive, as you might think that removing leaves would weaken the plant.
However, early pruning helps control the plant’s height and encourages a bushy growth habit. Imagine your loofah plant growing like a small shrub instead of a tall, leggy stem – this is exactly what you want to achieve. To do so, simply snip off the top set of leaves or trim them back by about one-third. This will stimulate the plant’s lower nodes to produce new growth, resulting in a fuller and more compact plant.
By pruning at this stage, you’re signaling to your loofah plant that it needs to focus on developing its roots and producing more foliage rather than just reaching for the sky.
Training Techniques
As you begin training your young loofah vines, it’s essential to establish a strong foundation that will support their growth and development. One effective method is to use a trellis. This allows the vine to climb upwards, exposing more leaves to sunlight and promoting healthy growth.
To train your loofah on a trellis, start by gently twining the stem around the structure when it’s about 6-8 inches tall. Make sure to secure the vine with soft ties or clips to prevent damage. As the plant grows, continue to guide the stems along the trellis, pruning any wayward growth to maintain an even shape.
Regular pruning is also crucial in controlling the shape of your loofah plant. Prune back the tips of the vines to encourage branching and a fuller appearance. Remove any weak or spindly growth to direct the energy towards the more vigorous stems. By doing so, you’ll create a strong, balanced framework that will support the development of your loofah’s unique gourds.
Be patient and consistent in your training efforts, as it may take some time for your loofah plant to adjust to its new surroundings. With proper care and attention, however, your loofah should thrive and produce an abundance of beautiful, fibrous fruits.
Harvesting Your Loofah
Now that you have successfully grown your loofah plant from seed, it’s time to harvest the fruits of your labor and collect the mature loofah pods for use in a variety of ways. Harvesting is an exciting step.
Signs of Readiness
When it’s time to harvest your loofah gourds, you’ll want to make sure they’re mature and ready for use. One of the easiest ways to determine this is by checking their size, color, and texture.
Loofah gourds are typically ready to harvest when they reach a diameter of around 6-8 inches (15-20 cm). At this point, they should also have a hard, dry rind that’s free of any soft spots or bruises. As for the color, loofah gourds will turn from a vibrant green to a more muted yellow or tan hue as they mature.
In terms of texture, you’ll want to gently tap on the gourd with your knuckles; it should produce a deep hollow sound when it’s fully ripe. If the sound is dull or metallic, it may not be ready yet.
Check on your loofah gourds regularly over the course of several weeks to catch them at their prime. Harvesting them too early can result in a lower-quality final product, so be patient and wait for the optimal moment to bring in those loofah treasures!
Harvesting Tips
When it’s time to harvest your loofah gourds, you’ll want to do so carefully to avoid damaging the delicate skin. The best method for harvesting depends on the size and maturity of the gourd. For smaller loofahs, you can simply cut the stem with a pair of scissors or pruning shears, leaving about an inch of stem attached to the gourd.
For larger loofahs, it’s better to twist the stem counterclockwise until it comes off easily. Be careful not to pull too hard, as this can cause the gourd to break or crack. You’ll know your loofah is ready to harvest when its skin is dry and hard, usually 3-5 months after sowing.
To avoid damaging the skin further, handle the harvested loofahs gently and keep them in a cool, dry place until you’re ready to use them. With proper care, your loofah gourds should last for several weeks or even months.
Common Issues and Troubleshooting
If you encounter any problems while growing your loofah plant from seed, don’t worry – we’ve got solutions for common issues like poor germination, pests, and diseases.
Common Pests and Diseases
Loofah plants can be susceptible to various pests and diseases that may compromise their health and growth. One of the most common pests affecting loofah plants is aphids, small sap-sucking insects that can cause curled or distorted leaves. To prevent infestations, ensure you inspect your plants regularly for signs of aphid activity, such as sticky honeydew droplets on the leaves.
Another prevalent issue is powdery mildew, a fungal disease characterized by white, powdery patches on the leaves. This condition can be prevented by maintaining good air circulation around the plants and ensuring they receive adequate moisture without overwatering. Fungal diseases like root rot can also arise from excessive watering, so it’s essential to monitor soil moisture levels.
Some natural methods for controlling pests include introducing beneficial insects like ladybugs or lacewings, which prey on aphid populations. Organic pesticides like neem oil or insecticidal soap can be used as a last resort when infestations are severe.
Environmental Stressors
Loofah plants are surprisingly resilient, but they’re not invincible. Environmental stressors can significantly impact their growth, making it challenging for even the most experienced gardeners to achieve optimal results.
Extreme temperatures, either too high or too low, can hinder loofah plant growth. Prolonged exposure to direct sunlight above 90°F (32°C) can cause scorching and damage leaves, while temperatures below 60°F (15°C) can slow down the germination process. Similarly, inadequate light can also have a negative impact on loofah plants.
To mitigate this issue, consider providing your loofah plant with filtered sunlight or using grow lights to supplement natural light. You can also move your plant to a more sheltered location during extreme weather conditions. In addition, ensure that your soil remains consistently moist but not waterlogged, as this can exacerbate temperature-related stress.
If you’re growing loofah plants indoors, consider investing in a thermostat-controlled environment or using a humidity dome to regulate temperature fluctuations. By taking proactive steps to mitigate environmental stressors, you’ll be well on your way to successfully cultivating loofah plants from seed.
Frequently Asked Questions
Can I grow loofah plants from seed indoors if I don’t have a greenhouse?
Yes, you can grow loofah plants from seed indoors as long as you provide them with sufficient light. Since loofah plants require full sun to partial shade, you may need to supplement their natural light with grow lights. Make sure the temperature remains above 65°F (18°C) and maintain high humidity to prevent fungal diseases.
How often should I water my young loofah seedlings during the germination period?
Water your young loofah seedlings gently but thoroughly once a week, or whenever the top inch of soil feels dry. Avoid overwatering, which can lead to root rot. Keep in mind that loofah seeds require moisture to germinate and need consistent watering as they grow.
What are some common pests I should watch out for when growing loofah plants outdoors?
Some common pests that may affect your outdoor loofah crop include aphids, whiteflies, and squash bugs. Regularly inspect your plants, and use organic pest control methods whenever possible to prevent the spread of diseases.
Can I grow multiple loofah plants in a single container, or should I plant them separately?
Yes, you can grow multiple loofah plants in a single container as long as it’s large enough (at least 3-4 feet deep) and has good air circulation. This will help prevent fungal diseases that thrive in moist environments.
How do I know when my loofah plant is ready to be harvested?
Signs of readiness include the gourds turning yellow or orange, and the rind becoming dry and brittle. The stems should also begin to turn brown and wither away from the plant. Harvest your loofah plants carefully to avoid damaging the delicate skin around the stem.