Starting seeds indoors can be a game-changer for any gardener, especially those just beginning their green thumb journey. Not only does it give you a head start on the growing season, but it also allows you to control the environment and ensure optimal conditions for your young seedlings to thrive. With the right equipment and techniques, starting seeds indoors can be a seamless process.
In this article, we’ll walk you through the benefits of indoor seed starting, from extended growing seasons to reduced transplant shock. We’ll cover the essential equipment you’ll need, including seed trays, grow lights, and warmth sources. You’ll also learn how to select the right seeds for your climate and region, and get tips on providing the best care for your young plants as they transition from indoor to outdoor environments. By following our comprehensive guide, you’ll be well on your way to successful indoor seed starting.
Understanding the Benefits of Indoor Seed Starting
As you start experimenting with indoor seed starting, it’s essential to understand the benefits that make this process a valuable skill for any gardener, from improved germination rates to space-saving potential. Let’s explore these advantages up close!
Why Start Seeds Indoors?
Starting seeds indoors offers numerous benefits that can significantly improve your chances of success as a beginner gardener. One of the most significant advantages is improved germination rates. By starting seeds indoors, you can provide them with optimal conditions for growth, such as precise temperature control and consistent moisture levels. This leads to higher germination rates compared to direct sowing in the garden.
Another benefit of indoor seed starting is reduced risk of pests and diseases. When seeds are started indoors, they are protected from common garden pests like slugs, snails, and aphids that can decimate a young plant’s chances of survival. Additionally, indoor growing conditions allow you to control the environment, reducing the risk of diseases that thrive in moist environments.
By starting seeds indoors, you also gain increased control over growing conditions, such as light exposure and temperature fluctuations. This means you can provide your seedlings with exactly what they need to develop strong root systems and establish themselves before being transplanted outside.
Choosing the Right Time to Start Seeds
When it comes to starting seeds indoors, timing is everything. You want to give those little sprouts the best possible start in life, and that means paying attention to the weather, temperature, and daylight hours outside.
In general, it’s best to start seeds indoors 4-6 weeks before the last frost date for your area. This allows you to get a head start on the growing season and gives your seedlings a chance to mature before being transplanted outdoors. However, if you’re starting seeds in a warm climate or in an area with mild winters, you may be able to start them even earlier.
To determine when it’s best to start your seeds indoors, check the average temperature for your area on the last day of February and March. If it’s below 40°F (4°C), it’s likely too early to start most vegetables and flowers. But if it’s above 50°F (10°C), you can go ahead and get started.
Remember, some seeds are more sensitive to cold temperatures than others. For example, lettuce, spinach, and peas can be started as early as 2-3 weeks before the last frost date, while warm-season crops like tomatoes and peppers should wait until it’s safely above 60°F (15°C) outside.
Preparing Your Space for Seed Starting
Before you start sowing those seeds, let’s get your indoor space ready to provide them with the perfect conditions for growth and success. This includes clearing clutter and setting up your workspace.
Setting Up a Seed Starting Station
When setting up an indoor seed starting station, it’s essential to have the right equipment and materials. First, you’ll need a good quality grow light that provides sufficient spectrum for plant growth. There are various options available, including LED, fluorescent, and incandescent lights. For a beginner, an LED grow light is a great option as it’s energy-efficient and produces minimal heat.
In addition to grow lights, you’ll also need a heat mat or propagation tray with built-in heating elements. This will help maintain the optimal temperature of around 75-85°F (24-29°C) for seed germination. Some popular options include Seed Starting Trays by Pro-Mix or Growers Supply Company’s Propagation Trays.
Propagation trays can be reused multiple times, making them an economical option. They come in various sizes, ranging from small seed starting cells to larger trays that can accommodate several dozen seeds at once. To keep your station organized, consider investing in a cart or shelving unit specifically designed for indoor gardening. This will help you maximize space and keep all your equipment within easy reach.
When selecting grow lights, be sure to consider the size of your growing area and the type of plants you plan to start. A general rule of thumb is to provide 2-4 watts of light per square foot of growing space.
Optimizing Lighting and Temperature Conditions
When it comes to seed starting, creating optimal lighting and temperature conditions is crucial for healthy growth. Seedlings need a specific amount of light to undergo photosynthesis, which fuels their development.
To provide the right amount of light, you can use various types of light sources. LED grow lights are an excellent option as they emit minimal heat and consume less energy compared to traditional incandescent bulbs. You can also utilize natural light by placing your seedlings near a sunny window. However, be cautious not to overexpose them to direct sunlight, which can cause scorching.
Maintaining a consistent temperature is equally important. Most seeds germinate between 65°F to 75°F (18°C to 24°C). Keep the temperature stable by placing the seed starting tray away from heating vents and radiators. You can also use a thermometer to monitor the temperature and adjust as necessary. Some popular varieties, like tomatoes, prefer warmer temperatures around 70°F to 80°F (21°C to 27°C), while others, such as lettuce, thrive in cooler conditions between 60°F to 65°F (16°C to 18°C).
Selecting the Right Seeds for Indoor Starting
When it comes to starting seeds indoors, choosing the right seeds is crucial for a successful outcome. In this section, we’ll guide you through selecting the best seeds for indoor starting.
Choosing Varieties Suitable for Indoor Growing
When it comes to starting seeds indoors, selecting varieties that are well-suited for indoor growing is crucial. This means considering factors such as maturity dates, growth habits, and space requirements.
For example, some vegetables like tomatoes and peppers require a long season to mature and can grow quite large, making them challenging to accommodate in an indoor setting. In contrast, compact or dwarf varieties of these same plants are specifically bred for container growing and will thrive indoors with minimal space.
To choose the right variety, check the seed package or consult online resources for information on maturity dates and growth habits. Also, consider the amount of light and temperature control available in your indoor growing space. Some seeds can tolerate low light conditions while others require direct sunlight to photosynthesize properly.
When shopping for seeds, look for descriptions that mention ” compact,” “dwarf,” or “bush” varieties, as these are often specifically designed for indoor growing. With a little research and planning, you can select the perfect variety for your indoor seed starting project.
Understanding Seed Packages and Labels
When it comes to selecting the right seeds for indoor starting, understanding what’s on the seed package and label is crucial. Let’s take a closer look at what you need to know.
First, let’s talk about germination rates. This refers to how many seeds will successfully sprout out of a given number of seeds. Look for a percentage or a “guaranteed germination rate” claim on the seed package. A higher rate usually indicates a healthier and more robust seed stock. For example, if a package claims 80% germination, this means that at least 8 out of every 10 seeds should sprout.
Another important detail is the number of days to maturity (DTM). This tells you how many days it’ll take for your seedlings to reach full maturity from sowing. Be sure to choose a variety with a DTM that matches your growing season and desired harvest date. Some seed packages may also list additional information, such as ideal temperature ranges, soil pH requirements, or specific light conditions needed for germination. Take note of these details to ensure you provide the best possible start for your seeds.
When reading labels, also look out for any unique growing instructions or recommendations. Some varieties may require special care, like vernalization (exposure to cooler temperatures) or pinching off seedlings at a certain stage. Pay attention to these details and adjust your care routine accordingly to give your seeds the best chance of success.
Lastly, be aware that some seed packages might contain misleading claims or exaggerated promises. Be cautious of “super-high-yielding” varieties that sound too good to be true. Verify information through reputable sources, such as gardening forums or extension services, if you’re unsure about a particular claim.
To sum it up, when reading seed packages and labels, keep an eye out for germination rates, days to maturity, and special growing instructions. By understanding what’s on the label, you’ll be better equipped to provide your seeds with the right conditions to thrive. Remember to verify information and don’t fall prey to exaggerated claims – this will help ensure a successful indoor starting experience from start to finish.
Preparing Seeds for Planting
Before you can start planting those seeds, let’s make sure they’re properly prepared to thrive. This is where the process of seed stratification and soaking comes into play.
Soaking and Scarifying Seeds
Soaking and scarifying seeds are crucial steps to enhance germination rates. Soaking involves rehydrating dry seeds, while scarifying involves making small scratches on the seed coat to help it absorb water more efficiently.
Start by checking the seed package for specific soaking instructions. Some seeds, like those from beans or peas, can be soaked overnight in water. Others, such as tomatoes and peppers, may require only 30 minutes to an hour. As a general rule, soak seeds in room temperature water for the recommended time frame.
To scarify seeds, use a nail file or fine-grit sandpaper to gently scratch the seed coat. Start with light pressure and gradually increase as needed. This process helps to break down any physical barriers that might prevent water from entering the seed. Be cautious not to damage the seed itself during this process. Practice makes perfect – it’s better to start with a few seeds and experiment before moving on to larger quantities.
Some seeds, such as those with hard coats like squash or melons, may require more aggressive scarification. In these cases, use a file to make deeper scratches. Always dry the seeds thoroughly after soaking and scarifying to prevent fungal growth and promote healthy germination.
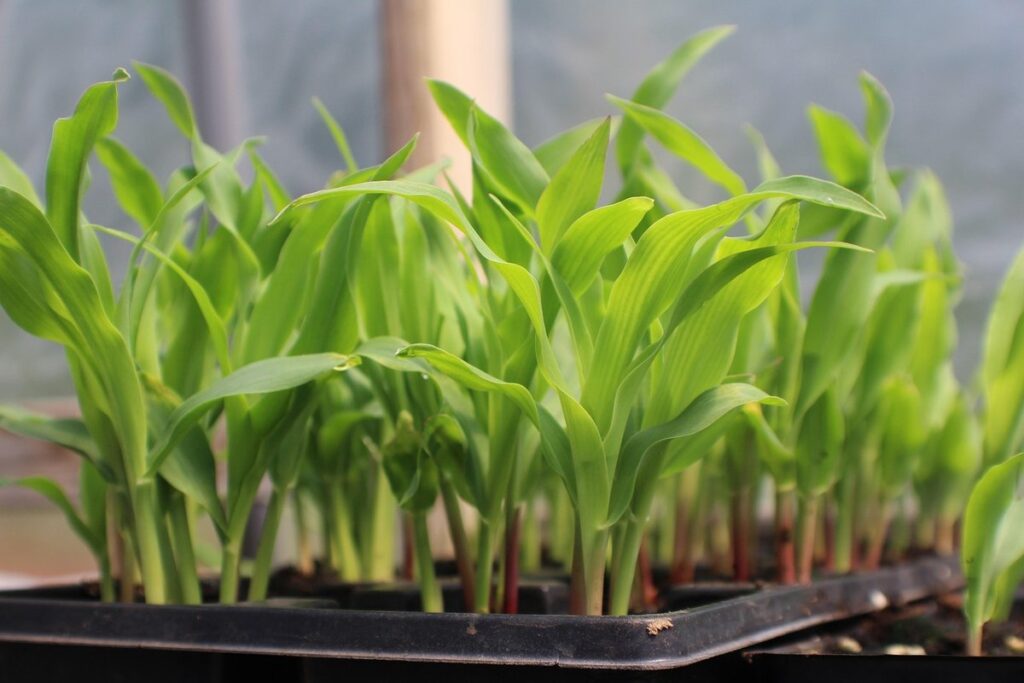
Sowing Seeds in Seed Starting Mix
When sowing seeds in seed starting mix, it’s essential to follow best practices for optimal germination and growth. To begin, gently fill a cell pack or pot with moistened seed starting mix, leaving about 1/4 inch of space at the top. Next, place one or two seeds (depending on the variety) onto the surface, depending on their size and spacing requirements.
For most small seeds like lettuce, herbs, and tomatoes, sow them 1-2 mm deep. Larger seeds, such as peas and beans, can be sown 2-3 cm deeper. It’s crucial to follow specific seed packaging guidelines for precise depth recommendations. Cover the seeds with a thin layer of mix, usually about 1/8 inch or less.
For even germination, press the mix gently over the seeds to ensure good contact. Water the mix thoroughly after sowing and keep it consistently moist during the first few weeks after planting. Avoid compacting the mix too much, as this can prevent proper drainage and root growth.
Caring for Your Indoor Seedlings
Now that you’ve successfully germinated your seeds, it’s time to give them the care they need to thrive as they continue to grow indoors. This is where proper watering, lighting, and temperature control come into play.
Watering and Humidity Control
Watering and humidity control are crucial aspects of caring for indoor seedlings. It’s essential to strike the right balance between keeping the soil moist and preventing overwatering, which can lead to root rot and other problems.
A moisture meter is an invaluable tool for monitoring soil moisture levels. You can place it in the soil to get an accurate reading, usually between 1-10, with higher numbers indicating drier conditions. This device helps you make informed decisions about watering your seedlings. For example, if the reading shows a high level of dryness (above 7), it’s time for a thorough watering session.
To maintain optimal humidity levels, create a humid microclimate around your seedlings by placing the pot on a tray filled with water and pebbles or using a cloche. This setup helps retain moisture in the air, creating an environment similar to that of a greenhouse. For instance, keeping the humidity level above 50% will help prevent seedlings from drying out quickly. Remember to check the moisture meter regularly and adjust your watering schedule accordingly to ensure healthy growth.
Monitoring for Pests and Diseases
As your seedlings grow indoors, it’s essential to keep an eye out for pests and diseases that can quickly take hold. Common culprits include aphids, whiteflies, spider mites, and mealybugs, which can be identified by their distinctive shapes and behaviors. Aphids, for example, appear as small, soft-bodied insects on the undersides of leaves or stems, while whiteflies are tiny, flying insects that feed on sap.
Diseases like root rot, leaf spot, and powdery mildew can also affect your seedlings. Root rot is characterized by yellowing or droopy leaves, which may indicate overwatering. Leaf spot appears as small, circular lesions on the surface of leaves, while powdery mildew looks like a white, powdery coating on leaves.
To control pests and diseases, use a combination of physical barriers, organic pest control methods, and good hygiene practices. For example, cover your seedlings with fine-mesh row covers to keep aphids and other insects away. Spray neem oil or insecticidal soap to control infestations. Regularly inspect your plants for signs of disease, and remove any affected leaves to prevent the spread.
When watering, make sure not to overwater, as this can exacerbate root rot and other diseases. Use a well-draining potting mix and water at room temperature, rather than cold water that can shock the roots. By staying vigilant and taking preventative measures, you can keep your indoor seedlings healthy and thriving.
Transplanting Seedlings Outdoors
Now that your seedlings have outgrown their indoor space, it’s time to transfer them outside where they can get some fresh air and sunlight. This is a delicate process, but don’t worry, we’ve got you covered!
Hardening Off Seedlings
Hardening off seedlings is an essential step to ensure their survival when moving them outdoors. This process helps to acclimate your seedlings to outdoor conditions, gradually exposing them to sunlight, wind, and cooler temperatures. Start by moving your seedlings to a shaded area outside for 1-2 hours a day, increasing the duration over the course of 7-10 days.
Next, introduce your seedlings to direct sunlight, beginning with partial sun exposure and gradually increasing the intensity. Be cautious not to expose them to extreme heat or intense sunlight, which can cause scorching or dehydration. You can also simulate wind by placing a fan nearby or gently blowing on the leaves to toughen them up.
As you progress, move your seedlings to an unheated area outdoors, such as a garage or covered patio, for 2-3 hours a day. This will help them adjust to cooler temperatures and prepare them for the transition to their final outdoor location. Keep in mind that some plants, like tomatoes and peppers, require more extensive hardening off due to their sensitivity to temperature fluctuations.
Planting Seedlings in Outdoor Conditions
When it’s time to transplant seedlings outdoors, make sure you’re preparing them for success. Start by choosing a location with plenty of sunlight and well-draining soil. If your outdoor area has poor drainage, consider installing a French drain or raised bed.
As you prepare the soil, keep in mind that seedlings are sensitive to shock. Avoid tilling or digging too deeply, as this can disrupt their root systems. Instead, use a garden fork to gently loosen the top 6-8 inches of soil. This will help create an easy transition for your seedlings’ roots.
When planting, space them according to their mature size. For example, if you’re planting tomatoes or peppers, give each plant about 18-24 inches of space. This allows for proper growth and minimizes competition for resources. Water thoroughly after transplanting and keep the soil consistently moist during the first few weeks.
Monitor your seedlings closely for signs of stress or pests. Adjust watering schedules as needed to prevent overwatering, which can be detrimental to young plants. With proper care, your seedlings will quickly adapt to their new outdoor environment and thrive in the sunshine.
Frequently Asked Questions
Can I start seeds indoors if my climate has limited daylight during the growing season?
Yes, you can still successfully start seeds indoors with limited daylight. This method is ideal for regions with short days or harsh winters. By providing supplemental lighting and maintaining optimal temperatures, you can promote healthy growth even in low-light conditions.
How long does it take to see germination results after sowing seeds indoors?
Germination times vary depending on the type of seed and growing conditions. Generally, you can expect to see signs of germination within 7-14 days for most seeds. Keep the soil consistently moist during this period, and maintain a temperature range of 65-75°F (18-24°C) for optimal results.
What happens if my seedlings become too leggy or stretched out from inadequate light?
If your seedlings are becoming too leggy or stretched out due to insufficient light, you can try using sheer curtains or shade cloth to filter the intense indoor lighting. Alternatively, consider relocating the seed starting station to a brighter area or investing in more powerful grow lights.
Can I reuse seed starting mix for multiple plantings?
No, it’s not recommended to reuse seed starting mix for subsequent plantings. The mix can become depleted of nutrients and may harbor diseases from previous crops. Instead, purchase fresh seed starting mix specifically designed for indoor seeding, which will provide optimal support for your young plants.
How do I prevent overwatering when caring for my indoor seedlings?
To prevent overwatering, check the soil moisture by sticking your finger into the soil up to the first knuckle. Water only when the top inch of soil feels dry to the touch. Also, ensure good air circulation around the seedlings and maintain a consistent watering schedule to avoid creating an environment conducive to root rot and other issues.