Are you ready to brighten up your garden with some sunshine? Yellow daylilies are a stunning addition to any outdoor space, offering vibrant blooms that can add warmth and personality to your landscape. But with so many varieties to choose from, it can be overwhelming to decide which ones will thrive in your yard. In this article, we’ll help you discover the best yellow daylily varieties, sharing expert advice on how to grow and care for them. We’ll also provide inspiring design ideas to take your garden’s beauty to the next level. Whether you’re a seasoned gardener or just starting out, our guide will walk you through everything you need to know about these gorgeous flowers – from selecting the perfect variety to showcasing their blooms in a way that shines.
Introduction to Yellow Daylilies
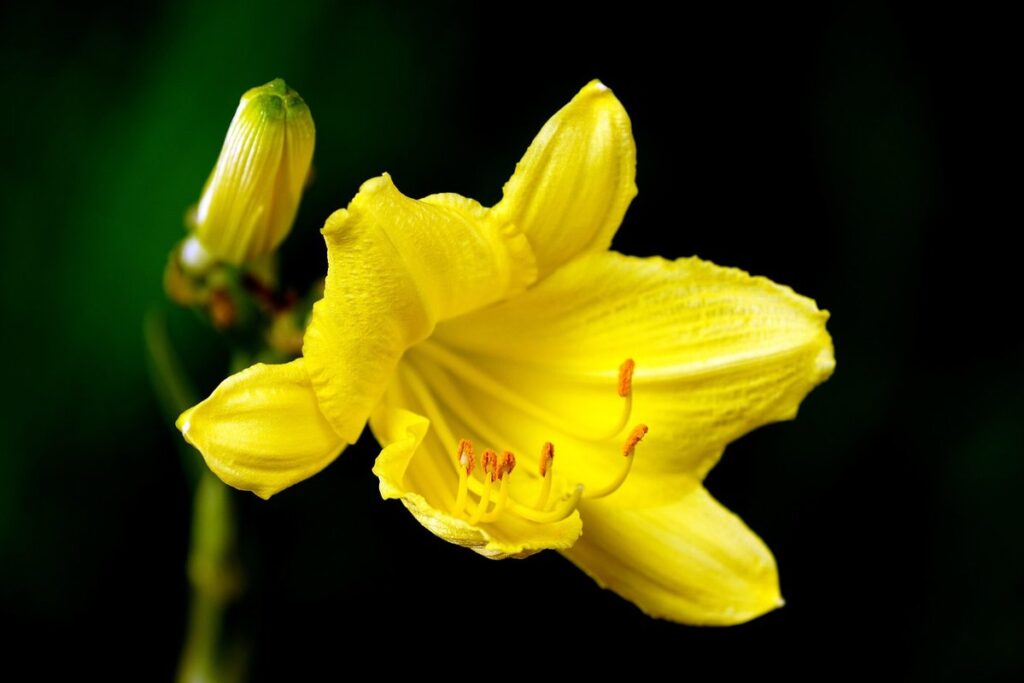
Let’s start by exploring one of the most iconic and beloved types of daylilies: those with bright, sunny yellow blooms. We’ll introduce you to some of our favorite varieties that are sure to shine in your garden.
What are Daylilies?
Daylilies are one of the most beloved and versatile flowering plants among gardeners. Their popularity stems from their ease of growth, adaptability to various environments, and stunning beauty. But have you ever wondered where these gorgeous flowers came from? Daylilies have a rich history dating back over 1,000 years, originating in Asia and introduced to Europe by the Romans.
They quickly gained popularity among gardeners for their unique characteristics – long-lasting blooms that can last up to two months, low maintenance requirements, and ability to thrive in challenging conditions. As a result, daylilies have become a staple in gardens worldwide, with over 80,000 registered varieties according to the American Daylily Society.
In terms of popularity, daylilies are often referred to as “perennial powerhouses” due to their high growth rates and ability to naturalize quickly. This means they can form dense clumps that spread rapidly, making them an excellent choice for gardeners who want a low-fuss yet eye-catching addition to their landscape.
Benefits of Growing Yellow Daylilies
Growing yellow daylilies in your garden can bring a plethora of benefits that make them an ideal choice for many gardeners. Not only do they add a pop of vibrant color to your outdoor space, but they’re also incredibly low-maintenance and adaptable. When it comes to visual appeal, yellow daylilies are a standout option due to their bright, sunny blooms that can brighten up any corner of your yard.
One of the most significant advantages of growing yellow daylilies is their ability to thrive in a variety of conditions. They’re perfect for gardeners with busy schedules or those who tend to forget to water their plants regularly – they can survive with minimal care and still produce beautiful blooms. Plus, they’re relatively pest- and disease-free, making them an excellent choice for gardeners who want to minimize maintenance.
In addition to their low-maintenance requirements, yellow daylilies are also incredibly versatile. They can be grown in containers or directly in the ground, making them a great option for gardeners with limited space. And, because they come in a range of sizes and growth habits, you can choose the perfect variety to suit your specific needs. Whether you’re looking for a compact, blooming machine or a statement piece to anchor your garden, yellow daylilies have got you covered!
Popular Yellow Daylily Varieties
When it comes to selecting the perfect yellow daylily for your garden, you’ve got a wealth of options to choose from. Let’s explore some popular varieties that are sure to catch your eye.
1. Stella de Oro: A Classic Choice
Stella de Oro is one of the most popular and sought-after yellow daylily varieties. This award-winning cultivar was introduced in 1973 by Robert Stein and has since become a staple in many gardens. One of its standout characteristics is its unique growth habit, producing a dense cluster of bright golden-yellow flowers with a sweet fragrance that attracts pollinators.
Stella de Oro grows to be around 24-30 inches tall, making it an excellent choice for hedges or borders. Its foliage is a deep green color and is relatively narrow in shape. This variety prefers full sun to partial shade and well-drained soil, which makes it suitable for a wide range of garden conditions.
As one of the most heat-tolerant daylily varieties, Stella de Oro performs exceptionally well in warm climates. It’s also an excellent choice for low-maintenance gardens due to its ability to thrive with minimal care. If you’re looking to add some vibrant color and structure to your garden, consider incorporating Stella de Oro into your landscape design.
2. Comet’s Tail: A Unique Variety
Comet’s Tail is a unique and stunning yellow daylily variety that has gained popularity among gardeners and enthusiasts. This variety boasts vibrant golden-yellow flowers with ruffled edges and a subtle green throat, adding an extra layer of visual interest to the plant.
In terms of growth habits, Comet’s Tail is known for its compact size, reaching heights of around 24-30 inches, making it an ideal choice for smaller gardens or containers. It also has a relatively slow growth rate, which allows it to maintain a neat and tidy appearance throughout the growing season.
Comet’s Tail can be used in a variety of garden settings, from modern to traditional landscapes. Its compact size makes it perfect for edging or as a specimen plant in a small garden bed. Additionally, its bright yellow color provides a beautiful contrast to other flowers and foliage, making it an excellent choice for adding some visual excitement to your garden.
When growing Comet’s Tail, be sure to provide it with full sun (at least 6 hours of direct sunlight) and well-draining soil to ensure optimal blooming. With proper care, this variety can produce multiple blooms throughout the summer months, providing a continuous display of vibrant yellow flowers.
3. Happy Returns: A Bright Yellow Option
Happy Returns is a bright yellow daylily variety that has captured the hearts of many gardeners. This stunning plant boasts vibrant, buttery-yellow blooms with a subtle sheen, which make it a standout in any garden setting. Its unique characteristics and growth habits set it apart from other varieties.
When growing Happy Returns, you can expect an upright habit with a mature height of around 24-30 inches and a spread of approximately 18-24 inches. This plant is relatively compact, making it perfect for smaller gardens or containers. It thrives in full sun to partial shade and requires well-drained soil to prevent waterlogged conditions.
One of the standout features of Happy Returns is its reblooming nature. As the name suggests, this daylily variety returns with new blooms throughout the growing season, providing extended periods of color. This trait makes it an excellent choice for gardeners who want a low-maintenance yet dynamic addition to their garden landscape.
Growing Tips for Yellow Daylilies
To get the most out of your yellow daylily blooms, you’ll want to learn how to grow them in a way that maximizes their natural beauty and resilience. Here are some expert tips for nurturing your sunny flowers.
Soil and Sun Requirements
When it comes to growing yellow daylilies, providing them with the right soil and sun conditions is crucial for their health and blooming success. As a general rule of thumb, yellow daylilies prefer well-draining soil that is rich in organic matter. This can be achieved by mixing in compost or well-rotted manure into the soil before planting. A pH range of 6.0 to 7.0 is also ideal for these plants.
In terms of sun exposure, yellow daylilies require full sun to partial shade. They can tolerate a wide range of sunlight conditions, but the more sun they receive, the more blooms they will produce. Aim for at least six hours of direct sunlight per day for optimal results. Water your yellow daylilies regularly during their first year of growth, providing about 1 inch of water per week. Established plants are relatively drought-tolerant and require less watering.
Be mindful that soil pH can affect the availability of nutrients in the soil, so ensure you’re not over- or under-fertilizing based on your soil’s pH level. Also, keep an eye out for signs of nutrient deficiencies, such as yellowing leaves or stunted growth, which may indicate a need to adjust your fertilization schedule.
Planting and Care Instructions
When planting and caring for your yellow daylilies, it’s essential to follow some key steps to ensure they thrive. First, choose a location with full sun to partial shade, as most yellow daylily varieties require at least six hours of direct sunlight per day.
Dig a hole that is twice as wide and just as deep as the plant’s root ball. Gently remove the daylily from its pot and place it in the hole. Backfill the soil with a mix of compost and well-draining garden soil, making sure to firm the soil around the roots. Water thoroughly after planting.
When transplanting mature daylilies, dig up the entire clump, gently separating the tubers. Replant the largest tuber as the new center, spreading the remaining ones evenly around it. Water well and keep the soil consistently moist during the first growing season.
Fertilize your yellow daylilies in early spring with a balanced, slow-release fertilizer. Deadheading spent flowers will encourage more blooms throughout the summer months. Avoid overwatering, which can lead to root rot and other problems. By following these simple steps, you’ll be on your way to enjoying vibrant, healthy yellow daylilies all season long.
Companion Planting with Yellow Daylilies
When it comes to adding some extra flair to your garden, companion planting is a fantastic way to enhance your yellow daylily blooms. Let’s explore which plants pair beautifully with these sunny flowers.
1. Combining with Perennials and Annuals
When combining yellow daylilies with perennials and annuals, it’s essential to consider the color palette, texture, and growth habits of both plants. This will create a visually appealing and harmonious garden display. For instance, pair yellow daylilies with blue delphiniums or purple coneflowers to create a stunning contrast in colors.
If you prefer to incorporate more neutral-toned companion plants, consider combining yellow daylilies with ornamental grasses like pampas grass or fountain grass. These add texture and movement to the garden while not competing with the vibrant blooms of the daylily.
When selecting annuals, choose those that thrive in the same growing conditions as your yellow daylilies. For example, if you’re planting a low-maintenance variety like ‘Stella de Oro’, pair it with heat-tolerant annuals such as zinnias or marigolds. This will ensure both plants receive similar care and won’t require extensive watering or fertilization.
Remember to also consider the mature size of your companion plants, ensuring they won’t overcrowd or overshadow the yellow daylily.
2. Using as a Focal Point
When using yellow daylilies as a focal point in garden designs, it’s essential to play up their stunning blooms and architectural foliage. One of the most effective ways to do this is by grouping them together with other plants that complement their vibrant yellow hue.
Consider pairing yellow daylilies with deep blue or purple flowers like delphiniums, lupines, or irises, which will create a striking contrast against the bright yellow blooms. This color combination not only adds visual interest but also creates a cohesive look in your garden design.
Alternatively, you can use the foliage of the daylily as a focal point by placing it near the front of the garden bed and using the flowers to frame it. For example, plant a few clumps of yellow daylilies near the entrance of your garden, then add some bold, dark-leaved plants like coleus or elephant ears behind them.
To maximize the impact of your yellow daylily focal point, don’t be afraid to prune nearby plants to allow its blooms and foliage to take center stage.
Pest and Disease Management for Yellow Daylilies
To keep your beautiful yellow daylilies thriving, you’ll want to know how to identify and manage common pests and diseases that can affect their health. We’ve got you covered with some essential tips and advice.
Common Pests Affecting Yellow Daylilies
As a daylily gardener, you may encounter common pests that can cause damage to your beautiful yellow blooms. Aphids, spider mites, and slugs are three of the most prevalent pests that affect yellow daylilies.
Aphids are small, soft-bodied insects that feed on plant sap, causing curled or distorted leaves. They reproduce quickly, so it’s essential to control them early on. To get rid of aphids, spray your plants with a strong jet of water to dislodge them, and then apply neem oil or insecticidal soap according to the product’s instructions.
Spider mites are tiny, spider-like insects that spin webs on plant leaves. They suck sap, causing yellowing or bronzing of the foliage. To control spider mites, use a miticide spray specifically designed for this pest, and make sure to treat all infested plants thoroughly.
Slugs are nocturnal pests that feed on leaves, stems, and flowers at night. They leave behind a silvery trail of slime as they move through your garden. To prevent slug damage, hand-picking is an effective method, especially in the early morning when slugs are most active. You can also use copper barriers or crushed eggshells to deter them from crossing over.
Regularly inspecting your plants and using integrated pest management techniques will help you keep these pests under control.
Common Diseases Affecting Yellow Daylilies
As you care for your yellow daylilies, it’s essential to be aware of the common diseases that can affect these beautiful flowers. One of the most significant threats is root rot, caused by a fungal infection that thrives in waterlogged soil. Symptoms include soft, mushy stems and leaves that turn yellow or brown.
To prevent root rot, ensure your daylilies have well-draining soil and adequate air circulation around the plants. Water them carefully, avoiding overwatering during periods of heavy rainfall or irrigation. For existing infections, treat with fungicides according to package instructions.
Powdery mildew and leaf spot are other common diseases affecting yellow daylilies. Powdery mildew appears as a white, powdery coating on leaves and stems, while leaf spot causes small, circular lesions that can lead to defoliation if left untreated. Regularly inspect your plants for these signs, and treat promptly with fungicides or remove infected areas.
By being vigilant about disease prevention and quick to address any issues, you’ll help ensure your yellow daylilies remain healthy and thrive in your garden.
Design Ideas Featuring Yellow Daylilies
Whether you’re a seasoned gardener or just starting out, incorporating yellow daylilies into your garden design can add a burst of sunshine and color. Here are some inspiring ideas to get you started.
1. Mass Plantings and Borders
When it comes to showcasing multiple yellow daylily varieties, mass plantings and borders are an excellent way to create striking displays. By combining different types of daylilies with varying bloom sizes, shapes, and colors, you can achieve a visually appealing effect that adds depth and interest to your garden.
For example, consider planting a mix of ‘Stella de Oro’, ‘Happy Returns’, and ‘Gold Medal’ in a large bed or border. These varieties offer different shades of yellow, from bright and vibrant to soft and pastel, which creates a beautiful contrast when planted together. To add visual interest, alternate the plants by height and bloom time, ensuring that there’s always something in bloom throughout the growing season.
Remember to choose daylilies with similar growing conditions and care requirements to ensure they thrive together. With proper planning and execution, mass plantings can become a focal point in your garden, drawing attention from visitors and creating a lasting impression. By experimenting with different combinations of yellow daylily varieties, you’ll discover the perfect look for your outdoor space.
2. Container Gardening with Yellow Daylilies
Growing yellow daylilies in containers is an excellent way to add a pop of color and vibrancy to small spaces or patios. Since they thrive in well-drained soil and full sun, container gardening provides the perfect conditions for these beautiful flowers.
When choosing a container, select one that’s at least 12-18 inches deep and has drainage holes to prevent waterlogged soil. Use a high-quality potting mix specifically designed for daylilies, as it will help retain moisture but also drain excess water quickly. Place the container in an area with full sun (at least six hours of direct sunlight) and maintain temperatures between 65-75°F (18-24°C).
To use yellow daylilies as a centerpiece, group them together with other complementary plants that add texture and contrast. For example, pair tall daylilies with compact grasses or ferns to create a visually appealing arrangement. Consider adding some seasonal interest by incorporating annual flowers like impatiens or begonias around the base of the daylily container.
By following these simple steps, you can enjoy the stunning beauty of yellow daylilies in your outdoor space, even in small areas with limited room for gardening.
Frequently Asked Questions
How often should I water yellow daylilies?
Water your yellow daylilies when the top inch of soil feels dry to the touch, usually once a week during hot summer months. However, this may vary depending on weather conditions and soil type.
Can I plant yellow daylilies in containers?
Yes! Yellow daylilies can thrive in containers as long as they receive full sun (at least 6 hours of direct sunlight) and have well-draining potting mix. Use a container that’s at least 12-18 inches deep to accommodate the plant’s roots.
How do I prevent pests from affecting my yellow daylilies?
Regularly inspect your plants for signs of aphids, slugs, or snails. Remove any infested sections and treat the affected area with insecticidal soap or neem oil according to package instructions.
Can I grow yellow daylilies in partial shade?
While yellow daylilies can tolerate some shade, they’ll produce fewer blooms and may not achieve their full potential. If you must plant them in partial shade (4-6 hours of direct sunlight), choose a variety that’s known for its tolerance to low light conditions.
How do I divide and replant yellow daylily clumps?
Dig up the entire clump, gently separating the rhizomes with a fork or knife. Trim back any dead or damaged leaves, then plant the separated sections 12-18 inches apart in well-draining soil. Water thoroughly after planting and keep the area consistently moist for the first few weeks.