When it comes to growing microgreens, one crucial aspect is often overlooked: the right container. Choosing the ideal container size can make all the difference in the health and flavor of your harvest. But with so many variables at play – from soil volume to root depth, and nutrient delivery – it’s not just a matter of grabbing any old pot.
In this article, we’ll delve into the world of microgreen containers, exploring what sizes are typically best for different species. We’ll discuss factors like compact growth patterns versus sprawling varieties, and how to maximize yield without sacrificing quality. By the end of this guide, you’ll know exactly which container size is right for your specific microgreens, ensuring a bountiful harvest every time. Whether you’re a seasoned gardener or just starting out, we’ve got you covered.
Understanding Microgreen Requirements
To grow healthy microgreens, you need to provide them with specific requirements, including temperature, humidity, and light control, which we’ll dive into in this next section. Let’s break down these essential needs together.
Container Size Basics
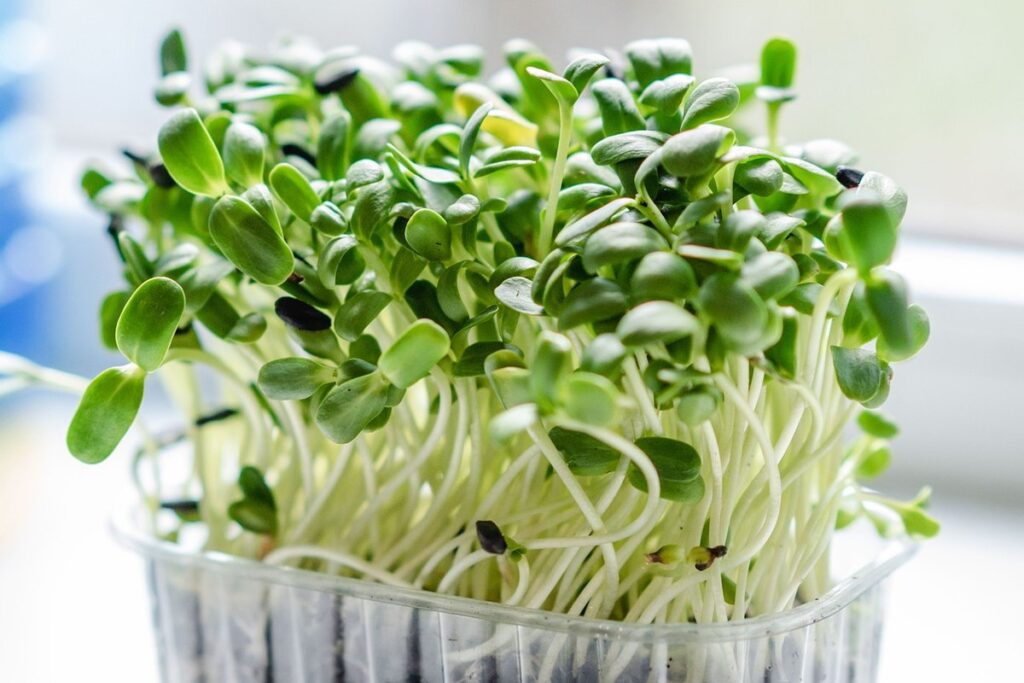
When it comes to growing microgreens, container size is more than just a matter of aesthetics – it’s crucial for optimal plant health. A well-chosen container size will provide the right balance of soil volume, root depth, and nutrient delivery.
To understand why this is important, let’s break down each component. Soil volume affects water retention, which can impact oxygen levels in the roots. If the container is too small, the soil may dry out quickly, causing stress to the young seedlings. Conversely, a larger container ensures that the soil stays moist but not waterlogged.
Root depth is another critical factor, as microgreens need room to develop their taproots without becoming constricted. A general rule of thumb is to choose containers with at least 1-2 inches of clearance between the soil surface and the bottom of the pot. This allows for healthy root growth while preventing the roots from becoming waterlogged.
Nutrient delivery is also crucial, as microgreens require a steady supply of nutrients during their short growth cycle. A larger container provides more room for nutrient-rich growing medium, ensuring that your microgreens get what they need to thrive.
Common Misconceptions about Container Sizes
When it comes to choosing the right container size for microgreens, there are several common misconceptions that can lead to suboptimal growth and yields. One of the most prevalent myths is that bigger is better when it comes to square footage. While having a larger growing space can be beneficial, relying solely on square footage ignores the importance of soil quality and depth.
In reality, microgreens require a specific balance between surface area and soil volume. A container that’s too large may lead to overwatering and root rot, while a container that’s too small can cause roots to become constrained. To give you a better idea, consider this: a 2×4 inch container can support up to 10-12 microgreen plants, but if the soil is too deep or the container is too large, it may only support 6-8 plants.
It’s also essential to consider the type of microgreens you’re growing. For example, radish and pea shoots prefer shallower soil depths, while lettuce and kale can thrive in deeper containers. By choosing the right balance between surface area and soil volume, you’ll be able to optimize your microgreen growth and achieve maximum yields.
Ideal Container Dimensions
When it comes to growing microgreens, choosing the right container size is crucial for optimal growth and yields. This section will help you determine ideal container dimensions for a thriving microgreen crop.
Rectangle vs. Square Containers
When it comes to microgreen cultivation, the shape of the container can significantly impact the growth and health of your greens. Two popular options are rectangular and square containers, each with its own set of benefits and drawbacks.
Rectangular containers offer a more efficient use of space, allowing you to grow multiple rows of microgreens in a single unit. This is ideal for larger operations or those with limited storage space. However, they can be more challenging to handle and transport due to their length and width ratio.
Square containers, on the other hand, provide easier handling and are often preferred by beginners. They offer a more balanced growth environment and are generally less expensive than rectangular options. Despite these advantages, square containers may not utilize space as effectively as rectangles, making them less suitable for large-scale operations.
Consider your specific needs and resources when choosing between rectangular and square containers. If you’re looking to maximize space efficiency and have the means to handle longer containers, a rectangle might be the better choice. However, if ease of handling is a top priority or you’re just starting out, a square container could be the way to go.
Small vs. Large Containers: What’s Best?
When it comes to choosing containers for microgreens, one of the most critical decisions is determining the ideal size. Two popular options are small and large containers, each with its own set of advantages and disadvantages.
Small containers (around 1-2 inches deep) are ideal for starting microgreens, as they allow for optimal root growth and prevent overcrowding. This can be beneficial for beginners or those growing a single variety, as it requires less initial investment in terms of soil and nutrients. However, small containers also have some drawbacks – the yield may be limited due to their compact size, and ongoing maintenance costs might increase if multiple crops are grown in succession.
On the other hand, larger containers (around 4-6 inches deep) offer more space for root development and can lead to higher yields. They also require less frequent watering and provide better soil aeration, which can be beneficial for large-scale or commercial growers. However, initial investment costs will be higher due to the increased amount of soil and nutrients required.
When deciding between small and large containers, consider your specific needs and growing conditions. If you’re just starting out or want to minimize upfront expenses, small containers might be a better fit. Conversely, if you plan to grow multiple crops or have limited time for maintenance, larger containers could provide more flexibility and efficiency in the long run.
Measuring Container Size Effectively
Measuring container size effectively is crucial for microgreen growth, and getting it right will prevent overcrowding and promote healthy development of your greens. Let’s explore how to measure containers like a pro!
Calculating Space per Plant
When growing microgreens, it’s essential to provide each plant with sufficient space to thrive. However, overcrowding can lead to reduced growth rates and compromised quality. To determine the ideal container size for your specific microgreen variety, you’ll need to calculate the space per plant.
Start by researching the recommended spacing for your chosen microgreen species. For example, kale and arugula typically require 1-2 inches of space between each seedling, while cilantro and parsley can be planted as close as 0.5-1 inch apart. To calculate the ideal container size, use the following formula: (desired spacing x number of plants) + 10% for growth room.
For instance, if you’re growing kale with a desired spacing of 2 inches between each seedling, and you plan to plant 12 seeds in a container, your calculation would be: (2 inches x 12 seeds) = 24 inches. Adding 10% for growth room brings the total to approximately 26.4 inches. To accommodate this measurement, choose a container that is at least 8-10 inches wide and deep to ensure healthy microgreen growth.
Key Factors Affecting Yield
When growing microgreens in containers, it’s essential to consider the impact of key factors on yields. Air circulation, light exposure, and nutrient availability can greatly influence the health and productivity of your crop.
Air circulation plays a crucial role in preventing fungal diseases and promoting healthy growth. In larger container sizes (around 2-4 square feet), air circulation is typically better due to increased space between plants. However, if you’re growing microgreens in smaller containers (less than 1 square foot), make sure to provide adequate ventilation through strategic placement or the use of trellises.
Light exposure also affects yields significantly. In general, south-facing windows receive more direct sunlight, while north-facing windows receive filtered light. Microgreens require at least 6 hours of direct light per day for optimal growth. Consider using LED grow lights if natural light is scarce.
Lastly, nutrient availability impacts yields directly. Ensure your containers have sufficient soil depth and quality to provide microgreens with the necessary nutrients. A well-balanced potting mix specifically designed for leafy greens will support healthy root development and promote optimal growth rates.
Popular Container Materials
When it comes to growing microgreens, the type of container you choose is crucial for healthy and optimal growth. Let’s take a look at some popular materials for container gardening.
Plastic vs. Fabric Containers
When it comes to choosing containers for microgreens, one of the most important decisions is selecting a material that balances functionality with sustainability. Two popular options are plastic and fabric containers, each with their own set of benefits and drawbacks.
Plastic containers offer durability and ease of cleaning, making them a convenient choice for large-scale microgreen production. They also provide excellent water retention and can be easily sterilized between uses. However, they contribute to environmental pollution and may harbor pathogens if not properly sanitized. On the other hand, fabric containers are biodegradable, compostable, and gentle on delicate microgreens. They allow for better aeration and drainage, reducing the risk of root rot. However, they can be more challenging to clean and maintain than plastic containers.
Ultimately, the choice between plastic and fabric containers depends on your specific needs and preferences. If you prioritize ease of use and durability, plastic may be the way to go. But if you’re concerned about environmental sustainability and willing to invest a bit more time in maintenance, fabric containers are an excellent option.
Wooden or Biodegradable Options
If you’re looking to create an eco-friendly microgreen growing setup, consider exploring alternative container materials like wood and biodegradable options. These alternatives offer unique benefits that might be worth considering.
Wooden containers, for instance, can add a natural aesthetic to your growing space. They also breathe, allowing for better air circulation around the roots of your microgreens. However, keep in mind that wooden containers may require more maintenance than their plastic counterparts – they’ll need occasional staining or sealing to protect against moisture damage. This increased upkeep can be a drawback for some growers.
Biodegradable options like coconut coir or bamboo containers offer another attractive alternative. These materials are often compostable and contribute less waste to landfills compared to traditional plastics. They’re also surprisingly durable, lasting just as long as plastic containers in many cases. When choosing biodegradable containers, look for products with high-quality certifications like BPI (Biodegradable Products Institute) or Compostable.
Consider the trade-offs between aesthetics, maintenance, and environmental impact when deciding on wooden or biodegradable options. For example, if you’re short on space, a compact bamboo container might be an ideal choice. In contrast, if you prioritize adding a rustic touch to your growing setup, a wooden planter could be the way to go. Ultimately, weigh these factors according to your specific needs and preferences when selecting from these eco-friendly alternatives.
Choosing the Right Container Size Based on Microgreen Species
When growing microgreens, selecting a container that’s too small can lead to overcrowding and reduced yields, so let’s explore which sizes work best for specific species.
Leafy Greens vs. Brassicas
When it comes to growing microgreens, not all species require the same amount of space. Two popular categories, leafy greens and brassicas, have distinct needs that affect recommended container sizes.
Leafy greens like lettuce, kale, and spinach are relatively compact and mature quickly (typically within 1-3 weeks). These fast-growing crops can thrive in smaller containers (around 2-4 inches deep and 6-8 inches wide) with minimal space for root growth. However, it’s essential to provide adequate light and ensure good air circulation to prevent fungal diseases.
On the other hand, brassicas like broccoli, cauliflower, and cabbage require more room to grow. Their roots are coarser and spread out further than those of leafy greens. For optimal growth, consider using larger containers (around 4-6 inches deep and 8-12 inches wide) that allow for better root development. This increased space also promotes healthier plants with less chance of overcrowding.
Keep in mind that these are general guidelines, and specific varieties within each category may have varying requirements. Always research the specific needs of your chosen microgreen species to ensure you provide the best possible conditions for optimal growth.
Root Depth Requirements
When it comes to choosing the right container size for microgreens, another crucial factor to consider is their root depth requirements. Different varieties of microgreens have varying levels of root growth, which can significantly impact their overall health and productivity.
For instance, dense-rooting varieties like radish, arugula, and lettuce require more spacious containers to accommodate their extensive root systems. These varieties need a minimum of 1-2 inches (2.5-5 cm) of soil depth to develop a robust root system. On the other hand, compact-rooting varieties like pea shoots and purslane can thrive in shallower containers with as little as 0.5-1 inch (1.3-2.5 cm) of soil.
To determine the ideal container size for your microgreen variety, consider the mature leaf width of the plant and the desired harvest period. A general rule of thumb is to provide at least twice the depth of the mature leaves in soil depth. This ensures that the roots have enough room to grow without becoming constricted.
Maintaining Healthy Microgreens in Large Containers
When growing microgreens in large containers, it’s essential to maintain optimal conditions for healthy growth. This section covers tips and tricks for keeping your microgreen crop thriving in bigger containers.
Water Management
Water management is crucial when growing microgreens in large containers. As your crop size increases, so does its water requirements. However, overwatering can be detrimental to the health of your plants. To efficiently manage water for your microgreens, consider implementing drip irrigation systems. These systems deliver water directly to the roots of the plants, reducing evaporation and runoff.
Another essential technique is monitoring moisture levels in the soil. Use a moisture meter or stick your finger into the soil up to the first knuckle. If the soil feels dry, it’s time for watering. But if it’s still damp, wait another day before checking again. This approach will help you avoid overwatering and ensure consistent soil moisture.
Regularly inspect your containers for signs of waterlogging or drought stress. Adjust your irrigation schedule accordingly to prevent these issues from occurring. By employing drip irrigation and monitoring moisture levels, you’ll be able to maintain optimal water conditions for healthy microgreen growth in large containers.
Fertilization Strategies
When it comes to maintaining healthy microgreens in larger containers, fertilization is a crucial aspect that requires careful consideration. One of the primary concerns with large container cultivation is nutrient delivery – ensuring that your microgreens receive the necessary nutrients for optimal growth.
To address this concern, you can implement a nutrient delivery system such as drip irrigation or fertigation. Drip irrigation involves delivering water and nutrients directly to the roots of the plants, reducing waste and runoff. Fertigation, on the other hand, is a more sophisticated method that injects fertilizers into the irrigation system for precise dosing.
In addition to these methods, it’s essential to monitor nutrient levels regularly to avoid over-fertilization – a common pitfall when using larger containers. Over-fertilizing can lead to wasted nutrients, increased water consumption, and even harm your microgreens. To prevent this, test your soil regularly and adjust your fertilization schedule accordingly.
Some great examples of nutrient-rich fertilizers for microgreens include fish emulsion and compost tea. These natural solutions are not only effective but also environmentally friendly. When used in conjunction with a proper nutrient delivery system and regular monitoring, you’ll be well on your way to cultivating healthy microgreens in large containers.
Frequently Asked Questions
What is the minimum container size I can use for growing microgreens, even if it’s just a small batch?
The smallest container size you can effectively use for growing microgreens depends on several factors, including the type of microgreen and your desired yield. Typically, you’ll want to start with a container that’s at least 2-3 inches deep to accommodate root growth, but for extremely compact varieties like salad mix or radish greens, you might get away with as little as 1 inch in depth.
Can I use containers of varying sizes if I’m growing multiple microgreen species together?
Yes. In fact, this is a common practice among experienced growers, especially when working with different leafy green and brassica varieties that have distinct growth patterns. By using multiple container sizes, you can tailor your setup to the specific needs of each microgreen type. This approach also allows for greater flexibility in terms of layout and nutrient management.
How do I decide between a rectangular or square-shaped container when growing microgreens?
When choosing between a rectangular and square-shaped container, consider the growth habits of your microgreen species. For example, compact varieties like pea shoots or sunflower greens might thrive in a square container with plenty of depth for root development. Conversely, sprawling types like kale or arugula often benefit from wider, shallower containers that allow their stems to spread out.
What are some key factors I should consider when measuring the space required per plant?
To calculate space requirements effectively, focus on the mature size of your microgreen plants. This includes leaf span and stem height, as well as any necessary spacing for easy harvesting and air circulation. A good rule of thumb is to allocate at least 1-2 inches between each plant, depending on its growth habits.
Can I repurpose other containers or materials for growing microgreens, like old plastic bottles or fabric bags?
Yes, you can indeed get creative with container materials when growing microgreens! For example, old plastic bottles (like a 2-liter soda bottle) make excellent mini-greenhouses that provide excellent insulation and support. Similarly, breathable fabrics like cotton or mesh bags are great for creating a humid environment without the risk of root rot. Just be sure to clean and sterilize any repurposed materials thoroughly before use.