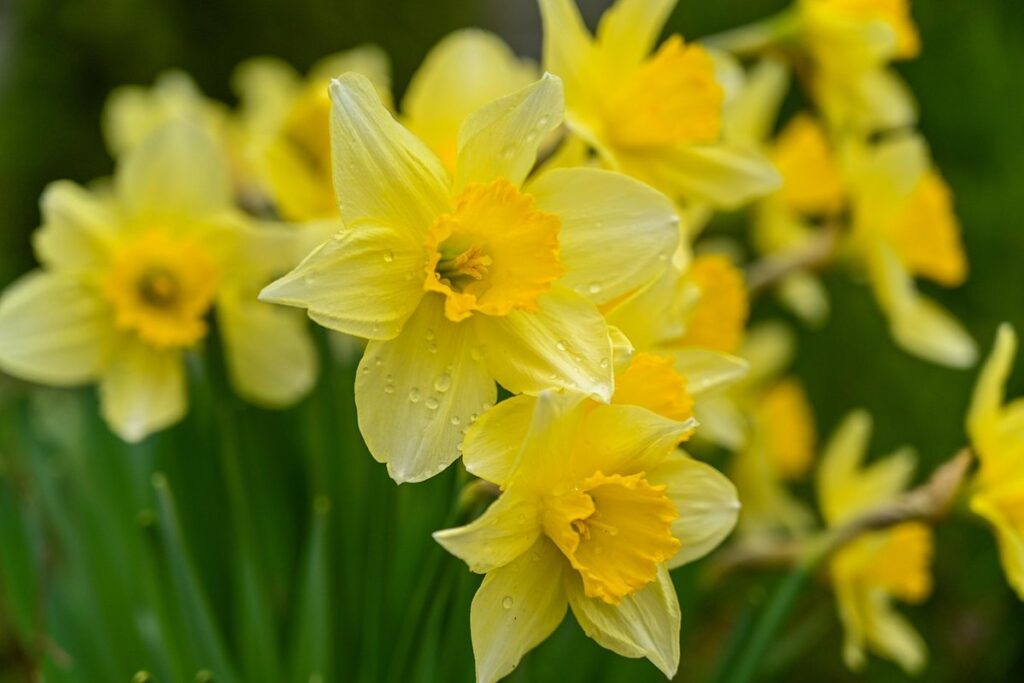
Spring is in full bloom, and your daffodils are shining brightly with vibrant colors. But as the blooms start to fade, many gardeners wonder: what’s next? How do I care for my daffodils after they finish blooming to ensure they come back strong year after year? It’s a common concern, but one that’s easily addressed with some simple expert tips. In this article, we’ll delve into the world of post-bloom daffodil care, covering essential tasks like removing dead flowers, fertilizing, and mulching. By following these steps, you can improve your spring bulbs’ health, promote stunning blooms, and enjoy a dazzling display of color in your garden season after season. Whether you’re a seasoned gardener or just starting out, this advice will help you get the most out of your daffodils.
Understanding Daffodil Post-Bloom Care
Now that your daffodils have bloomed, it’s essential to focus on their post-bloom care to ensure they continue thriving and come back strong next year. This section covers the dos and don’ts of caring for your bulbs after they’ve finished flowering.
Why Proper Care Matters
Proper care after daffodils have bloomed is crucial for their overall health and performance in subsequent years. If neglected, it can lead to a decline in blooming performance, reduced foliage, and even the death of the bulb. The reason behind this is simple: daffodil bulbs need time to recharge and store energy for next year’s bloom.
If not given proper care after blooming, the bulb’s energy reserves will dwindle, making it harder for the plant to produce new flowers. This can result in smaller blooms, fewer flowers, or even no flowers at all the following year. By providing adequate care post-bloom, you’re essentially giving your daffodil bulb a chance to rejuvenate and come back stronger next season.
To ensure your daffodils continue to thrive, make sure to deadhead the spent blooms, allowing the foliage to yellow and die back naturally. This process usually takes 6-8 weeks after blooming. Avoid cutting or removing the foliage prematurely, as it’s essential for photosynthesis and nutrient uptake by the bulb. By providing the right conditions and care post-bloom, you’ll be rewarded with a healthier, more vibrant daffodil display in years to come.
Common Mistakes to Avoid During After Bloom Care
When caring for daffodils after they finish blooming, it’s easy to make mistakes that can impact their health and performance for years to come. One common error is not removing dead flowers as soon as possible. This may seem like a minor task, but leaving the blooms on the plant allows seeds to form, which can lead to unwanted self-seeding and weaken the bulb over time.
Another mistake gardeners often make is dividing bulbs incorrectly. When daffodils are divided, it’s essential to separate the offsets or new bulbs that have formed around the base of the original bulb. If these offsets are not separated, they may grow into weak plants that won’t produce blooms as well as the parent plant.
It’s also crucial to avoid over-handling or digging up daffodil bulbs during after-bloom care, as this can cause damage to the bulbs and disrupt their ability to store energy for next year’s blooms.
Removing Dead Flowers and Foliage
As daffodil blooms fade, it’s essential to remove dead flowers and foliage promptly to maintain your bulb garden’s health and prevent disease from spreading. Let’s learn how to do it effectively.
Why Remove Dead Heads?
Removing dead flower heads from daffodils is an essential task that many gardeners overlook. However, it plays a crucial role in maintaining the health and vigor of your spring bulbs. One of the primary reasons to remove dead heads is to prevent seed production. When daffodil flowers die back, they direct their energy towards producing seeds instead of storing nutrients for next year’s bloom. This process can deplete the bulb’s energy reserves, weakening it over time.
If you don’t remove the dead flower heads, your daffodils may become less productive and more susceptible to disease. In fact, studies have shown that removing spent blooms can increase yields by up to 20% in subsequent seasons. To remove dead heads effectively, simply snip off the stalk at ground level using scissors or pruning shears. This will prevent any remaining seeds from dispersing and conserve your bulb’s energy for next year’s bloom. By making this simple step a part of your daffodil care routine, you’ll be rewarded with healthier, more vibrant plants that thrive year after year.
How to Remove Dead Heads Without Damaging Bulbs
When removing dead flower heads from your daffodils, it’s essential to do so without accidentally damaging the bulbs or weakening the plant. This is because daffodil bulbs are sensitive and can be easily damaged if not handled carefully.
To avoid this, start by gently grasping the stem of the dead flower head just above the base of the bulb. Avoid pulling directly on the leaves or foliage, as this can cause unnecessary stress to the plant. Instead, use your fingers or a pair of scissors to snip off the dead flowers at an angle, making sure not to leave any stubs that could potentially rot and infect the surrounding area.
Remove all dead flower heads in one session, taking care not to disturb the surrounding soil or damage the bulbs in the process. This will help prevent pests and diseases from spreading to other parts of the plant. By being mindful of your actions when removing dead flowers, you can ensure that your daffodils continue to thrive and bloom beautifully year after year.
Dividing and Repotting Daffodil Bulbs
As your daffodils finish blooming, it’s essential to divide and repot their bulbs to maintain their health and vigor. This process will also encourage new blooms in future seasons.
When to Divide Daffodils
When daffodils have finished blooming, it’s essential to consider dividing their bulbs every 3-4 years to maintain their health and vigor. One of the primary signs that indicate it’s time for division is when the bulb clumps start to break apart naturally. You’ll notice this as the individual bulbs begin to separate from each other, making it easier to lift them out.
Another sign is if you notice a decrease in flowering performance over the years. This could be due to the bulb’s energy being diverted towards producing offsets (small bulblets) rather than flowers. As the clump grows, the central bulb may become congested, leading to reduced flower production and overall health.
In general, daffodils typically need division when they’ve reached a diameter of 3-4 inches or more. If you’re unsure whether your bulbs require division, gently dig around them with a fork and lift out a few of the bulbs. Inspect their size and condition – if they appear congested or small, it’s time to divide. Divide the bulb clumps into smaller sections, making sure each section has at least one “eye” (the white, pointed tip from which new growth emerges) to ensure continued flowering performance.
The Best Time for Repotting
When repotting daffodil bulbs, timing is everything. You see, daffodils have a specific dormancy period that requires precise handling to ensure they thrive. Repotting at the wrong time can lead to rot, disease, or even death of the bulb.
The ideal seasons for repotting are spring and fall, with spring being the preferred choice. During this time, the bulbs are dormant, making them more receptive to new soil and conditions. Spring repotting allows you to refresh the soil, divide and replant the bulbs before they begin their growth cycle. This way, you can enjoy an even healthier bloom in the following seasons.
In contrast, fall repotting is also suitable but requires careful consideration. Make sure the new potting mix is well-draining to prevent waterlogged soil during the winter months when the bulb is at its most vulnerable state.
When choosing between spring and fall, consider your local climate and the specific needs of your daffodil variety. By repotting during these seasons, you’ll ensure a strong, healthy start for your bulbs and enjoy years of vibrant blooms to come.
Watering and Fertilizing After Bloom
Now that your daffodils have bloomed, it’s time to focus on their long-term health through careful watering and fertilization practices. This is where you’ll learn how to nurture them for years to come.
Post-Bloom Drought Tolerance
As your daffodils finish blooming, it’s natural to wonder if they’ll be okay without water. The good news is that daffodils are surprisingly drought-tolerant after flowering. In fact, overwatering during this period can be detrimental to their health.
Daffodils have adapted to survive for several weeks without significant rainfall or irrigation. During the blooming phase, they focus their energy on producing flowers rather than storing water. Once the blooms fade, they shift into a dormant state, relying on stored moisture reserves. This means you don’t need to water them immediately after flowering.
To avoid overwatering, wait until new growth appears (typically 4-6 weeks after blooming) before providing supplemental irrigation. Check soil moisture by inserting your finger into the soil up to the knuckle; if it feels dry, it’s time to water. Water lightly but thoroughly, allowing the soil to dry slightly between waterings. By giving your daffodils a break from watering, you’ll help them conserve energy and store nutrients for next year’s blooms.
Fertilization After Bloom: What You Need to Know
When the blooming period of daffodils comes to an end, it’s essential to provide them with the right nutrients for optimal health and growth. Fertilizing daffodil bulbs after they finish blooming is crucial as it replenishes the energy reserves depleted during the blooming process.
At this stage, you should opt for a balanced fertilizer that provides nitrogen, phosphorus, and potassium in equal proportions (10-10-10 NPK). This type of fertilizer promotes healthy foliage growth and root development. Bulb fertilizers are also suitable, as they contain micronutrients specifically formulated to support bulb health.
It’s recommended to apply the fertilizer in late spring or early summer, when the foliage has died back naturally. Follow the instructions on the label for application rates, but a general rule of thumb is to spread 1-2 inches of compost around the base of each plant. This approach not only replenishes nutrients but also improves soil structure and supports beneficial microbial activity in the soil.
Deadheading vs. Dead Leaf Removal
When it comes to daffodil after bloom care, two common practices often get confused: deadheading and removing dead leaves. Let’s clarify their differences for healthier bulbs.
The Difference Between Deadheading and Removing Dead Leaves
When it comes to daffodil after bloom care, two essential tasks often get confused with each other: deadheading and removing dead leaves. Understanding the difference between these two practices is crucial to keep your spring bulbs healthy and thriving.
Deadheading involves removing the dead flower heads from the plant. This process encourages the daffodil bulb to focus its energy on recharging for next year’s bloom, rather than expending it on seed production. Think of it like giving the plant a gentle nudge towards producing more flowers in the future. To deadhead your daffodils effectively, simply snip off the spent blooms using scissors or pinch them between your fingers. Make sure to remove any remaining seeds or foliage attached to the flower head.
On the other hand, removing dead leaves is an essential practice that helps prevent disease and promotes healthy growth. As daffodil foliage dies back after blooming, it can become a haven for pests and diseases. Remove these dead leaves as soon as possible to prevent any potential issues from arising. Simply grab the base of the leaf and gently pull it away from the bulb, making sure not to damage any remaining green leaves.
Why Removing Dead Foliage Is Crucial
Removing dead daffodil foliage is crucial for maintaining the health and longevity of your spring bulbs. After blooming, the leaves may appear wilted and yellow, but they are still hard at work replenishing energy reserves within the bulb.
If you fail to remove these leaves, they can become a haven for disease and pests that could harm your daffodils next season. For instance, fungal diseases like leaf spot or root rot thrive in moist environments created by the decomposing foliage. Similarly, slugs, snails, and other pests may be attracted to the dead leaves, further weakening your plants.
To remove dead foliage effectively, wait until the leaves have turned yellow and begun to wilt, usually 4-6 weeks after blooming. Cut them back as close to the ground as possible using a sharp knife or pruning tool. This will not only eliminate potential disease hotspots but also direct more energy towards next year’s blooms.
Remember, proper removal of dead foliage is essential for a healthy bulb that will reward you with vibrant flowers come springtime.
Mulching Around Daffodils
When it comes to mulching around daffodils, you’ll want to use a thin layer that won’t smother the bulbs as they go dormant. This simple trick helps prevent rot and keeps your spring bloomers healthy.
The Benefits of Mulch for Spring Bulbs
When daffodils have finished blooming, it’s an excellent time to apply mulch around them. One of the primary benefits is regulating soil temperature. Mulch acts as a barrier between the soil and the sun, preventing it from getting too hot or cold. This stability in soil temperature encourages healthy root growth and prevents any potential stress on the bulbs.
Another advantage of applying mulch is its ability to retain moisture in the soil. As daffodils are dormant after blooming, they require consistent moisture levels to remain healthy until next spring. Mulch helps maintain a stable level of humidity by reducing evaporation and runoff. This ensures that your daffodils receive adequate water without being overwatered.
To maximize these benefits, apply a 2-3 inch layer of organic mulch such as wood chips or straw around the base of your daffodils. Keep the mulch several inches away from the bulb crowns to prevent moisture from accumulating and potentially causing rot.
Tips for Effective Mulching Techniques
When it comes to mulching around daffodils, the key is to use this protective layer effectively. The right type and quantity of mulch can make all the difference in keeping your spring bulbs healthy. First, choose a mulch that’s organic and breathable, such as wood chips or bark. Avoid using pine straw or needles, which can be too acidic for daffodils.
For small areas around individual plants, use a thin layer (about 2-3 inches) of mulch to prevent moisture from accumulating and causing rot. For larger spaces, apply a thicker layer (around 4-6 inches), but make sure it’s not piled up against the base of the plant. This can cause stem rot and other problems.
When applying mulch, consider using a loose, crumbly material that allows for good air circulation around the daffodils’ crowns. Some examples include leaf mold or composted manure. As you spread the mulch, keep it about 2-3 inches away from the plant’s base to prevent moisture buildup and promote healthy growth. Regularly replenish your mulch as needed to maintain its effectiveness.
Frequently Asked Questions
How often should I water my daffodils after blooming to prevent drought damage?
Drought tolerance is a common concern for spring bulbs like daffodils. While they can survive with minimal watering, consistent moisture during the post-bloom period (May-June) will promote healthy foliage and ensure energy storage for next year’s bloom. Water your daffodils once a week, unless rainfall exceeds 1 inch, in which case you can skip that week.
What if I missed fertilizing my daffodils after blooming? Can I still do it later?
Yes, it’s never too late to fertilize your daffodils. Even though the bloom period has ended, a balanced fertilizer (10-10-10 NPK) applied in early summer will provide essential nutrients for healthy foliage and bulb growth. Follow package instructions and take care not to over-fertilize, as this can cause more harm than good.
Can I mulch around my daffodils at any time of the year?
While it’s best to apply a 2-inch layer of organic mulch (like straw or bark chips) in early spring before new growth emerges, you can also do it after blooming. However, be cautious not to pile mulch too high, as this can cause moisture accumulation and rot. Remove any dead foliage before applying mulch for optimal results.
What if I accidentally damaged a bulb while removing dead flowers or foliage? Can it still recover?
No, unfortunately, damaging a daffodil bulb during post-bloom care can be detrimental to its health. Inspect the area carefully before cutting back foliage or removing dead heads, and avoid using sharp objects that might puncture the bulb. If you do accidentally damage a bulb, consider dividing and repotting it in a new location with better growing conditions.
Can I divide daffodils immediately after blooming, or is there an optimal time for division?
It’s best to wait until late summer (July-August) or early fall (September-October) before dividing daffodil bulbs. This allows the foliage to die back naturally, making it easier to separate individual bulbs and promoting healthy growth in new locations. Divide only mature bulbs with multiple offsets, as this will ensure successful division and prevent damage to the parent bulb.