Grafting apple trees is an art that’s been perfected by farmers for centuries, but with the right techniques, you can master it too. Whether you’re a seasoned gardener or just starting out, growing your own fruit at home has never been more accessible. By learning how to graft apple trees in your backyard, you’ll not only be able to produce a wider variety of apples, but also ensure they thrive with optimal rootstocks and scions. But what exactly is involved in the process? In this article, we’ll take you through everything from selecting the perfect rootstock and scion combination to post-graft care and maintenance. From choosing the right grafting techniques to dealing with common challenges, our step-by-step guide will have you successfully growing grafted apple trees like a pro.
Understanding the Basics of Grafting
To successfully graft apple trees at home, you first need to understand the basics, including the different types of grafts and the tools required for the process. This section will break down these fundamentals in simple terms.
What is Grafting and Why It’s Essential for Apple Trees?
Grafting is an age-old technique used to combine the desirable qualities of one apple tree with the robust root system of another. Essentially, it’s a process where a piece of stem (scion) from one tree is joined to the root system of another tree (rootstock). This union allows gardeners to create hybrid trees that produce better-tasting fruits or have improved disease resistance.
For instance, let’s say you want an apple tree with exceptional sweetness but poor disease resistance. By grafting a scion from a sweet variety onto a rootstock known for its resilience against certain diseases, you’ll end up with a healthier and more productive tree. This is precisely why grafting is essential for growing superior-quality apples at home.
To start grafting your apple trees, choose healthy scions from the desired varieties, then select a sturdy rootstock that complements their growth habits. Next, prepare both pieces by making smooth cuts on either end of the scion and cutting any buds or leaves from the bottom half of the grafted section. Once prepared, carefully join them together using grafting tape or wax, ensuring the cuts are aligned properly. With proper care, your grafted apple trees should thrive in no time, yielding an abundance of delicious fruit for years to come.
Choosing the Right Rootstocks and Scions
When it comes to grafting apple trees at home, selecting the right rootstock and scion is a critical decision that will impact the tree’s overall health, productivity, and adaptability. So, what factors should you consider when choosing between different varieties?
Firstly, think about disease resistance. Some rootstocks and scions are bred to be more resistant to specific diseases such as powdery mildew or scab, which can devastate an apple crop. For example, the ‘M9’ rootstock is known for its high level of resistance to fire blight, a bacterial disease that can kill trees in a single growing season. Research the disease pressure in your area and choose varieties that are well-suited to your climate.
Climate suitability is also essential. Some apple varieties prefer cooler or warmer temperatures, and may not thrive if grafted onto a rootstock that’s adapted to different conditions. For instance, if you live in an area with hot summers, a scion like ‘Gala’ may struggle on a rootstock like ‘M9’, which prefers cooler temperatures. By choosing the right combination of rootstock and scion, you’ll be creating an apple tree that’s well-suited to its environment and more likely to thrive.
Preparing the Materials and Tools Needed
Now that you’ve selected your apple tree varieties, it’s time to prepare the essential materials and tools needed for successful grafting at home. Gather these carefully to avoid any setbacks during the process.
Equipment Requirements for Grafting Apple Trees
To successfully graft apple trees at home, you’ll need to gather some essential equipment. A sharp knife or grafting tool is a must-have for making clean cuts on the rootstock and scion wood. This will help promote healthy union and reduce the risk of disease.
Rooting hormone powder is another crucial item, as it stimulates root growth and increases the chances of successful grafting. Apply it to the cut surfaces of both the rootstock and scion, following the product’s instructions for application rates and timing.
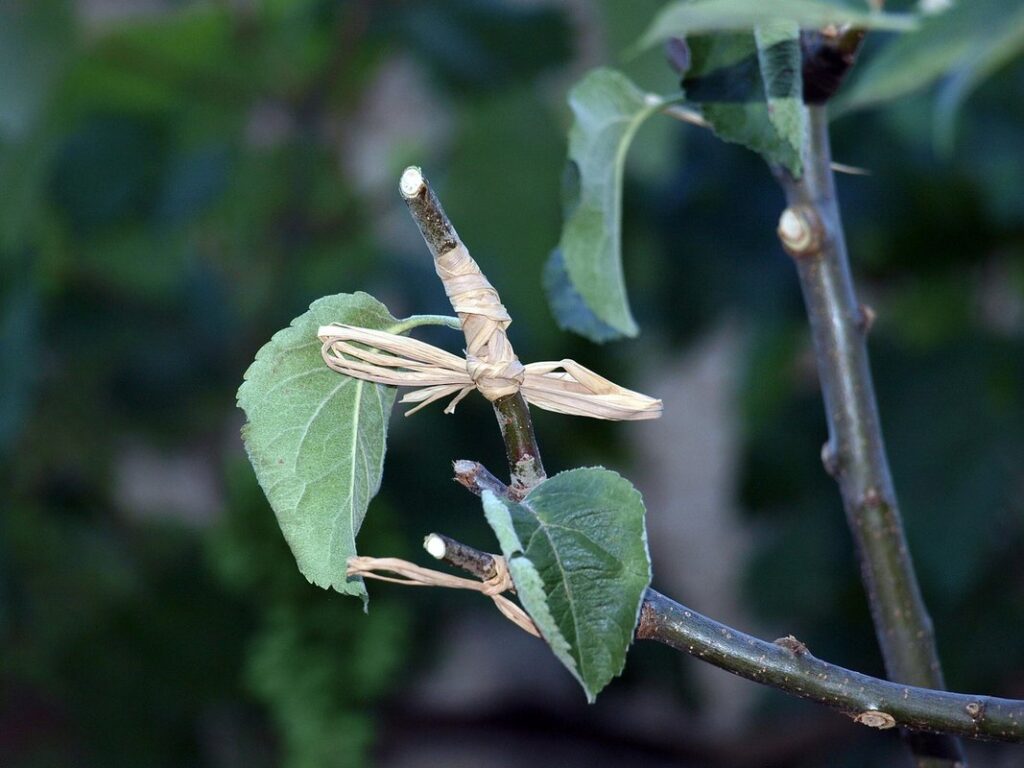
Twine or grafting tape will be used to secure the joined branches together. This helps maintain pressure on the wound until roots develop, which can take anywhere from a few weeks to several months.
A clear plastic bag is also necessary for creating a mini-greenhouse effect around the grafted area. Place it over the union, securing with twine if needed. This will help retain humidity and promote healing. By having all these tools at hand, you’ll be well-equipped to tackle the grafting process successfully.
Preparing the Rootstocks: Cleaning and Cutting
Properly cleaning and cutting the rootstock is a crucial step in ensuring successful grafting. Before you start, make sure to sanitize all of your tools with 70% alcohol or bleach solution to prevent contamination. Next, carefully remove any debris or old growth from the rootstock using a sharp, sterile knife.
Once cleaned, inspect the rootstock for any signs of damage or disease. Remove any weak or damaged tissue as this can negatively impact the health and productivity of your grafted tree. Now it’s time to cut the rootstock. Cut at an angle, about 1-2 inches from the top of the root system. This will help prevent water from collecting on the surface and promote healthy callus formation.
When cutting, make sure to use a sharp knife or pruning saw, as a dull blade can crush the tissue and lead to poor grafting success. Use a clean, sharp instrument to make a smooth cut, about 1/4 inch deep. This will help create a strong bond between the scion and rootstock.
Cutting at an angle also allows you to remove any old growth or weak tissue, promoting healthy cell division and ensuring a strong, successful graft. Remember to label your cut rootstocks clearly so you can easily identify them later in the process.
Grafting Techniques: A Step-by-Step Guide
Now that you have your rootstock and scion trees selected, it’s time to learn the specific grafting techniques for successful union between them. This section will walk you through those crucial steps.
T-Budding Method: The Most Common Approach
T-budding is one of the most widely used and successful grafting techniques for apple trees. This method involves taking a bud from a desirable rootstock or scion variety and attaching it to the top of a stem, allowing it to grow into a new tree. To perform T-budding on an apple tree, you’ll need a sharp, sterile knife or grafting tool, some budding wax, and a healthy bud from a compatible rootstock.
First, cut a straight section of stem from the scion, about 1-2 inches long. Next, make a small incision in the side of this stem, just above a bud eye. Gently pry the bark away from the wood to expose the cambium layer underneath. Now, take your grafting tool and carefully remove a small section of the rootstock’s stem, creating a “T” shape.
Apply a small amount of budding wax to the cut end of the scion and attach it to the rootstock, making sure the bud eye is aligned with the cambium layer. Secure the scion in place using additional wax or tape. With proper care, your T-budded apple tree should begin producing fruit within 2-3 years.
Whip and Tongue Graft: Alternative Methods for Beginners
When it comes to grafting apple trees at home, there are several techniques you can try. For beginners or in specific situations where other methods may not be feasible, whip and tongue grafts offer an alternative approach. These methods involve joining two compatible tree varieties together using a wedge-shaped piece of stem (whip) or the leafy tongue of one tree.
A whip graft involves cutting a section from the scion (the variety you want to propagate) at a 45-degree angle, leaving about 1-2 inches intact for rooting. The cut end is then inserted into a matching slot on the rootstock (the base tree). This method is useful when working with varieties that have a more delicate bark.
A tongue graft, also known as a cleft graft, involves cutting a section from both the scion and rootstock to fit together like a wedge. This technique allows for a stronger bond between the two trees, making it ideal for propagation in areas with harsh weather conditions.
Keep in mind that these alternative methods require patience and attention to detail. It’s essential to research specific techniques tailored to your climate and tree varieties to ensure success.
Post-Grafting Care and Maintenance
Now that you’ve successfully grafted your apple tree, it’s essential to provide proper care to ensure a healthy and thriving sapling. This involves regular watering, pruning, and monitoring for potential diseases.
Providing Adequate Watering and Light Conditions
After grafting your apple tree, it’s crucial to provide adequate watering and light conditions to promote healthy root establishment and encourage vigorous growth. Watering schedules will vary depending on the climate you’re in, but a general rule of thumb is to water your grafted tree regularly during its first year. Aim to provide about 1 inch of water per week, either through rainfall or irrigation.
Keep in mind that overwatering can be detrimental to newly grafted trees, so make sure the soil isn’t too moist or waterlogged. A good way to check is by sticking your finger into the soil up to the knuckle; if it feels dry, it’s time for a drink. As for light exposure, most apple tree varieties prefer full sun to partial shade, but be cautious not to scorch the leaves with intense direct sunlight.
Maintain temperatures between 65°F and 75°F (18°C and 24°C) during the first year after grafting to promote healthy root development. Avoid exposing your grafted tree to extreme temperature fluctuations or frost damage.
Fertilization Strategies: Balancing Nutrients for Healthy Growth
When it comes to fertilizing your newly grafted apple tree, timing is everything. As a general rule of thumb, you’ll want to start fertilizing your tree about 6-8 weeks after grafting, when the sap begins to flow and new growth starts to appear.
It’s essential to provide a balanced diet for your young tree, as excessive nitrogen can lead to weak wood and reduced fruit production. A well-rounded fertilizer should contain a mix of nitrogen (N), phosphorus (P), and potassium (K). Look for a 10-10-10 or 20-5-5 formula, which provides equal amounts of each macronutrient.
During the first year after grafting, focus on providing enough nutrients to support vigorous growth. You can apply a slow-release fertilizer in early spring, following the manufacturer’s instructions. As your tree matures, you’ll need to adjust your fertilization schedule to reflect its changing needs. Be sure to avoid over-fertilizing, as this can damage your tree and lead to costly mistakes down the line. By providing a balanced diet and monitoring your tree’s progress, you’ll be well on your way to growing a healthy, thriving apple tree through grafting at home.
Troubleshooting Common Grafting Issues
As you begin grafting your apple trees, it’s inevitable that you’ll encounter some issues – don’t worry, most can be easily resolved with a few simple troubleshooting techniques. Here are the common problems and their solutions to get you back on track.
Identifying and Addressing Root System Problems
When you’re grafting apple trees at home, it’s not uncommon to encounter problems that affect the root system. One common issue is fungal infections, which can spread quickly through the tree if left unchecked. To address this problem, make sure to sterilize all tools and equipment before use, and disinfect any wounds on the tree with a fungicide.
Another potential problem is root bound conditions, where the roots become constrained within the pot or soil. This can stunt the growth of the tree and even cause it to die. To prevent root bound conditions, choose a container that’s large enough for the tree to grow into, and use a well-draining potting mix to keep the roots healthy.
Regular monitoring is key in identifying these problems early on. Check your trees regularly for signs of disease or pests, and take action promptly if you notice anything out of the ordinary. By staying vigilant and taking preventative measures, you can help ensure that your grafted apple trees thrive.
For example, consider grafting multiple scions onto a single rootstock to create a robust tree with a healthy root system. This can also make it easier to manage any potential problems that arise.
Signs of Stress: Recognizing When Your Tree Needs Extra Support
When you notice your grafted apple tree struggling to thrive, it’s essential to recognize the signs of stress and provide extra support. One common sign is leaf drop, where leaves turn yellow or fall off prematurely. This can be due to a variety of factors such as root disturbance during grafting, inconsistent watering, or exposure to extreme temperatures.
Another sign of stress is stunted growth, where the tree’s growth rate slows down significantly. If you notice your grafted apple tree’s growth has slowed down compared to its ungrafted counterpart, it may be a sign that the tree needs additional support. To address this issue, make sure the tree is receiving enough water and nutrients. You can also prune the tree to promote healthy growth and remove any diseased or damaged branches.
In addition, consider providing support for your grafted apple tree by staking it temporarily until it becomes more robust. This will help prevent damage from wind or other environmental stressors. Keep an eye on your tree’s overall health and adjust its care accordingly to ensure a successful grafting experience.
Tips for Success and Common Mistakes to Avoid
As you continue growing your apple trees, it’s essential to know what common pitfalls to watch out for and how to avoid them to ensure healthy and thriving trees. Let’s take a closer look at the most crucial tips and mistakes to be aware of.
Understanding Seasonality: The Best Time to Graft Apple Trees
When it comes to grafting apple trees, timing is everything. Seasonality plays a significant role in determining the success of your grafting endeavor. Apple trees are typically grafted during the dormant season, which usually falls between late winter and early spring.
In regions with mild winters, the ideal time for grafting is from January to February, when the tree is still dormant but starting to show signs of new growth. In areas with harsher winters, it’s best to wait until March or April when the threat of frost has passed.
Climate factors also come into play. For example, if you live in an area prone to late frosts, it’s essential to graft your apple trees as early as possible in the spring to allow for a full growing season. On the other hand, if you’re in a region with hot summers, fall or early winter grafting may be more suitable.
Keep in mind that these are general guidelines, and the specific timing will depend on your local climate and weather conditions. Always observe your tree’s behavior and adjust your schedule accordingly to ensure optimal results.
Monitoring Progress and Making Adjustments as Needed
Monitoring progress and making adjustments as needed is crucial when grafting apple trees at home. It’s essential to regularly inspect your grafted tree for signs of success or failure. Check for the presence of a healthy callus forming over the graft union, which should be firm and free from any visible cracks.
As you monitor progress, keep an eye out for common issues such as graft failure due to inadequate moisture or low temperatures. Make sure to maintain consistent watering and provide protection from frost or extreme heat.
If you notice that your grafted tree is not thriving, don’t hesitate to make adjustments. Prune back any weak growth to encourage stronger development of the scion. Also, ensure that the graft union remains clean and free of pests or diseases by applying a fungicide if necessary.
With regular monitoring and adjustments, you can increase the chances of successful grafting and enjoy a healthy, thriving apple tree in your home garden.
Case Studies and Variations: Examples from Experienced Gardeners
Let’s take a look at how experienced gardeners have successfully grafted apple trees at home, including unique combinations and troubleshooting tips they’ve learned along the way. We’ll dive into their successes and challenges.
Real-Life Success Stories: Insights from Experienced Grafters
We’re fortunate to have had the opportunity to connect with several experienced grafters who’ve shared their insights on successful apple tree grafting projects. One such gardener is Sarah Jenkins from Oregon, who successfully grafted over 50 apple trees in her backyard using the wedge graft method.
Sarah’s key takeaway was the importance of choosing a healthy rootstock and scion combination. “It’s crucial to select varieties that are compatible with each other,” she emphasizes. She recommends starting with dwarf or semi-dwarf rootstocks, which are more adaptable to smaller spaces and easier to manage.
Another important lesson Sarah learned is the significance of proper tree care after grafting. “Make sure to provide enough water and nutrients during the first year,” she advises. This ensures that the graft takes hold effectively, reducing the risk of disease or pest issues down the line.
Exploring Unique Applications of Grafting Apple Trees
When it comes to grafting apple trees, there are numerous techniques and applications that can enhance their growth and productivity. One innovative method is interstem grafting, which involves inserting a stem (or “interstem”) between the rootstock and scion. This technique allows for greater flexibility in choosing rootstocks and scions, enabling gardeners to combine desirable traits from different tree varieties.
For instance, you can use a disease-resistant rootstock like MM111 and pair it with a scion of your favorite apple variety, such as ‘Honeycrisp’. By interstem grafting, you can create a tree that offers improved resistance to common apple diseases while maintaining the desirable fruit characteristics. Another benefit of this technique is its ability to control suckering – the production of vigorous shoots from the rootstock.
Interstem grafting also enables you to try out new and unusual apple varieties, such as antique or heirloom types, which may not be readily available in your area. By experimenting with different combinations, you can discover unique flavor profiles and textures that will make your orchard stand out.
Frequently Asked Questions
How do I know if a rootstock is suitable for my climate?
Conduct research on the specific rootstocks recommended for your region and climate zone. Look for varieties that are resistant to diseases common in your area and have a growth habit suitable for your local conditions. Consult with experienced gardeners or check online resources like gardening forums or university extension services for guidance.
What’s the best way to handle scion wood that’s been stored for an extended period?
When working with dormant scion wood, inspect it carefully before grafting. Remove any damaged or rotting tissue, and gently scrub the cut end to promote healing. Soak the scion in water or a rooting hormone solution to stimulate cell growth, but avoid over-wetting which can lead to root rot.
How often should I water my newly grafted apple trees?
Newly grafted trees require consistent moisture during their first year after grafting. Water your trees regularly, but make sure not to overwater, as this can cause more harm than good. Aim for about 1 inch of rainfall or irrigation per week, and adjust according to weather conditions.
Can I use a combination of rootstocks from different tree types?
While it’s technically possible to combine rootstocks from various tree species, it’s essential to understand that some combinations might not be compatible. Research the specific grafting requirements for your chosen scion and rootstock combination, as some may require specialized techniques or care.
What signs should I look out for when identifying issues with root system problems?
Keep an eye on the overall health of your tree, including its growth rate, leaf color, and fruit production. Common symptoms of root system problems include stunted growth, yellowing leaves, or reduced fruit yields. Regularly inspect your tree’s roots and adjust your care routine as needed to prevent further complications.