Growing your own watermelons can be a rewarding experience, especially when you get to enjoy that first juicy slice straight from your backyard. However, knowing where to start can be overwhelming, and it’s easy to end up with unripe or bland fruit. But don’t worry, we’ve got you covered. With our comprehensive guide on how to grow watermelons, you’ll learn everything you need to know to produce sweet and delicious watermelons that are perfect for snacking, salads, and more.
In this article, we’ll walk you through the essential steps of growing watermelons, from selecting the right variety to preparing your soil and knowing when to harvest. We’ll also share expert tips on watering and care to ensure your plants receive the best conditions for growth. Whether you’re a seasoned gardener or just starting out, this guide will provide you with all the information you need to grow juicy and sweet watermelons in no time.
Choosing the Right Variety
When growing watermelons, selecting the right variety is crucial as it affects factors such as disease resistance and climate adaptability. This section will guide you through choosing a suitable variety for your specific needs.
Understanding Watermelon Types
When it comes to growing watermelons, choosing the right variety is crucial. With over 300 known types of watermelon worldwide, selecting a suitable one for your region and climate can be overwhelming. Let’s break down some of the main types, their characteristics, and uses.
For warm climates with long growing seasons, ‘Charleston Grey’ and ‘Sugar Baby’ are excellent choices. These varieties mature quickly, taking around 70-80 days to ripen. They’re ideal for small spaces and produce smaller fruits, perfect for snacking or salads. On the other hand, ‘Orinoco’ and ‘Crimson Sweet’ thrive in cooler climates with shorter growing seasons. These varieties take around 90-100 days to mature and yield larger, sweeter fruits.
When choosing a watermelon variety, consider your region’s temperature fluctuations and growing season. Also, think about the intended use of your harvest. If you’re looking for a compact, fast-growing option, ‘Sugar Baby’ might be the way to go. However, if you want a large, juicy watermelon for special occasions, opt for a variety like ‘Orinoco’.
Factors to Consider When Selecting a Variety
When selecting a watermelon variety, there are several factors to consider. Disease resistance is one of the most critical considerations. If you’re growing watermelons in an area with high humidity or frequent rain, look for varieties that are resistant to powdery mildew and fusarium wilt. Some popular disease-resistant varieties include ‘Sugar Baby’ and ‘Yellow Doll’.
Another important factor is fruit size. If you have a small garden or prefer smaller watermelons, choose compact varieties like ‘Tiny Sweet’ or ‘Sugar Pear’. These produce smaller fruits (typically 5-10 pounds) that are perfect for snacking and salads. On the other hand, if you want to grow larger watermelons (20-40 pounds), consider varieties like ‘Charleston Grey’ or ‘Moon and Stars’.
Rind thickness is also worth considering. Thicker rinds tend to be more resistant to cracking during shipping and handling. If you plan to sell your watermelon harvest, opt for thicker-skinned varieties like ‘Crimson Sweet’ or ‘Yellow Flesh’.
Preparing the Soil
Before you can start planting those juicy watermelon seeds, it’s essential to prepare the soil to give your crop a strong foundation. Let’s dive into the key steps for preparing the perfect growing environment.
Soil Requirements for Watermelons
When it comes to growing watermelons, the soil is perhaps one of the most crucial factors. Watermelons require a well-balanced and nutrient-rich soil that can provide them with the necessary support for optimal growth. The ideal pH level for growing watermelons ranges between 6.0 and 6.8. If your soil’s pH is too high or too low, it may lead to nutrient deficiencies, which can severely impact fruit production.
To ensure adequate nutrient supply, watermelons need a balanced mix of essential macronutrients like nitrogen (N), phosphorus (P), potassium (K), and micronutrients such as calcium (Ca) and magnesium (Mg). You can test your soil to determine its nutrient levels and adjust accordingly. For instance, if your soil lacks nitrogen, you can apply a balanced fertilizer that contains NPK (10-10-10).
Drainage is another critical aspect of watermelon cultivation. Watermelons don’t like standing water, which can lead to root rot and other diseases. Make sure the soil drains well by mixing in organic matter such as compost or manure, which will also improve soil structure and fertility. A minimum of 6 inches of space between plants is essential for air circulation and moisture penetration, reducing the risk of fungal diseases like powdery mildew.
Watermelons grown in sandy soils may require more frequent watering to maintain adequate moisture levels. Conversely, those grown in heavy clay soils might benefit from mulching to prevent waterlogging. By selecting a suitable soil type and following best practices for nutrient management and drainage, you can create an optimal growing environment for your watermelon plants.
Adding Organic Matter to Improve Soil Quality
Adding organic matter to your soil is one of the most effective ways to improve its quality and create an ideal environment for your watermelon plants to thrive. When you incorporate compost or manure into your soil, it adds essential nutrients, improves drainage, and increases the soil’s water-holding capacity.
Compost, in particular, is a nutrient-rich amendment that can help neutralize acidic soils and provide a balanced diet of micro-nutrients for your watermelon plants. For example, adding 2-3 inches of compost to your soil can increase its organic matter content by up to 10%, which can lead to increased crop yields and better disease resistance.
To incorporate compost into your soil preparation routine, start by mixing it in at a rate of about 5-10% of the total soil volume. You can also use manure as an alternative, but be sure to pasteurize it first to kill any weed seeds or pathogens that may be present. Another option is to create a compost tea by steeping the compost in water and using it as a foliar spray for your plants.
By adding organic matter to your soil, you can significantly improve its quality and give your watermelon plants the best chance of success.
Sowing Watermelon Seeds
When sowing watermelon seeds, it’s essential to start indoors 2-3 weeks before the last frost date and then transplant them outside when the weather warms up. This allows for a healthy head start on your watermelon crop.
When to Plant Watermelons in Your Region
When planting watermelon seeds, it’s essential to consider the regional climate and frost dates to ensure optimal growth. In general, watermelons thrive in warm weather with temperatures between 65°F to 85°F (18°C to 30°C). However, the specific planting time varies depending on your location.
In regions with a long growing season, such as California or Florida, you can plant watermelon seeds directly into the soil in late spring to early summer. For areas with a shorter growing season, like the Northeast or Midwest, it’s best to start seedlings indoors 2-3 weeks before the last frost date and then transplant them outside when the weather warms up.
In regions with mild winters, like Southern California or Hawaii, you can plant watermelon seeds year-round. However, in areas with harsh winters, like the Northeast or Midwest, it’s best to wait until late spring or early summer when the soil has warmed up.
To determine the ideal planting time for your region, check the average frost dates and weather patterns specific to your area. This will help you plan a successful watermelon harvest.
Tips for Sowing Seeds Correctly
When sowing watermelon seeds, it’s crucial to get it right from the start. This will ensure that your seeds have a solid foundation for optimal growth and development. To begin with, choose a spot with full sun and well-draining soil, as watermelons require at least 6 hours of direct sunlight daily.
As you prepare to sow your seeds, make sure they are 1-2 inches deep in the soil. This allows for even moisture absorption and helps prevent fungal diseases that thrive in moist environments. For optimal spacing, sow two to three seeds per hill, with about 3-4 feet between each hill. This will give them ample room to grow without becoming overcrowded.
When placing your seeds in the soil, ensure they are oriented correctly. Watermelon seeds have a natural inclination to sprout at an angle, so gently press them into the soil with their pointed end facing downwards and the rounded side up. Finally, cover the seeds with a thin layer of fine soil, tamping it down lightly to prevent settling during watering.
Watering and Irrigation
To grow healthy watermelons, proper watering and irrigation are crucial steps that can make all the difference. In this next part of our guide, we’ll cover how to get it just right.
How Much Water Do Watermelons Need?
Water is essential for watermelon growth, and it’s not just about pouring water over them. To understand how much water watermelons need, let’s break down their watering requirements. Watermelons need about 1-2 inches of water per week, either from rainfall or irrigation.
To determine if your watermelons are receiving enough moisture, insert a finger into the soil up to the knuckle. If the soil feels dry, it’s time to water. You can also check the color of the leaves – if they turn yellow or wilted, it’s likely due to a lack of water. On the other hand, too much water can cause root rot and lead to an increase in fungal diseases.
Make sure the soil has good drainage holes at the bottom of the container to prevent waterlogged conditions. Aim to provide about 20-30 gallons of water per plant during its growing season. Keep an eye on weather forecasts and adjust your watering schedule accordingly. Avoid overwatering, especially if you have a watermelon variety that’s prone to it.
Keep in mind that younger plants require more frequent watering than mature ones. As they grow, reduce the frequency but maintain consistent moisture levels throughout their development.
Techniques for Efficient Watering and Irrigation
When it comes to growing watermelons, efficient watering and irrigation techniques are crucial for optimal growth and fruit production. One of the most effective methods is drip irrigation, which delivers water directly to the roots of the plant, reducing evaporation and runoff. This not only conserves water but also reduces the risk of fungal diseases that thrive in moist conditions.
Another technique is mulching, which helps retain moisture in the soil while regulating soil temperature. Organic mulch materials like straw or wood chips can be applied around 2-3 inches deep around the plant’s base. As it breaks down, it will add nutrients to the soil and improve its structure.
To get the most out of drip irrigation and mulching, aim to water your watermelon plants when the top inch of soil feels dry to the touch. Monitor the weather forecast and adjust your watering schedule accordingly. For example, if you’re experiencing a heatwave, increase the frequency of watering to ensure the plant receives adequate moisture.
By implementing these efficient watering techniques, you’ll be able to provide your watermelon plants with the right amount of water at the right time, promoting healthy growth and maximizing fruit production.
Supporting the Plant
To ensure your watermelon plants thrive, it’s crucial to provide them with essential support as they grow and spread outwards. Proper staking will keep the fruit off the ground and prevent disease from taking hold.
Trellising and Pruning Techniques
Trellising and pruning are essential techniques for growing watermelon vines. Not only do they help to keep the vines organized and off the ground, but they also promote healthy growth and prevent disease. When left to spread out on the ground, watermelon vines can become a breeding ground for fungal diseases that thrive in moist conditions. By providing support with trellises or other structures, you can improve air circulation and reduce the risk of disease.
To trellis your watermelon vines, start by installing a sturdy trellis near each plant. You can use individual tomato cages or create a larger structure using wood or metal. As the vine grows, gently twine it around the support, working from the bottom up to avoid damaging the stems. Pruning is also crucial for promoting healthy growth and encouraging fruiting. Remove any weak or spindly growth, as well as any leaves that are touching the ground or developing signs of disease. By keeping your vines tidy and supported, you’ll be rewarded with larger, more consistent fruits.
How to Mulch Around Watermelons for Weed Control and Moisture Retention
Mulching around watermelons is an effective method for controlling weeds and retaining moisture in the soil. One of the key advantages of mulching is that it prevents weeds from growing by blocking light and preventing seeds from germinating. This reduces the need for frequent weeding, saving you time and effort.
To apply mulch effectively, start by applying a 2-3 inch layer around the base of your watermelon plants. You can use organic materials like straw, bark chips, or even grass clippings. Keep the mulch at least an inch away from the plant’s stem to prevent moisture from accumulating and causing rot.
When choosing a mulch, consider its texture and color. A coarse-textured mulch will help break down faster and provide more nutrients to the soil. As for color, light-colored mulches reflect heat and light, while dark-colored ones absorb them. For watermelons, which prefer full sun, a light-colored mulch is recommended.
Mulching also helps retain moisture in the soil by reducing evaporation and runoff. This means your watermelon plants will have access to consistent water levels throughout the growing season.
Monitoring for Pests and Diseases
As you tend to your watermelon plants, keep a close eye out for signs of pests and diseases that can quickly spread through a patch. Regular monitoring is key to preventing these issues.
Common Pests That Affect Watermelon Crops
Watermelon crops are susceptible to various pests that can cause significant damage if left unchecked. Among the common pests that target watermelons are aphids and whiteflies. These tiny insects feed on the sap of the plant, causing curled or distorted leaves, and stunted growth. They can also transmit diseases such as viruses, which can be devastating to a watermelon crop.
Another pest that poses a significant threat to watermelon crops is the squash bug. These flat, brown bugs feed on the plant’s sap, causing wilting and yellowing of leaves. If left unchecked, squash bugs can kill an entire watermelon plant by sucking out its nutrient supply.
To manage these pests effectively, it’s essential to monitor your watermelon crop regularly for signs of infestation. Look for sticky honeydew droplets on the leaves or stems, which are indicative of aphid and whitefly presence. Remove any affected plants immediately to prevent further damage. For squash bugs, use row covers to prevent them from reaching your watermelon plants.
Recognizing Signs of Watermelon Diseases
When growing watermelons, it’s essential to keep an eye out for diseases that can severely impact yields and fruit quality. One of the most common issues is powdery mildew, which appears as a white, powdery coating on leaves and stems. To identify this disease, look for fine, grayish-white patches on the undersides of leaves, especially in areas with high humidity.
Another prevalent issue is fusarium wilt, caused by a fungal infection that clogs watermelon plants’ vascular system. Early symptoms include yellowing or browning leaves, stunted growth, and a general decline in plant health. If left unchecked, this disease can cause the plant to collapse completely.
To prevent these diseases from taking hold, practice good sanitation, remove any infected plant material promptly, and maintain optimal growing conditions for your watermelons. By staying vigilant and recognizing the early warning signs of disease, you’ll be able to take swift action and save your crop before it’s too late.
Harvesting Your Watermelons
Now that your watermelon plants are mature, it’s time to learn how to harvest them at the optimal stage of ripeness for maximum flavor and texture. This process is crucial to enjoying a bountiful and delicious crop.
When to Expect a Harvest
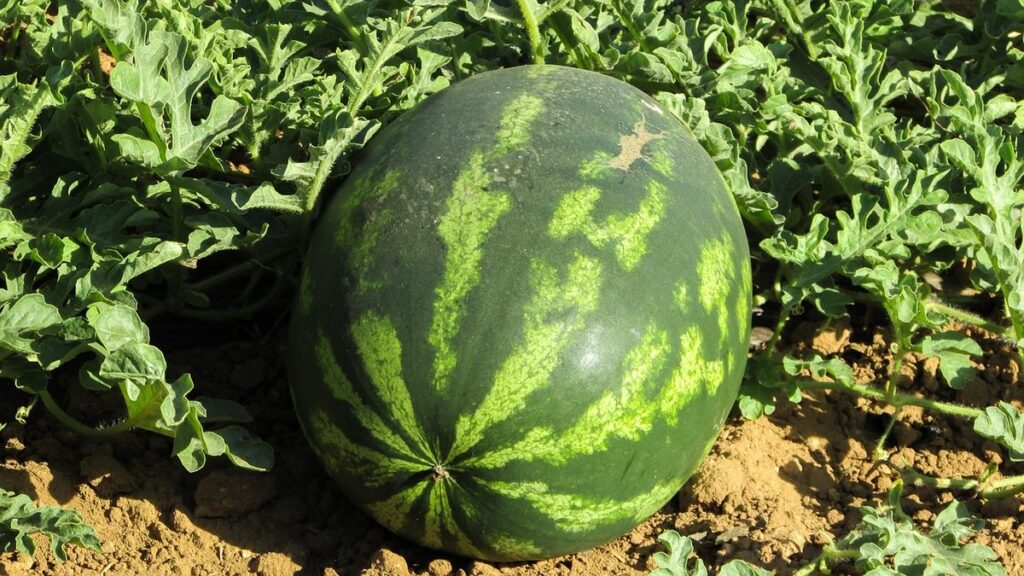
Growing watermelons can be a rewarding experience, but timing is everything when it comes to harvesting them. The maturity period of watermelons typically ranges from 70 to 100 days after planting, depending on the variety and growing conditions.
Weather conditions play a significant role in determining when your watermelon will be ready for harvest. A warm and dry spell can cause the fruit to ripen quickly, while excessive rain or cooler temperatures may delay it. Monitor the weather forecast closely and keep an eye out for signs of ripeness, such as a yellow spot on the underside of the fruit.
Soil quality also affects the maturity rate of watermelons. Well-draining soil with adequate nutrients can promote healthy growth and faster maturation. Aim to harvest your watermelon when it reaches its full size and has a deep green rind. Avoid squeezing or cutting into the fruit, as this can cause damage and reduce shelf life. Instead, gently twist the stem to check for ripeness, and enjoy your homegrown watermelon at its peak flavor and texture.
How to Handle and Store Watermelon Crops After Harvest
After carefully harvesting your watermelon crops, it’s essential to handle and store them properly to maintain their freshness and prolong their shelf life. When handling watermelons, gently grasp the fruit around its middle, rather than holding it by the stem or picking it up from the ground. This prevents damage to the delicate flesh, which can lead to spoilage.
To store watermelon crops after harvest, keep them in a cool, dry place with good air circulation. Avoid storing them in direct sunlight or near heat sources, as this can cause the fruit to ripen too quickly and spoil. If you plan to consume your watermelons within a week or two, you can store them at room temperature.
If you need to store your watermelon crops for an extended period, consider placing them in a single layer on a tray, making sure not to overcrowd the space. Then, cover the tray with plastic wrap or aluminum foil and keep it refrigerated at 50°F (10°C) or below. This will help maintain the fruit’s freshness and prevent moisture buildup.
When storing watermelon crops for an extended period, check on them regularly to ensure they’re not developing off-flavors or spoilage.
Frequently Asked Questions
Can I grow watermelons indoors using a hydroponic system?
Yes, with proper planning and execution, you can successfully grow watermelons indoors using a hydroponic system. Ensure your setup provides sufficient light (at least 18 hours of supplemental lighting) and maintains optimal temperatures between 65-70°F (18-21°C). Hydroponics can be an excellent way to control nutrient delivery and increase yields.
How often should I inspect my watermelon plants for signs of pests or diseases?
Regular inspections are crucial in preventing the spread of pests and diseases. Check your plants at least once a week, paying attention to any unusual growth patterns, yellowing leaves, or black spots on the fruit. Early detection allows for timely intervention and reduces the risk of crop loss.
What’s the best way to determine if my watermelon is ripe and ready for harvest?
A ripe watermelon will have a deep, rich yellow spot (the “ground spot”) where it rested on the ground during ripening. The skin should be smooth and glossy, and the weight of the fruit is often heavier than its size would suggest. Avoid squeezing or applying pressure, as this can damage the fruit.
Can I grow watermelons in containers using a mix specifically designed for citrus trees?
While watermelon plants prefer well-draining soil with a pH between 6.0-6.8, you can adapt to growing in containers by using a high-quality potting mix designed for vegetable gardens or cucumbers (which are often used as a watermelon substitute). Avoid citrus-specific mixes, as they may lack the necessary nutrients and drainage required for optimal growth.
How should I store my harvested watermelons to extend their shelf life?
To prolong the freshness of your harvested watermelons, keep them at room temperature (around 65-70°F or 18-21°C) with good air circulation. Avoid storing them in direct sunlight, as this can cause moisture loss and spoilage. Once ripe, you can store watermelons in a cooler environment (around 40°F or 4°C) for up to two weeks.