Growing your own ginger can be a rewarding experience, especially if you’re new to gardening. Not only is it relatively easy to cultivate, but it’s also a valuable addition to any kitchen. However, successfully growing ginger requires attention to detail and some expert knowledge. In this ultimate guide, we’ll take you through the process of choosing the right variety for your climate, preparing the perfect soil conditions, and protecting against pests. We’ll cover everything from planting and harvesting to preserving and storing your harvest, giving you all the tips and tricks you need to grow ginger like a pro. Whether you’re looking to add some exotic flavor to your cooking or simply want to try something new, this guide is here to help.
Choosing the Right Variety and Climate
Choosing the right variety of ginger for your climate is crucial, so let’s explore the different options available to you as a gardener. With the right selection, you’ll be on your way to growing healthy and delicious ginger at home.
Understanding Ginger Varieties
Ginger is a versatile root that comes in various forms and characteristics. When choosing a ginger variety for cultivation, it’s essential to understand their differences and ideal growing conditions.
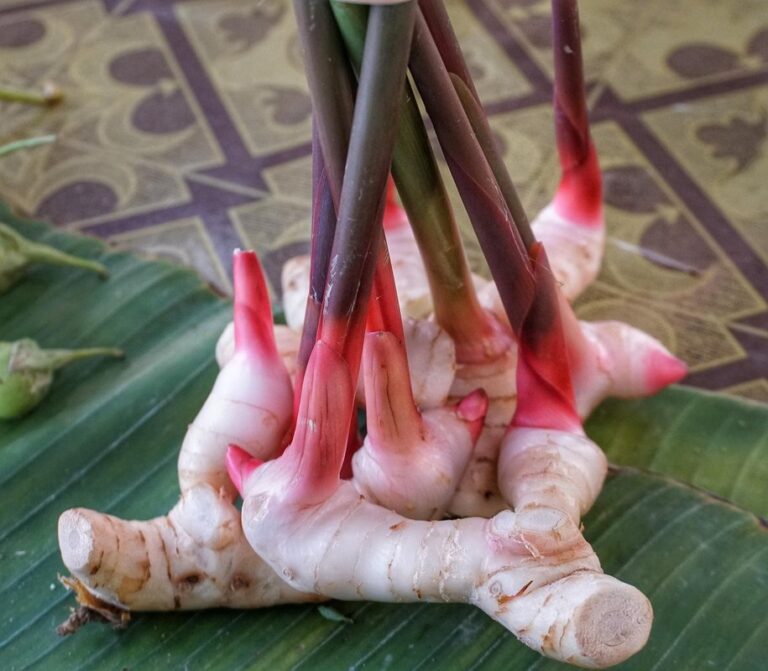
There are several types of ginger available, including common ginger (Zingiber officinale), young ginger (also known as baby ginger or pickling ginger), and turmeric (Curcuma longa). Common ginger is the most widely cultivated variety and is commonly used in cooking. It has a thick skin that ranges from yellow to brown in color and can grow quite large.
Young ginger, on the other hand, is harvested before it reaches maturity and has a thin, tender skin. It’s often pickled or used as an ingredient in Asian cuisine. Turmeric, which belongs to the same family as ginger, has a distinct bright orange-yellow color and is primarily grown for its medicinal properties.
When selecting a variety, consider your climate and desired harvest. Common ginger prefers well-drained soil and partial shade, while young ginger can thrive in full sun with minimal maintenance. Understanding these differences will help you choose the best variety for your needs and ensure a successful ginger crop.
Optimizing Your Growing Environment
When it comes to growing ginger, understanding the ideal climate conditions is crucial for its optimal growth. Ginger thrives in temperatures between 64°F and 90°F (18°C and 32°C), making it a suitable crop for tropical and subtropical regions. However, with proper care, you can still grow ginger indoors or outdoors in areas with cooler temperatures.
To create a suitable environment, ensure your space has high humidity levels, typically above 60%. This can be achieved by placing the pot on a tray filled with water and pebbles or using a humidifier. Ginger also requires partial shade to full sun, depending on the climate. In warmer regions, it’s best to provide some shade to prevent scorching.
When growing ginger indoors, place the pot near an east- or west-facing window to maximize natural light. If you’re growing outdoors, choose a location with filtered sunlight to protect the rhizomes from intense rays. By replicating these conditions, you’ll be well on your way to successfully cultivating this versatile and nutritious spice. Regularly monitoring temperature and humidity levels will also help prevent any potential issues.
Preparing the Soil and Planting
Before we dive into the fun part of growing your ginger, let’s make sure the soil is ready to support its growth and root development. This means selecting a location and preparing the soil properly for planting.
Ginger Root Preparation
When preparing ginger roots for planting, selecting healthy ones is crucial. Look for roots with at least two to three “eyes” or nodules, which are small buds on the sides of the rhizome. Avoid roots with soft spots, mold, or fungal growth, as these can spread disease and harm your crop.
To prepare your ginger roots, trim them correctly by cutting off any damaged or diseased areas. Make sure to leave at least one eye intact per section, as this will encourage new growth. If the eyes are not visible, gently scratch the surface of the rhizome with a fork to help bring them out.
Before planting, treat any fungal infections promptly using a fungicide specifically designed for root crops like ginger. Allow the treated roots to air dry for 24 hours before planting to prevent further infection.
Planting Techniques and Spacing
When it comes to planting ginger, choosing the right soil type and pH level is crucial for its growth. Ginger prefers well-draining, rich soil with a slightly acidic pH between 6.0 and 7.0. If you’re unsure about the pH level of your soil, consider getting a soil test done.
For optimal growth, plant ginger in a location that receives partial shade to full sun, depending on your climate. Space individual plants about 12-18 inches apart, allowing for good air circulation to prevent fungal diseases from taking hold. If growing multiple rows, maintain a spacing of at least 24 inches between each row.
You can grow ginger directly in the ground or in containers. When planting in containers, use a minimum depth of 6-8 inches and ensure good drainage holes to prevent waterlogged soil. Use a high-quality potting mix specifically designed for tropical plants like ginger. Plant multiple eyes (small buds on the rhizome) 2-3 inches deep into the container or soil, and gently firm the soil around them. Water well after planting, and keep the soil consistently moist during the first few weeks.
Nurturing Your Ginger Crop
To successfully grow a healthy and thriving ginger crop, you’ll want to pay close attention to providing it with consistent moisture and warmth. This is especially crucial during its early stages of growth.
Watering and Fertilization Strategies
When it comes to watering and fertilizing your ginger crop, it’s essential to strike the right balance. Over-watering can lead to root rot, while under-fertilizing can stunted growth. To avoid these issues, aim to water your ginger plants when the top 1-2 inches of soil feels dry to the touch.
A general rule of thumb is to water your ginger crop once a week during its first year of growth, and gradually reduce frequency as it matures. It’s also crucial to fertilize your ginger plants regularly. A balanced fertilizer (10-10-10 NPK) should be applied every 2-3 weeks during the growing season.
One natural method for fertilizing is using compost tea. To make compost tea, steep a cup of compost in 5 gallons of water for 24 hours. This liquid fertilizer is rich in beneficial microbes that promote healthy root growth and disease resistance.
When it comes to the quantity of fertilizer, start with a small amount (about 1 tablespoon per plant) and gradually increase as needed. Monitor your ginger plants’ response to fertilization and adjust accordingly. By paying attention to these watering and fertilizing strategies, you’ll be well on your way to growing a thriving and healthy ginger crop.
Pest Management and Common Problems
As you tend to your ginger crop, be on the lookout for common pests and diseases that can affect its growth. Aphids and spider mites are two of the most prevalent issues that can decimate a ginger crop if left unchecked.
To identify these problems early on, inspect your plants regularly for signs of infestation or disease. Check for yellowing leaves, stunted growth, or sticky honeydew droplets – all of which can be indicative of aphid or spider mite activity. Regularly examining the underside of leaves and stems is also crucial in detecting pests that thrive in these areas.
Organic control measures are an effective way to minimize harm to your ginger crop while maintaining a chemical-free environment. For aphids, try introducing natural predators such as ladybugs or lacewings into your garden. Alternatively, you can use neem oil or insecticidal soap to manually remove them from the affected area. Spider mites, on the other hand, are best controlled with sticky traps or fine-mesh cloths that prevent them from crawling onto plants.
Keep in mind that prevention is always better than cure – maintaining a healthy and balanced ecosystem will go a long way in preventing pest infestations from occurring in the first place. Regularly watering, fertilizing, and pruning your ginger crop can also help boost its natural defenses against disease and pests.
Pruning and Harvesting Techniques
Now that your ginger plants are thriving, it’s time to learn how to prune and harvest them effectively for a bountiful crop. We’ll cover the key techniques you need to know.
Timing the Perfect Harvest
When your ginger plants have reached maturity, it’s essential to identify when they’re ready for harvest. This can be determined by observing their size, color, and texture. A mature ginger rhizome is typically around 1-2 inches in diameter and has a smooth, woody texture. The skin may also turn yellow or orange, signaling that the plant is ready.
The best time to harvest your ginger is in the early morning, when the plants are at their highest moisture content. Avoid harvesting during the hottest part of the day, as this can cause the rhizomes to dry out quickly. In terms of seasons, most commercial ginger crops are harvested between 8-10 months after planting, although this may vary depending on your specific climate and region.
After harvesting, it’s crucial to handle the rhizomes with care. Gently brush off any excess soil, and then store them in a cool, dark place with good air circulation. Avoid washing or soaking the rhizomes, as this can cause them to rot. Instead, gently clean any dirt from the surface, and let them dry for a few days before using them in cooking.
Tips for Successful Root Regeneration
When you’re harvesting your ginger, don’t toss those leftover root pieces aside just yet. With a little creativity and know-how, you can coax new growth from them, essentially doubling your crop’s yield. This process is called root regeneration, and it’s an excellent way to make the most out of your harvest.
To encourage regrowth, find a suitable spot with bright, indirect light and maintain a consistent temperature between 64°F to 75°F (18°C to 24°C). Soak the leftover roots in water for 2-3 days to awaken them from dormancy. Next, gently scrub off any remaining ginger bits using a soft-bristled brush, then plant them about an inch deep in moist potting soil.
For preserving roots for future planting, wrap them in paper or newspaper and store them in a cool, dark place. This method will keep the roots dormant until you’re ready to replant them. Alternatively, dry your ginger root by slicing it thinly and spreading it out on a wire rack or tray. Allow the slices to air-dry completely before storing them in an airtight container.
Remember, not all leftover roots may regenerate successfully. But with patience and proper care, you’ll be surprised at how many will sprout new growth, giving you even more ginger to harvest in no time!
Preserving and Storing Ginger
Now that you’ve successfully grown your ginger, it’s essential to store and preserve it properly to keep its flavor and nutrients intact. Learn how to dry, freeze, and ferment your fresh ginger for long-term use.
Drying, Freezing, or Curing: Choosing the Best Preservation Method
When it comes to storing and preserving ginger for an extended period, choosing the right method is crucial. Drying, freezing, and curing are popular techniques that help maintain quality and prevent spoilage.
Drying, also known as dehydration, involves removing moisture from ginger using heat or air circulation. This method is ideal for making ginger powder or flakes, but it can result in a loss of flavor and aroma. To dry ginger effectively, you’ll need to slice it thinly and spread it out in a single layer on a baking sheet. Keep the oven at its lowest temperature setting (150°F – 200°F) and dehydrate for 3-4 hours.
Freezing, on the other hand, helps preserve ginger’s flavor and aroma by keeping it in a frozen state. You can chop or slice ginger and store it in an airtight container or freezer bag to prevent moisture buildup and freezer burn. Frozen ginger is perfect for using in cooked dishes, smoothies, or as a garnish.
Curing involves soaking sliced ginger in a brine solution (water, salt, and sometimes sugar) to enhance its flavor and texture. This method helps preserve ginger by creating an environment that inhibits the growth of bacteria and other microorganisms. To cure ginger, combine 1 cup of water with 1 tablespoon of salt and 1 tablespoon of sugar in a bowl. Add sliced ginger and let it sit for 2-3 hours before rinsing and drying it with paper towels.
When storing preserved ginger, ensure that the container or bag is airtight to maintain quality and prevent spoilage. Keep it away from direct sunlight, moisture, and heat sources to extend its shelf life.
Cooking with Fresh and Preserved Ginger
Fresh ginger is an incredibly versatile ingredient, and once you’ve grown your own, the possibilities are endless. Not only can you enjoy its spicy kick in sweet treats like gingerbread cookies and ginger ale, but it’s also a staple in many savory dishes, from Asian stir-fries to Indian curries.
When working with fresh ginger, be sure to peel it using a spoon or a vegetable peeler before slicing or grating. For preserved ginger, look for store-bought pickled ginger or make your own by slicing thin pieces and soaking them in vinegar, sugar, and spices. This adds a delightful crunch and flavor to salads, noodles, and sushi.
Incorporating ginger into different cuisines is a breeze – try adding it to Mexican salsas for an unexpected kick, or use preserved ginger as a marinade for grilled meats. In Indian cuisine, fresh ginger is often used in combination with garlic and chili peppers to add depth to curries. Experiment with different recipes and flavor combinations to unlock the full potential of your homegrown ginger.
Advanced Techniques: Using Ginger for Medicine and Crafts
Now that you’ve successfully grown your ginger, let’s dive into some advanced uses for this versatile root, from medicinal applications to creative crafts.
Ginger as a Medicinal Herb
Ginger has been utilized as a medicinal herb for thousands of years, with its anti-inflammatory properties being particularly prized. The ancient Indians and Chinese used ginger to treat a range of ailments, from nausea and digestive issues to arthritis and sore muscles. In fact, the Indian Ayurvedic tradition still uses ginger today to balance the body’s “doshas” or energies.
One of the key ways to harness ginger’s medicinal properties is through its oil, which can be extracted using steam distillation or solvent extraction methods. This oil can then be used topically to reduce pain and inflammation, making it a popular ingredient in creams and ointments for arthritis sufferers. For nausea and digestive issues, you can make a ginger tea by steeping fresh ginger root in boiling water, or create a soothing compress by soaking a cloth in warm ginger-infused oil.
When working with ginger as a medicinal herb, be sure to use high-quality roots that have been grown without pesticides or other chemicals. You can also experiment with different preparation methods, such as drying and powdering the root for use in teas or capsules. With its numerous health benefits and versatility, it’s no wonder ginger remains a staple of traditional medicine worldwide.
Crafting with Ginger and Its Byproducts
As you’re enjoying the benefits of growing your own ginger, don’t forget about the creative potential hidden within its byproducts. Repurposing ginger waste can lead to some amazing crafting projects that not only reduce waste but also add a personal touch to your home decor.
One innovative use for ginger is as a natural dye for fabrics and papers. You can boil dried ginger in water to create a vibrant yellow-orange hue, perfect for creating unique textiles or artwork. Simply steep the ginger in hot water, let it cool, and then soak your fabric or paper in the solution. The longer you leave it, the deeper the color will be.
Another creative way to repurpose ginger is by turning it into potpourri. Dry sliced ginger and combine it with other spices like cinnamon sticks, cloves, and star anise to create a warm and inviting blend that can freshen up any room. You can also add some dried flowers or essential oils to enhance the scent.
When using ginger for crafting, be sure to dry it thoroughly before storing it to prevent mold and spoilage. This will ensure your natural dyes and potpourri last long enough to enjoy throughout the seasons. By embracing the full potential of your ginger plant, you’ll not only reduce waste but also discover new ways to express your creativity.
Frequently Asked Questions
Can I grow ginger indoors if my outdoor climate is not suitable?
Ginger can be grown indoors as long as you provide it with the right conditions, such as high humidity and filtered light. You’ll need to maintain a consistent temperature between 75°F to 85°F (24°C to 30°C) and ensure good air circulation around the plant.
How do I protect my ginger crop from pests like aphids and spider mites?
To prevent pest infestations, keep your ginger plants in well-ventilated areas, avoid overwatering, and regularly inspect for signs of pests. If you notice any issues, use organic pest control methods such as neem oil or insecticidal soap to eliminate the problem.
Can I harvest my ginger at any stage, or is there a specific time?
Yes, your ginger is ready for harvesting when it reaches maturity, typically after 8-10 months from planting. You can also harvest young ginger leaves and stems in as little as 3-4 months for use in cooking.
How do I preserve my harvested ginger to keep it fresh for longer?
You can preserve ginger by drying, freezing, or curing it. Drying is the simplest method, where you slice the ginger thinly and dry it in a low-temperature oven (150°F) for 2-3 hours. Freezing is also effective, where you chop the ginger and store it in an airtight container.
Can I use ginger as a medicinal herb to make homemade remedies?
Yes, ginger has various medicinal properties that can be utilized to create homemade remedies. You can make tea by steeping fresh or dried ginger slices, or use it in combination with other herbs for pain relief, digestive issues, and colds. Always consult with a healthcare professional before using ginger as a treatment.