Are you ready to unlock the secret to growing your favorite plants from seed? Germinating seeds is an essential step in the gardening process, but it can be a daunting task for beginners. With so many factors affecting success, it’s no wonder many gardeners struggle to get their seeds off to a healthy start.
That’s where this ultimate guide comes in! In this article, we’ll take you through everything you need to know about germinating seeds, from selecting the right varieties to troubleshooting common issues that can derail even the best-laid plans. We’ll cover seed preparation, planting techniques, and expert tips for achieving optimal results. Whether you’re a seasoned green thumb or just starting out, this comprehensive guide will give you the confidence and knowledge to successfully germinate seeds and watch them grow into thriving plants.
Understanding Seed Germination Basics
To germinate seeds successfully, you need a solid grasp of the basic processes involved, including seed structure and optimal conditions for growth to begin. Let’s dive into the fundamentals of seed germination.
What is Seed Germination?
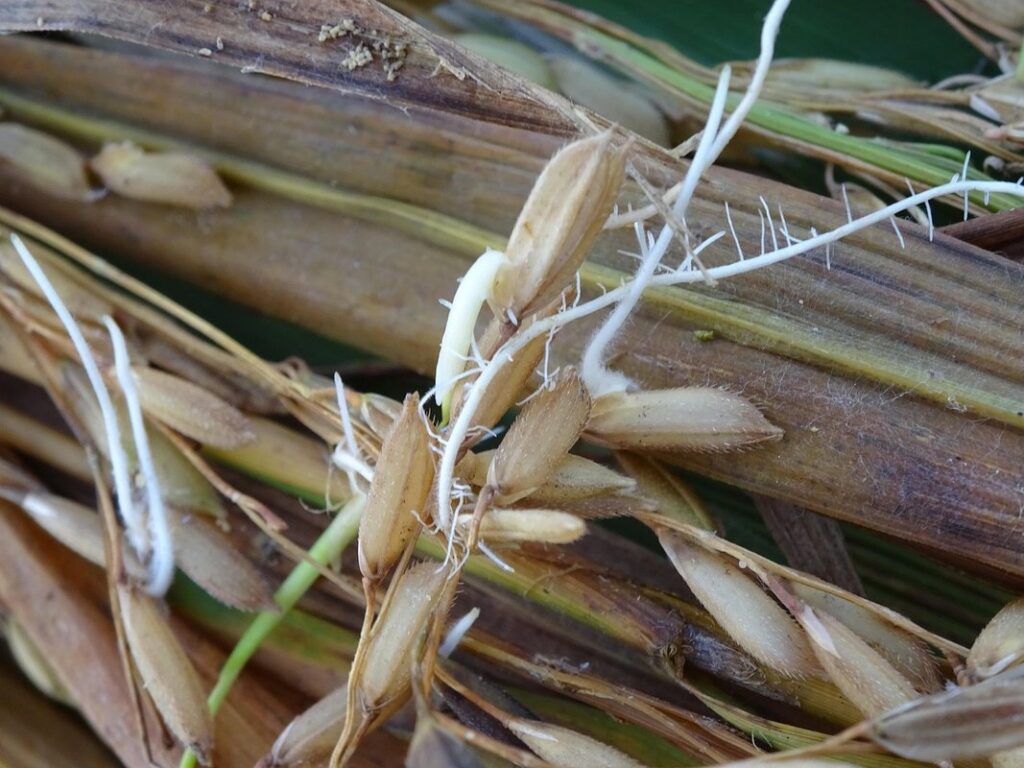
Seed germination is the initial stage of plant growth, where a seed begins to sprout and develop into a mature plant. It’s an essential process that sets the foundation for the entire life cycle of the plant. When seeds are exposed to the right conditions – such as adequate moisture, warmth, and light – they break dormancy and start growing.
This critical phase can last anywhere from a few days to several weeks or even months, depending on the type of seed and environmental factors. During germination, the seed absorbs water, which triggers the breakdown of stored nutrients and energy sources. This process allows the embryo within the seed to begin developing into a sprout, complete with roots and shoots.
Understanding seed germination is crucial for successful plant growth and development. By controlling the conditions that promote healthy germination, gardeners can increase their chances of getting high-quality plants. For example, by providing seeds with consistent moisture and optimal temperatures, you can ensure they reach their full potential and thrive in your garden.
Factors Affecting Seed Germination
When it comes to seed germination, several environmental factors play a crucial role in determining whether seeds will successfully sprout. One of the most significant influences is light exposure. Seeds require adequate light to undergo photosynthesis and develop into healthy plants. For example, tomato seeds typically require direct sunlight or supplemental lighting to germinate quickly, while lettuce seeds prefer partial shade.
Temperature also has a profound impact on seed germination. Most seeds have an optimal temperature range for germination, which can vary depending on the species. Generally, temperatures between 65°F and 75°F (18°C and 24°C) are ideal for seed germination. However, some seeds, such as those from tropical plants, require warmer temperatures to sprout.
Water levels are another critical factor in seed germination. Seeds need consistent moisture to break dormancy and initiate root development. Make sure the soil is moist but not waterlogged, as this can lead to rot and poor germination rates.
Oxygen levels also play a crucial role in seed germination. Seeds require oxygen to respire and sustain metabolic processes. Ensure good air circulation around seedlings by keeping the growing medium loose and avoiding overwatering.
Choosing the Right Seeds for Germination
When selecting seeds for germination, you’ll want to consider factors such as seed type, size, and viability to ensure optimal results. Let’s dive into what to look for in a seed packet.
Selecting High-Quality Seeds
When selecting seeds for germination, it’s essential to choose high-quality seeds with a high viability rate. One key factor is seed age: look for seeds that are less than two years old, as older seeds tend to have lower germination rates. Check the packaging or consult with the supplier to determine the seed’s age.
Storage conditions can also impact seed quality. Seeds stored in dry, cool environments will retain their viability longer than those exposed to heat, moisture, or light. Avoid storing seeds in plastic bags or containers, as these can trap moisture and cause damage.
Purchasing from reputable sources is another crucial consideration. Buy seeds from well-established companies that have a track record of producing high-quality seeds. Check online reviews, ask for recommendations from fellow gardeners, or visit local nurseries to find trusted suppliers.
When selecting seeds, also consider the source of origin. Some seeds are bred specifically for commercial production and may not be suitable for home germination. Opt for open-pollinated or heirloom varieties that have been developed for their unique characteristics and adaptability.
Understanding Seed Types and Varieties
When it comes to choosing the right seeds for germination, understanding the different types and varieties available is crucial. You’ll come across three main categories: heirloom, hybrid, and open-pollinated.
Heirloom seeds are saved and handed down through generations, often producing unique characteristics and flavors. They’re ideal for gardeners who value diversity and want to save their own seeds for next season. On the other hand, hybrid seeds are bred for specific traits like disease resistance or higher yields. While they may not produce consistent results when saved, they offer improved performance in certain conditions.
Open-pollinated seeds, also known as OP seeds, can be saved and replanted year after year, producing consistent results. They’re a great choice for gardeners who want to preserve seed lines and experiment with different varieties. Consider your gardening goals, climate, and available space when selecting the right type of seed. If you plan to save seeds, opt for heirloom or OP varieties. For improved performance in specific conditions, hybrid seeds might be the way to go.
Preparing Seeds for Germination
Now that you’ve selected the seeds you want to germinate, it’s time to prepare them for optimal growth. This involves cleaning and treating your seeds to remove any debris or inhibitors.
Seed Stratification and Scarification
When it comes to germinating seeds, one of the biggest challenges is breaking dormancy. This is where seed stratification and scarification come into play. Stratification involves simulating winter conditions to trick the seed into thinking it’s time to grow. For example, if you’re trying to germinate a cool-season crop like lettuce or broccoli, you can place the seeds in a plastic bag with some damp peat moss and store them in the refrigerator for 2-4 weeks.
Scarification is another technique used to break dormancy. This involves physically damaging the seed coat to allow water to penetrate and activate germination. You can use sandpaper, nail clippers or even a sharp knife to carefully scratch the surface of the seed. Be careful not to damage the embryo inside. For example, if you’re trying to germinate a hard-seeded bean like lima beans or kidney beans, scarification is often necessary.
It’s essential to note that stratification and scarification are techniques used for specific types of seeds. Not all seeds require these treatments, so it’s crucial to research the specific requirements for your seeds. With practice and patience, you’ll become more comfortable using these methods and see improved germination rates in no time.
Seed Soaking and Hydro-Priming
Seed soaking and hydro-priming are two effective methods used to stimulate germination. By immersing seeds in water or a nutrient-rich solution, you can encourage them to break dormancy and sprout more quickly.
The benefits of seed soaking and hydro-priming include increased germination rates, faster growth, and enhanced root development. For example, research has shown that soaking bean seeds for 24 hours can increase their germination rate by up to 20%. Similarly, a study on pumpkin seeds found that those soaked in a solution with a pH level of 6.5 had a higher germination rate than those soaked in water alone.
To soak seeds safely and effectively, start by selecting a clean container and filling it with lukewarm water. Add the desired number of seeds and let them soak for the recommended time – typically anywhere from 12 to 48 hours, depending on the type of seed. After soaking, gently drain off the solution and plant the seeds as usual.
Some gardeners also use a hydro-priming method by mixing seeds with a nutrient-rich solution containing beneficial microorganisms. This can provide an extra boost to the seed’s natural growth processes. However, it’s essential to follow specific guidelines for each type of seed to ensure optimal results.
Planting Seeds for Optimal Germination
When planting seeds, it’s essential to get them right from the start. This section will cover the crucial steps you need to take to create an optimal environment for seed germination.
Soil Preparation and Seed Depth
When it comes to planting seeds for optimal germination, soil preparation and seed depth are two crucial factors that often get overlooked. Yet, they play a vital role in determining the health and success of your seedlings.
First and foremost, make sure you’re using high-quality potting mix specifically designed for seed starting. This type of mix is usually sterile, which means it won’t harbor any diseases or pests that can harm your seeds. You can also repurpose leftover houseplants’ soil, but be aware that it might contain weed seeds or pathogens.
When planting your seeds, the correct depth is essential. Generally, you want to plant them at a depth 2-3 times their width. For example, if you’re sowing a small petunia seed, about 1/8 inch deep would be sufficient. Make sure not to over-bury your seeds; this can lead to rot and reduced germination rates.
Incorporating a 1/4-inch layer of fine vermiculite or perlite on top of the potting mix will help maintain moisture levels and provide better drainage, ultimately promoting healthier seedlings. By paying attention to these details, you’ll be setting your seeds up for success from day one.
Watering and Humidity Requirements
Maintaining consistent moisture levels is crucial for optimal germination. During this critical stage, seeds absorb water to initiate root growth and sprout development. However, overwatering can be detrimental, leading to rot and poor germination rates.
To strike the right balance, create a humid microclimate around your seeds by placing them in a sealed container or plastic bag with damp paper towels or cloth. Check on the moisture levels daily to avoid excessive water accumulation. For example, store seeds in an airtight container at 80-90% relative humidity for optimal germination.
Alternatively, use a propagation tray or mini-greenhouse with built-in ventilation to maintain consistent humidity while preventing overwatering. Keep the soil consistently moist but not waterlogged by avoiding frequent watering and ensuring proper drainage. Aim for a slightly moistened surface, as this will encourage healthy root development without promoting fungal growth. Monitor your seeds’ progress closely to adjust moisture levels accordingly, making adjustments as needed to achieve optimal germination rates.
Troubleshooting Common Germination Issues
Don’t worry if you’re encountering germination problems – we’ll walk you through some common issues and provide solutions to help your seeds sprout successfully. Let’s troubleshoot together!
Delayed or Failed Germination
Delayed germination can be frustrating and disappointing, especially if you’re eager to get started with your seedlings. But don’t worry, it’s not uncommon for seeds to take longer than expected to sprout. In fact, the ideal temperature range for germination is between 70°F (21°C) and 90°F (32°C), but this can vary depending on the specific seed type.
If you’re experiencing delayed or failed germination, there are several potential causes worth investigating. Poor seed quality is often a major culprit – old or low-quality seeds may not be viable or may have reduced germination rates. Another common issue is inadequate light, which can slow down the germination process. This is especially true for seeds that require direct sunlight to germinate.
Other factors like temperature fluctuations, overwatering, and lack of humidity can also impact germination success. To avoid these issues, make sure you’re using fresh seeds, providing adequate light (but not too much), maintaining a consistent temperature, and keeping the soil moist but not waterlogged. If you’ve tried these steps and still experience problems, it may be worth re-evaluating your seed selection or seeking advice from a local nursery or gardening expert.
Dealing with Seed Rot and Mold
Seed rot and mold can be a frustrating issue during germination. It’s essential to take preventive measures to avoid this problem altogether. First, ensure the seeds are not too wet when sowing. A general rule of thumb is to maintain a moisture level that’s around 50-60% relative humidity. This will help prevent excess moisture from accumulating and causing rot.
To prevent seed rot and mold, it’s also crucial to provide adequate air circulation. Make sure your growing space has sufficient ventilation to circulate the air and reduce humidity levels. Keep an eye on the temperature too – most seeds germinate best between 65-75°F (18-24°C). High temperatures can cause moisture to evaporate rapidly, potentially leading to dry rot.
If seed rot or mold does arise during germination, take action immediately. Discard any affected seeds and ensure your growing space is well-ventilated to prevent further growth of the fungus. Clean and disinfect your equipment thoroughly before re-sowing new seeds.
Tips for Optimizing Germination Rates
To maximize your seed germination success, follow these essential tips that will help you create an optimal environment for seeds to sprout and thrive.
Using Heat Mats and Propagation Trays
When it comes to germinating seeds, using heat mats and propagation trays can significantly boost success rates and promote healthy growth. These tools allow for precise temperature control, which is essential for optimal seed germination.
Heat mats, in particular, are designed to maintain a consistent temperature of around 70-80°F (21-27°C), which is ideal for most seeds. By placing the propagation tray directly on top of the heat mat, you can create an environment that mimics the natural process of seed germination. This means that your seeds will have the best chance to sprout and develop strong roots.
Propagation trays also provide excellent air circulation, preventing fungal diseases from taking hold. They come with built-in drainage holes and often feature adjustable water levels, making it easy to manage moisture levels. To maximize their effectiveness, make sure to clean and sanitize them regularly to prevent any potential issues.
By incorporating heat mats and propagation trays into your germination setup, you’ll be able to achieve higher success rates and give your seedlings a strong start in life.
Monitoring Seed Progress and Timing
Monitoring seed progress and timing is crucial for achieving optimal germination rates. To do this effectively, you’ll need to observe and track your seeds’ development regularly. Start by checking on them every 24 hours, looking for signs of growth such as tiny roots or shoots emerging from the soil.
Use a calendar or planner to keep track of when you planted each batch of seeds, as well as any changes in temperature, humidity, or light exposure that may be affecting their progress. This will help you identify patterns and make adjustments as needed.
Keep an eye out for specific milestones, such as germination timeframes for different types of plants. For example, many vegetable seeds take 7-14 days to germinate, while some flowers like marigolds can sprout in just 3-5 days. By being aware of these general guidelines, you can anticipate when your seeds will be ready and make any necessary adjustments to ensure they’re receiving the right conditions.
Regularly inspecting your seedlings for signs of stress or disease will also help you catch potential issues before they become major problems.
Frequently Asked Questions
How do I know if my seeds have reached optimal temperature for germination?
Optimal temperatures vary depending on the seed type, but most seeds require a consistent temperature between 65-75°F (18-24°C) to germinate. Check your seed packet or research specific temperature requirements for your chosen varieties.
Can I use tap water for soaking my seeds, or does it need to be distilled?
Tap water can work for soaking seeds, but it’s recommended to use filtered or distilled water to prevent any potential additives or minerals from interfering with the germination process. Avoid using hard water, as it may contain high levels of calcium and magnesium that can affect seed growth.
How often should I check on my seeds during the germination period?
It’s essential to monitor your seeds regularly for signs of germination, such as swelling or sprouting. Check your seeds every 1-2 days to ensure they receive adequate moisture and warmth. Be gentle when handling the seeds to avoid damaging their delicate roots.
Can I use a heating mat with indoor seed starting mixes that don’t require high temperatures?
Yes, using a heating mat can still be beneficial even if the seed starting mix doesn’t require high temperatures. The increased warmth will promote faster germination and healthier root development, especially for sensitive seeds or those grown in cooler conditions.
How do I prevent seed rot and mold when germinating seeds in small trays or containers?
To prevent seed rot and mold, ensure good air circulation around the seeds by not overcrowding the tray or container. Maintain a consistent watering schedule, and avoid getting water on the soil surface to prevent fungal growth. Monitor your seeds regularly for any signs of decay, and take prompt action if you notice any issues.