As the seasons change, Siberian irises need special care to thrive through winter. If you’re like many gardeners, you’ve fallen in love with these stunning plants for their vibrant blooms and hardy nature. However, if you neglect to prepare your Siberian irises for fall, they may not make it through the cold months intact. To ensure a healthy plant come springtime, you need to know how to properly care for your Siberian irises during this critical period.
In this guide, we’ll walk you through the essential steps for preparing and caring for your Siberian irises in the fall, including planting, pruning, and mulching techniques. By following these simple tips, you can give your plants the best chance at survival and enjoy their beauty again next season. From planting to post-winter care, we’ve got everything covered.
Understanding Siberian Irises and Their Needs
To grow vibrant Siberian irises, it’s essential to understand their specific needs and characteristics that set them apart from other types of irises. Let’s dive into what makes these beautiful flowers unique.
Types of Siberian Irises and Their Characteristics
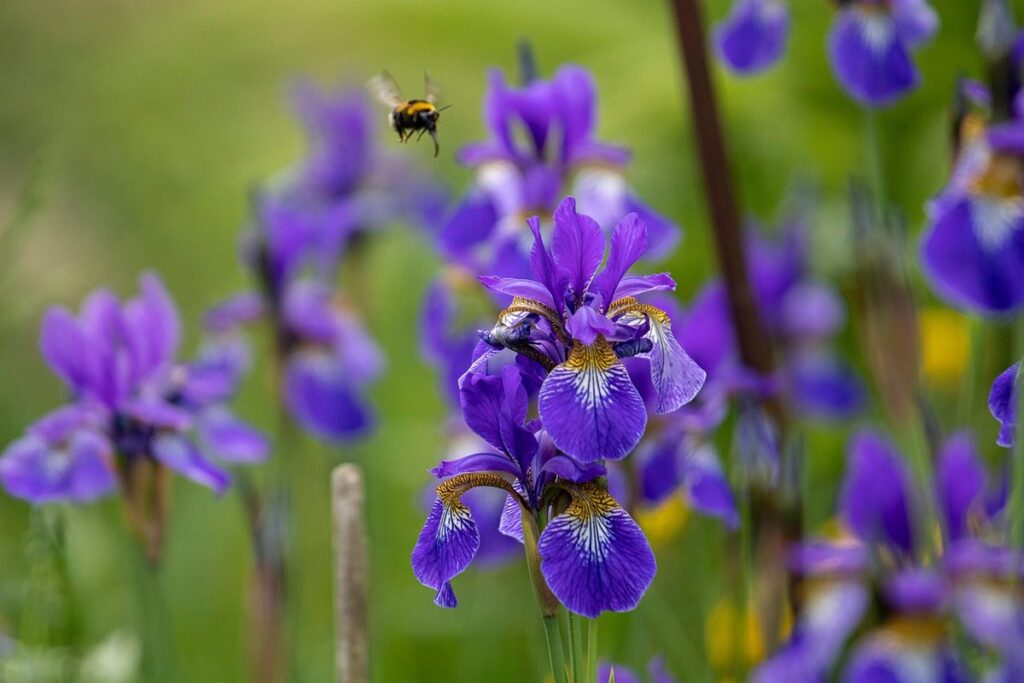
There are several types of Siberian irises to choose from, each with its unique characteristics and growth habits. The most common varieties include ‘Caesar’s Brother’, ‘Immortality’, and ‘Snow Trillium’. These plants typically grow 2-3 feet tall, have sword-shaped leaves, and produce funnel-shaped flowers in shades of purple, blue, and white.
Some Siberian irises are known for their vibrant foliage, such as the ‘Blue Pearl’ variety, which features deep blue-green leaves. Others, like the ‘Butterfly Blue’, boast delicate, pastel-colored flowers. When selecting a Siberian iris, consider factors like mature height, flower color, and leaf texture to ensure it fits your garden’s needs.
It’s also worth noting that some varieties are more tolerant of shade than others, so if you’re planting in an area with limited sunlight, look for irises labeled as “shade-tolerant”. For example, the ‘Immortality’ variety can thrive in partial shade. By choosing a Siberian iris that suits your garden conditions, you’ll be better equipped to provide it with optimal care and ensure its success during the fall season and beyond.
Planting Location and Soil Requirements
When it comes to planting Siberian irises, selecting the right location is crucial for their overall health and blooming performance. As a general rule, Siberian irises prefer full sun to partial shade, with at least 6 hours of direct sunlight per day. However, in warmer climates, providing some afternoon shade can help prevent scorching.
In terms of soil type, Siberian irises thrive in moist, fertile soil that’s rich in organic matter. They tend to perform poorly in alkaline soils, so a slightly acidic to neutral pH (around 6.0-7.0) is ideal. To create a suitable environment, mix in a 2-inch layer of compost or well-rotted manure into the planting area before adding the iris rhizomes.
Proper drainage is also essential for Siberian irises, as they’re susceptible to root rot if the soil is too wet. Make sure the planting site has good air circulation and isn’t prone to waterlogging. By providing a suitable location with adequate sunlight, fertile soil, and proper drainage, you’ll be well on your way to creating an environment that will support the growth and blooming of your Siberian irises throughout the fall season.
Preparing for Fall Care: Timing and Planning
Now that you’ve enjoyed your Siberian iris blooms, it’s time to think ahead to fall care. To ensure their beauty returns next year, timing and planning are crucial steps in the process.
Identifying When to Start Fall Care
Identifying when to start fall care for Siberian irises is crucial to ensure a healthy plant during the winter months. As the days shorten and temperatures drop, your Siberian iris will begin to prepare for dormancy. Typically, this process starts around late summer to early fall, around 6-8 weeks before the first frost.
To determine when to start fall care, observe your plant’s natural cues. Stop watering your Siberian iris once it has finished blooming and the foliage has begun to die back. This is usually a sign that the plant is transitioning into dormancy.
At this stage, reduce watering to about 1 inch per month, allowing the soil to dry slightly between waterings. Pruning can also be done during this time, but wait until the foliage has died back completely. Remove any dead or damaged leaves and stems, cutting them back to about 3-4 inches from the ground.
Planning ahead is essential to ensure your Siberian iris receives the right amount of care before winter.
Assessing Plant Health Before Winter
As winter approaches, it’s essential to evaluate the health of your Siberian iris plants before the cold weather sets in. A thorough assessment will help you identify potential issues and take corrective action to prevent damage.
Start by inspecting your plants for signs of disease or pests. Check for any unusual growth patterns, discoloration, or lesions on the leaves or rhizomes. Look for pests like aphids, slugs, or snails that can cause significant harm if left unchecked. If you notice any problems, take a closer look at the soil conditions and adjust them as necessary to create an environment that’s less conducive to disease.
Some common signs of trouble include yellowing leaves, mushy stems, or black spots on the foliage. If you encounter these issues, it may be due to factors like overwatering, underwatering, or nutrient deficiencies. To address these problems, adjust your watering schedule and fertilize your plants according to their specific needs.
Regular monitoring will also help you catch potential issues early on, allowing for more effective treatment and minimizing the risk of long-term damage. By taking a proactive approach to plant health assessment, you’ll be better equipped to protect your Siberian iris from the challenges that winter may bring.
Fall Care Tasks: Pruning, Dividing, and Mulching
Now that you’ve got your Siberian iris looking its best through the summer months, it’s time to tackle some essential fall care tasks to keep them thriving year-round. This includes pruning, dividing, and mulching for optimal growth and health.
Pruning Siberian Irises for Winter Survival
Pruning Siberian Irises for Winter Survival is a crucial step in their fall care. As the growing season comes to an end, it’s essential to prune these beautiful plants to maintain their shape and promote healthy growth.
When to Prune: The best time to prune Siberian irises is after they have finished blooming and the foliage has begun to die back naturally. This usually occurs in late summer or early fall, depending on your location and climate. However, make sure not to prune too early, as this can leave the plant vulnerable to disease.
Removing Dead or Dying Foliage: Regularly remove dead or dying leaves from your Siberian irises to prevent the spread of disease and maintain a neat appearance. Cut back any damaged or discolored foliage with clean, sharp pruning tools to about 3-4 inches above the ground.
By prunning Siberian Irises regularly, you’ll be able to maintain their shape, promote new growth, and encourage more blooms in the spring. Remember to also remove old flower stalks and spent blooms for a tidy appearance.
Dividing and Transplanting Siberian Irises in Fall
Dividing and transplanting Siberian irises is an excellent way to propagate these beautiful plants and maintain their health. To do this successfully, you’ll need a few tools: a fork or spade for gently digging around the rhizomes, a sharp knife or pruning saw for dividing, and some fresh potting mix.
To begin, carefully dig up the entire plant, taking care not to damage any of the rhizomes. Gently wash off any excess soil, then use your sharp tool to divide the rhizome into sections, each with at least one “eye” (growth bud). Make clean cuts just above an eye, and trim any old or damaged growth.
Plant the new divisions immediately, burying them up to their eyes in fresh potting mix. Water well and keep the soil consistently moist during the first growing season. Aftercare is crucial: avoid overwatering, which can lead to rot, and provide support for tall stems if necessary. By following these steps and taking good care of your new divisions, you should be able to enjoy a healthy crop of Siberian irises next spring.
Mulching and Protection for Winter Months
Now that you’ve prepared your Siberian iris for dormancy, it’s time to think about how to protect it from harsh winter conditions with effective mulching techniques. A good mulch can make all the difference in keeping your irises safe and healthy.
Benefits and Types of Mulch for Siberian Irises
Mulching is an essential aspect of Siberian iris fall care, providing crucial protection during winter months. Adequate mulching helps retain moisture, suppress weeds, and regulate soil temperature. For Siberian irises, a 2-3 inch layer of organic mulch is recommended.
When it comes to choosing the right type of mulch, options abound. Bark chips are an excellent choice, as they break down slowly and improve soil structure over time. Straw is another popular option, offering good insulation properties while allowing for easy water penetration. Other suitable alternatives include wood shavings, pine needles, or even leaves.
Organic mulches have numerous benefits: they enhance soil fertility, support beneficial microorganisms, and add visual appeal to your garden bed. However, it’s essential to replenish mulch annually to maintain its effectiveness. Avoid using inorganic materials like plastic sheets or stones, as these can harm the rhizomes and hinder water absorption.
When applying mulch, be sure to leave a 1-2 inch gap around the base of each plant to prevent moisture accumulation and potential rot. Regularly replenish your mulch layer throughout the growing season to ensure optimal protection for your Siberian irises.
Creating a Protective Barrier Against Extreme Weather
As we’ve discussed earlier, Siberian irises are sensitive to extreme weather conditions. To safeguard your plants from harsh winds, frost, and snow, creating a protective barrier is essential. One of the most effective methods is using burlap or frost blankets. These breathable materials allow for air circulation while keeping cold air out.
Start by wrapping the burlap or frost blanket around the plant, making sure to cover the rhizome (underground stem) and roots completely. Secure it with stakes or rocks to prevent it from shifting in the wind. For larger plants, you may need to use multiple layers of burlap or blankets to ensure complete coverage.
Another option is using a snow fence, which can be placed around the plant at an angle to deflect falling snow. This method works well for plants in exposed areas where snow accumulation is significant. Additionally, consider adding a layer of straw or mulch around the base of the plant to insulate it from cold temperatures and retain moisture.
Regularly inspect your plants during harsh weather conditions, making adjustments as needed to ensure the barrier remains effective.
Common Issues and Pests in Siberian Irises During Fall
As you enjoy your beautiful Siberian irises throughout the fall, it’s essential to be aware of potential issues that can arise during this time. This section will help you identify and address common pests and problems that may affect your plants.
Identifying and Managing Common Diseases
As we approach fall, Siberian irises are more susceptible to certain diseases that can weaken their roots and impact bloom quality come spring. Among the most common issues are root rot, leaf spot, and powdery mildew.
Root rot is a fungal infection that begins at the base of the plant, causing the rhizomes to decay and eventually killing the iris. Symptoms include soft, mushy stems and leaves, as well as a sour smell. To prevent root rot, make sure your soil isn’t waterlogged and provide good air circulation around your irises.
Leaf spot, on the other hand, is caused by fungal pathogens that attack the foliage, leaving behind brown or black spots. Regularly inspect your plants for signs of infection and remove any affected leaves to prevent further damage. To manage outbreaks, increase space between plants to promote air circulation and use fungicides as a last resort.
Powdery mildew is a white powdery coating on the upper surface of leaves that can weaken the plant and reduce flowering. Control it by spraying with a mixture of 1 tablespoon baking soda per gallon water every 7-10 days, or using neem oil according to product instructions. By being aware of these potential threats, you can take proactive steps to protect your Siberian irises and keep them healthy throughout fall.
Recognizing and Controlling Pests in Siberian Irises
As fall arrives, Siberian irises are more vulnerable to pests that can cause damage and weaken their roots. Among the most common culprits are aphids, whiteflies, and spider mites. These tiny insects feed on the plant’s sap, causing curled or distorted leaves, yellowing foliage, and even stunted growth.
To identify an infestation, look for sticky honeydew droplets on the leaves or stems, a sign that these pests have been feasting on your irises. Check the undersides of leaves and stems for tiny eggs, larvae, or actual insects. If you notice any of these signs, take action quickly to prevent further damage.
To control these pests, start by washing the affected areas with a mild soap solution and water. Then, treat the plants with neem oil or insecticidal soap according to the product’s instructions. For severe infestations, consider using horticultural oil as a systemic pesticide. To prevent future problems, maintain good garden hygiene, inspect your irises regularly, and remove any weeds or debris that can harbor pests.
Bringing Your Siberian Irises Indoors or Creating a Cold Frame
As you prepare for the cold winter months, learn how to bring your beloved Siberian irises indoors or create a protective cold frame to keep them safe from harsh frosts and freezing temperatures.
Benefits of Bringing Plants Indoors During Winter
Bringinging plants indoors during winter is an excellent idea, and it’s particularly beneficial for Siberian irises. When temperatures drop, these hardy plants can still be susceptible to damage from harsh weather conditions like frost, freezing rain, and strong winds. By bringing them indoors, you’re protecting your investment in the plant and ensuring its continued health.
To bring your Siberian iris indoors, choose a container that’s at least 6-8 inches deep to accommodate the rhizomes, which are the thick, underground stems from which new growth emerges. This will also allow for proper drainage, as these plants don’t like wet feet. Make sure the pot has good air circulation and adequate light – a south-facing window or a grow light is ideal.
When selecting a container, consider the size of your plant’s rhizomes and choose one that provides enough room to grow. For example, if you’re moving an established clump with 3-4 rhizomes, select a pot at least 12-18 inches deep. Place a layer of perlite or small rocks at the bottom of the container for drainage, followed by a mix of peat moss and compost. Plant your Siberian iris in this mixture, making sure to cover the rhizome with soil.
By bringinging your Siberian irises indoors during winter, you’ll not only protect them from harsh weather but also give them a head start on next year’s bloom.
Creating a Cold Frame for Year-Round Planting
If you’re not ready to bring your Siberian irises indoors for winter, but still want to extend their growing season, a cold frame is an excellent solution. A cold frame, also known as a hoop house, is essentially an insulated structure that captures and retains heat from the sun during the day, releasing it at night.
To create a cold frame, you’ll need a wooden or metal base (4-6 feet long and 2-3 feet wide), six to eight PVC pipes or posts for the frame, some wire, screws, and transparent plastic sheeting. You can also repurpose an old greenhouse or buy a pre-made kit online.
Begin by assembling the frame on your chosen location, securing it with screws and wire. Then, cover the top with the transparent plastic sheeting, ensuring it’s tightly secured to prevent cold air from seeping in. Place a layer of insulation (such as straw bales) underneath for added protection. The benefits of a cold frame include extending the growing season by up to 6-8 weeks and providing a unique space for microclimates to thrive.
Conclusion and Tips for Future Care
Now that you’ve learned how to care for your Siberian irises through the fall season, let’s discuss what comes next: preparing them for a thriving spring bloom.
Recap of Key Takeaways
As we conclude our comprehensive guide to Siberian iris fall care, it’s essential to recap key takeaways to ensure you’re equipped with the knowledge needed for a healthy and thriving plant.
Regular maintenance is crucial, and one of the most critical aspects is watering. Remember that Siberian irises need less water during the fall season, so reduce your watering schedule accordingly. Aim for about an inch of water per week, either from rainfall or irrigation.
Mulching also plays a vital role in maintaining soil moisture and regulating soil temperature. Apply a 2-3 inch layer of organic mulch around your plants to keep them healthy and protected.
Fertilization during the fall season can be beneficial, but it’s essential to choose the right type. Opt for a balanced fertilizer with a slightly higher phosphorus content to promote root growth and development.
In addition to these maintenance tasks, pruning is also crucial. Remove any dead or dying leaves to prevent disease from spreading, and cut back foliage to about 3-4 inches above ground level to prepare your plants for winter dormancy. By following these key takeaways, you’ll be well on your way to enjoying a lush and vibrant Siberian iris garden all year round.
Additional Tips for Year-Round Care
To ensure your Siberian iris garden remains thriving year-round, consider these additional tips for spring and summer care. Proper planning will help extend your growing season, allowing you to enjoy the beauty of these gorgeous flowers for as long as possible.
When preparing for spring, make sure to divide and replant your irises every 10-15 years to maintain their health and vigor. This process allows new growth to emerge, ensuring a robust display of blooms in the following seasons. Also, fertilize your Siberian irises in early spring with a balanced fertilizer to provide essential nutrients for growth.
During the summer months, be mindful of excessive heat and moisture. Provide some shade for your plants during the hottest part of the day to prevent scorching of the foliage. Regular watering is also crucial; aim to maintain moist soil but avoid overwatering, which can lead to root rot.
To further extend your growing season, consider incorporating companion planting techniques into your garden design. Pair Siberian irises with plants that complement their blooming schedule and growth habits, such as daylilies or coneflowers.
Frequently Asked Questions
What if I forget to prune my Siberian irises before winter, can they still recover?
Yes, your Siberian irises may still survive without pruning, but they’ll likely suffer from weakened growth and reduced blooming potential come spring. If you forgot to prune them in fall, do it as soon as possible in early spring, focusing on removing dead or damaged foliage.
Can I mulch my Siberian irises with regular garden soil, or is there a specific type recommended?
While regular garden soil can provide some protection, using the right mulch for Siberian irises is crucial. Opt for organic materials like wood chips, bark, or straw that retain moisture and regulate soil temperature.
How do I determine when to start bringing my Siberian irises indoors or creating a cold frame for winter?
Monitor your plant’s specific needs based on its health, size, and climate zone. Typically, bring plants indoors 6-8 weeks before the first frost date if you live in areas with harsh winters. For milder climates, create a cold frame using materials like wood and plastic to protect your Siberian irises from extreme weather.
What are some common signs that my Siberian irises may be suffering from disease or pests during fall?
Watch for yellowing leaves, black spots, or soft, mushy stems. Regularly inspect your plants for aphids, spider mites, or other pests that might infest them in the fall. Early detection and treatment will help prevent serious damage to your Siberian irises.
Can I divide and transplant my Siberian irises at any time during the year, or is there a specific season recommended?
For healthy growth and minimal disruption, it’s best to divide and transplant your Siberian irises in late summer or early fall when they’re dormant. This reduces stress on the plant and allows it to establish itself before winter.