Growing Black-Eyed Susans from Seed: A Gardener’s Challenge
Are you eager to cultivate these beautiful, drought-tolerant flowers in your garden? Growing black-eyed susans (Rudbeckia hirta) from seed can be a bit more involved than other plants, but with the right guidance and care, you’ll be rewarded with vibrant blooms. The process requires attention to climate, soil conditions, selecting high-quality seeds, and providing optimal growing conditions. In this article, we’ll delve into the specifics of how hard it is to grow black-eyed susans from seed and provide a comprehensive guide to help you succeed. We’ll cover topics such as ideal climates for growth, preparing the right soil, choosing the best seeds, and tips for proper care. With our expert advice, you’ll be well on your way to growing these stunning flowers in no time!
Understanding Black-Eyed Susans and Their Growth Requirements
To successfully grow Black-Eyed Susans from seed, you need to understand their specific growth requirements and learn how to provide them with the right conditions. Let’s dive into what these requirements are.
What are Black-Eyed Susans?
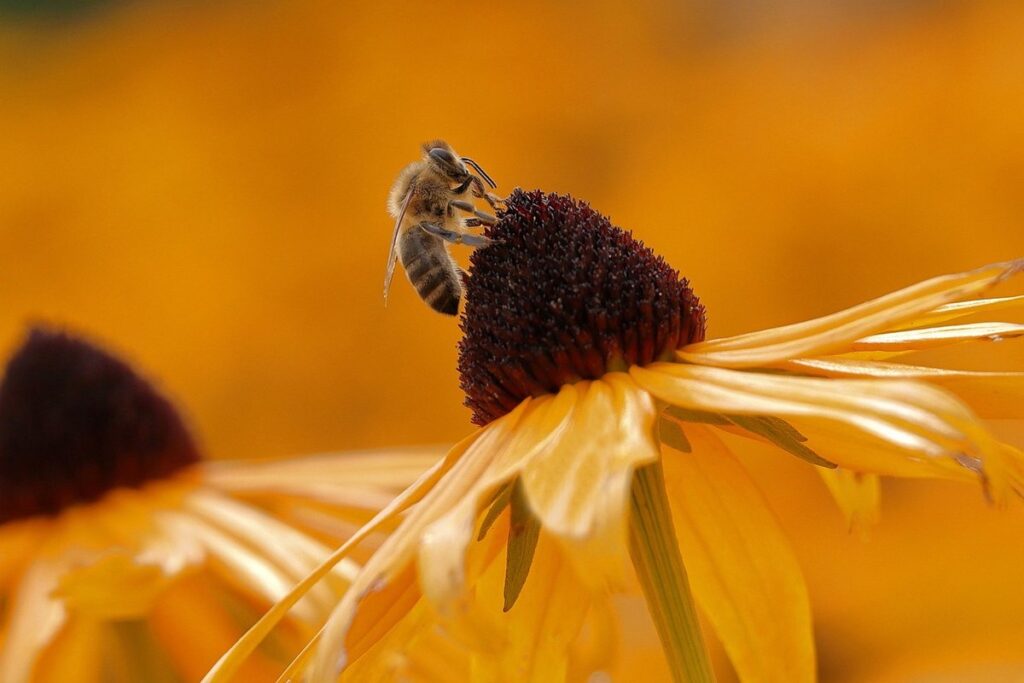
Black-eyed Susans are one of the most recognizable and beloved wildflowers native to North America. They’re aptly named for their distinctive dark centers and bright yellow petals that resemble the classic American flower, Lady Black-Eyed Susan, after which they were likely named.
These daisy-like flowers are hardy in USDA zones 3-9, meaning they can thrive in a wide range of climates and conditions. Their growth habit is upright, reaching heights of around 2-4 feet, with a spread of about 1-2 feet. They bloom from mid-to-late summer, producing an abundance of nectar-rich flowers that attract pollinators like bees and butterflies.
One of the reasons Black-eyed Susans are so popular among gardeners is their ease of growth and low maintenance requirements. They’re drought-tolerant, can thrive in poor soil, and don’t require deadheading or frequent pruning. In fact, it’s best to let them self-seed, as this allows them to spread naturally and create a beautiful, informal display.
When growing Black-eyed Susans from seed, keep these characteristics and growth habits in mind to provide the right conditions for success.
Ideal Climate and Soil Conditions for Black-Eyed Susans
Black-eyed Susans thrive in well-draining soil and full sun to partial shade conditions. When it comes to temperature, they prefer a range of 65°F to 95°F (18°C to 35°C). Avoid planting them in areas with frost, as this can damage the delicate seeds.
In terms of sunlight, Black-eyed Susans need at least six hours of direct sunlight per day. However, they can tolerate partial shade, making them an excellent choice for gardens with varying levels of sunlight. When selecting a location, choose a spot that receives morning sun and afternoon shade to prevent scorching.
When it comes to soil preferences, Black-eyed Susans love dry to medium moisture levels. Avoid planting them in areas with standing water or where water tends to collect. The ideal soil pH for Black-eyed Susans is between 6.0 and 7.0. To achieve this, mix in compost or well-rotted manure to improve the soil structure and fertility.
When growing from seed, it’s essential to replicate these conditions to give your plants the best chance of success. By choosing a spot with suitable sunlight and soil characteristics, you’ll be well on your way to cultivating healthy Black-eyed Susans.
Sourcing High-Quality Seeds
Sourcing high-quality seeds can be a challenge, but it’s essential for successfully growing Black-Eyed Susans from seed. We’ll explore some tips and tricks to help you find the best seeds for your garden.
Choosing the Right Seed Type
When it comes to growing black-eyed susans from seed, selecting the right type of seed is crucial for success. There are three primary types of seeds: heirloom, hybrid, and open-pollinated. Each has its advantages and disadvantages.
Heirloom seeds come from plants that have been saved and handed down through generations, preserving their unique characteristics and traits. These seeds often produce flowers with varying colors and patterns, adding to the plant’s natural beauty. However, they can be less reliable in terms of germination rates and may require more maintenance.
Hybrid seeds, on the other hand, are bred for specific qualities like disease resistance or increased vigor. They tend to perform consistently well but might not produce seeds that retain their parent plant’s desirable traits. Hybrid seeds can also be more expensive than heirloom or open-pollinated options.
Open-pollinated seeds are another option, allowing you to save and replant the seeds from your harvest. These seeds often offer a balance between reliability and genetic diversity, making them an excellent choice for gardeners who want to experiment with new varieties.
Consider your gardening goals and experience when choosing between these seed types. If you’re looking for unique flowers or want to preserve the characteristics of your parent plant, heirloom or open-pollinated seeds might be the best fit.
Where to Buy Seeds: Online vs. Local Nurseries
When it comes to sourcing high-quality black-eyed susan seeds for growing from seed, you have several options to consider. Online seed retailers and local nurseries are two of the most popular sources, but what’s the best choice for you?
Online seed retailers offer a wide selection of varieties, often with detailed descriptions, reviews, and ratings to help you make an informed decision. They also provide the convenience of being able to browse and purchase seeds from anywhere in the world at any time. However, be cautious when buying online, as some sellers may not guarantee the quality or viability of their seeds.
On the other hand, local nurseries typically carry a more limited selection of varieties, but you can inspect the plants and ask knowledgeable staff about growing conditions and seed quality. This option is ideal if you want to support your local community and get expert advice in person.
Additionally, consider checking with botanical gardens, specialty plant stores, or even online marketplaces like eBay or Craigslist for other sources of black-eyed susan seeds. Just be sure to exercise caution when buying from individual sellers and research the seller’s reputation before making a purchase.
Preparing the Seeds for Germination
To successfully grow Black-Eyed Susans from seed, it’s crucial to prepare them properly before sowing. In this next step, we’ll walk you through how to get your seeds ready for germination.
Seed Stratification: A Crucial Step
Seed stratification is a crucial step in growing black-eyed susans from seed, as it helps break dormancy and encourages germination. This process involves simulating the natural conditions of winter, which triggers the seeds to sprout. Black-eyed susan seeds typically require 30-60 days of cold stratification to overcome their innate dormancy.
To achieve this, you can either use a refrigerator or a specialized seed starting mix that has built-in moisture and cooling properties. Simply place the seeds in a damp paper towel or a container filled with the seed starting mix, seal it, and store it in the fridge at around 40°F (4°C). Check on the seeds periodically to ensure they remain moist but not waterlogged.
The importance of stratification cannot be overstated, as neglecting this step can lead to inconsistent germination rates or even complete failure. By incorporating seed stratification into your process, you’ll significantly improve the chances of successfully growing black-eyed susans from seed.
Seed Starting Mix and Containers
When it comes to starting black-eyed susan seeds, using the right seed starting mix and containers can make all the difference in promoting healthy root development. For black-eyed susans, which are native to North America, a well-draining potting mix specifically designed for seed starting is ideal.
You’ll want to avoid using regular garden soil as it may contain weed seeds or diseases that could harm your delicate seedlings. Instead, opt for a high-quality seed starting mix that’s rich in organic matter and has good water-holding capacity. This will help ensure that the seeds receive consistent moisture levels without becoming waterlogged.
When selecting containers, choose small pots or cell trays with built-in drainage holes to prevent water from accumulating and causing root rot. Make sure they’re also shallow enough for the seeds’ delicate roots to develop easily. Some gardeners prefer using biodegradable seed starting pods made of coconut coir or peat moss, which can be composted along with the spent potting mix after germination.
As a general rule of thumb, use one seed per container and fill each pot about 1/8 inch deep with the chosen seed starting mix. Plant the seeds at the same depth they’re packed in the packet and gently firm the soil to secure them.
Sowing and Caring for Black-Eyed Susans from Seed
Starting your black-eyed susan journey from seed can be a bit more challenging, but with some guidance, you’ll be on your way to growing these beautiful flowers in no time. This section walks through the process of sowing and caring for them successfully.
Planting Depth, Spacing, and Timing
When planting black-eyed susan seeds, it’s essential to get the depth, spacing, and timing just right. This will ensure that your seedlings develop strong roots and grow into healthy, vibrant flowers.
Start by sowing your seeds about 1/4 inch deep in well-draining soil. Black-eyed susans prefer full sun and can tolerate some drought, but consistent moisture promotes optimal growth. Space the seeds 12-18 inches apart to allow for proper air circulation and room to mature.
Timing is crucial when sowing black-eyed susan seeds. In most regions, it’s best to sow in late spring or early summer, about 8-10 weeks before the first frost. This allows the seedlings to develop a robust root system before winter sets in.
Be sure to firm the soil gently over the seeds to prevent washing them away during rainfall. Water thoroughly after sowing and keep the soil consistently moist until germination occurs, usually within 7-14 days. With proper care and attention, your black-eyed susans will thrive from seed to bloom.
Watering, Humidity, and Light Requirements
When sowing black-eyed susans from seed, it’s essential to provide optimal conditions for germination. In terms of watering, make sure not to overwater the soil. Black-eyed susans need consistent moisture, but their seeds can rot if exposed to too much water. Check the soil daily and gently water when the top inch feels dry to the touch.
Maintaining a humid environment also plays a crucial role in promoting germination. Cover the seed tray with a clear plastic bag or a cloche to maintain humidity levels between 70-80%. This will help keep the seeds warm and moist, encouraging them to sprout within 7-10 days.
In terms of light, black-eyed susans require indirect sunlight for optimal growth. Place the seed tray near an east- or west-facing window or under grow lights with a moderate intensity setting. Avoid direct sunlight, as it can cause the seeds to overheat and reduce germination rates. Keep in mind that these conditions are ideal for indoor sowing; outdoor planting should be done after the last frost date when soil temperatures reach at least 60°F.
Transplanting and Aftercare
Now that you’ve successfully grown your Black-Eyed Susans from seed, it’s time to transplant them into a larger space where they can thrive. This section will guide you through the transplanting and aftercare process.
When to Transplant Seedlings
Now that your Black-Eyed Susan seedlings have two sets of true leaves, it’s time to think about transplanting them into larger containers or directly into the garden. The ideal time for transplanting depends on the weather and the health of your seedlings.
Wait until the soil can be worked in your area, which is usually around 2-3 weeks after the last frost date. This allows the seedlings to establish a strong root system before being transplanted. Make sure the seedling’s stem is at least an inch long and has two sets of true leaves for successful transplanting.
Check the weather forecast before transplanting, as sudden changes in temperature or excessive rain can shock your seedlings. Transplant on a cloudy day to minimize stress. Harden off your seedlings by gradually exposing them to outdoor conditions over 7-10 days before transplanting. This will help prevent shock and ensure a smooth transition.
Transplant seedlings into larger containers or directly into the garden when they are between 4-6 inches tall. Space them about 12-18 inches apart, depending on the variety. Water thoroughly after transplanting and keep the soil consistently moist during the first week to facilitate establishment.
Fertilization and Pest Control Strategies
Fertilizing your black-eyed susans is crucial for their growth and development. A balanced fertilizer with equal parts nitrogen, phosphorus, and potassium (NPK) will provide the necessary nutrients for a healthy plant. Feed your seedlings once a month during the first growing season, following the package instructions for application rates.
As for pest control, black-eyed susans are relatively low maintenance, but they can be susceptible to pests like aphids, whiteflies, and spider mites. Organic methods are always preferred over chemical pesticides. To keep these pests at bay, use neem oil or insecticidal soap to spray the plants regularly. You can also introduce beneficial insects like ladybugs or lacewings into your garden to control pest populations naturally.
It’s essential to monitor your plants closely for any signs of pests or diseases and take action promptly to prevent infestations from spreading. Regularly inspecting your black-eyed susans will help you identify potential problems early on, allowing you to address them before they become severe issues.
Common Challenges and Troubleshooting Tips
Growing Black-Eyed Susans from seed can be a bit tricky, so we’re here to help you troubleshoot common issues that might be getting in the way of success.
Identifying and Resolving Seed Germination Issues
Seed germination issues can be frustrating, especially when you’re excited to see your Black-Eyed Susans take shape. If your seeds are taking longer than expected to sprout, there might be a few reasons why. One common cause is that the soil is too dry or too cold for optimal germination. Check the seed packet for specific temperature requirements – some varieties of Black-Eyed Susans prefer warmer temperatures around 70-80°F (21-27°C).
Another issue you may encounter is damping off, a fungal disease that can kill young seedlings. This often occurs when the soil is too moist and humid, creating an ideal breeding ground for fungi. To prevent this, make sure to sow seeds at the right depth and maintain good air circulation around your seedlings.
If poor seedling growth is the problem, it could be due to inadequate light or nutrients. Black-Eyed Susans require full sun to partial shade, so ensure they’re getting enough direct sunlight. You can also try fertilizing with a balanced, water-soluble fertilizer once seedlings have two sets of leaves.
Keep in mind that even healthy seeds can take longer than usual to germinate due to environmental factors or quality issues with the seed stock. If you’ve tried everything and still encounter problems, consider starting with fresh seeds or consulting with a local nursery for advice on the best varieties for your region.
Managing Pests and Diseases in Black-Eyed Susans
When growing Black-Eyed Susans from seed, you may encounter common pests and diseases that can threaten their health. To prevent these issues, it’s essential to understand the signs of infestation or infection and take proactive steps.
Powdery mildew is a fungal disease that causes white powder to form on leaves and stems. It thrives in humid conditions and can be prevented by providing good air circulation, watering carefully, and removing infected areas. Regularly inspect your plants for powdery mildew and treat promptly if you notice any symptoms.
Aphids are tiny insects that feed on plant sap, causing curled or distorted leaves. To control aphid populations, introduce natural predators like ladybugs or lacewings to your garden, or use neem oil spray to repel them.
Slugs can be a significant problem for Black-Eyed Susans, especially at night when they emerge to feed. Use copper tape around the base of your plants to deter slugs and other pests from crawling up. You can also hand-pick slugs under moonlight or use beer traps to capture them.
Remember, prevention is key. Regularly inspect your plants for signs of infestation or infection, and take action promptly to prevent pest and disease issues from getting out of control.
Harvesting and Propagating Black-Eyed Susans
Now that you’ve successfully grown your Black-Eyed Susans from seed, let’s focus on harvesting and propagating these beautiful flowers to enjoy for years to come. This section will cover the best methods for collecting seeds and dividing established plants.
When to Expect Blooms and Seed Production
Black-eyed susans (Rudbeckia hirta) are one of those perennials that seem to bloom forever. However, if you’re growing them from seed, understanding their flowering cycle is crucial for knowing when and how often they’ll produce blooms and seeds.
Typically, black-eyed susan plants take around 3-4 months to mature after sowing seeds indoors or direct sowing outdoors in the spring. Once they reach maturity, they start producing small yellow flowers with dark centers (or “black eyes”) from mid-to-late summer. These blooms can last for several weeks and are a favorite of pollinators like bees and butterflies.
After the blooming period is over, black-eyed susans will produce seed heads, which typically turn brown within 1-2 months. The seeds themselves mature after another month or so, usually by late fall. At this point, you can collect them for sowing in the spring or let them fall to the ground for natural dispersal.
It’s worth noting that black-eyed susans are prolific seed producers, and with proper care, they can self-seed in your garden year after year.
Collecting Seeds for Future Plantings
Collecting seeds for future plantings is an essential part of growing black-eyed Susans from seed. To ensure successful propagation, it’s crucial to harvest, dry, and store the seeds properly. Begin by selecting mature pods that are dry and brown, usually after the first frost or when the petals have dropped.
Cut off the pod carefully, leaving a small piece attached to the stem. Place the pods in a paper bag or a dry container to catch any loose seeds. Tie the top of the bag with a twist tie or rubber band to prevent seeds from escaping. Store the bag in a cool, dark place for 1-2 weeks to allow the seeds to mature further.
Once the seeds are dry and free-flowing, transfer them to an envelope or container for long-term storage. Label the container with the date, variety name (if applicable), and any other relevant information. Store the seeds in an airtight container at room temperature, away from direct sunlight and moisture. This will help preserve their viability for up to 5 years.
When selecting seeds for future plantings, choose those that are plump, firm, and free of mold or mildew. Avoid using seeds that have been exposed to water, as this can damage their embryo and reduce germination rates. By following these steps, you’ll be able to collect high-quality seeds for successful black-eyed Susan propagation.
Frequently Asked Questions
Can I grow Black-Eyed Susans indoors?
Yes, it’s possible to grow Black-Eyed Susans indoors, but they require specific conditions to thrive. Provide them with bright, indirect light and maintain a consistent temperature between 65-75°F (18-24°C). Keep the soil consistently moist, but not waterlogged.
How long does seed stratification take?
Seed stratification is an essential step in growing Black-Eyed Susans from seed. The duration of stratification can vary depending on the type of seeds and climate conditions. As a general rule, stratify seeds for 30-90 days at a temperature between 35-45°F (2-7°C). This process mimics natural winter conditions, promoting germination.
Can I use regular potting mix to sow Black-Eyed Susans?
No, it’s not recommended to use regular potting mix when sowing Black-Eyed Susans. A seed starting mix with a pH between 6.0 and 7.0 is ideal for these seeds. This specialized mix contains ingredients that help prevent fungal diseases and promote healthy root development.
How do I know if my Black-Eyed Susans are getting enough light?
Black-Eyed Susans require full sun to partial shade, depending on the climate. If your seedlings are not receiving sufficient light, they may become leggy or develop weak stems. Monitor their growth and adjust their location accordingly. In areas with extreme sunlight, consider providing some afternoon shade to prevent scorching.
What’s a common mistake beginners make when sowing Black-Eyed Susans?
One common mistake is overwatering the seeds during germination. This can lead to fungal diseases or root rot, which can be devastating for young seedlings. Keep the soil consistently moist but not waterlogged, and ensure good air circulation around the seedlings to prevent moisture-related issues.