Harvesting honey is an exciting milestone for beekeepers, but timing is everything. If you’re new to keeping bees, it can be tricky to determine when the nectar flow has slowed down and the honey is ready to be collected. On the other hand, if you harvest too early or late, the quality of your honey may suffer. That’s why learning when to harvest honey safely and efficiently is crucial for successful beekeeping.
In this comprehensive guide, we’ll walk you through the key factors that influence timing, including visual cues, nectar flow measurements, and honey quality assessments. We’ll also cover how to prepare for harvest, ensuring a safe and efficient process from start to finish. Whether you’re an experienced beekeeper or just starting out, our expert advice will help you make the most of your honey harvest and enjoy the sweet rewards of your labor.
Understanding the Basics of Honey Harvesting
When it comes to harvesting honey, understanding the basic process is essential for success. In this next part, we’ll explore the fundamentals of extracting honey from your beehives.
Factors Influencing Harvest Timing
When it comes to harvesting honey, timing is everything. But what factors influence this crucial decision? As a beekeeper, you need to consider the intricate dance of weather, nectar flow, and bee health to ensure that your harvest is both plentiful and healthy.
Weather patterns play a significant role in determining when to harvest honey. Heavy rainfall, for instance, can dilute the nectar in flowers, reducing the quality and quantity of honey. Similarly, extreme temperatures can stress the bees, affecting their ability to produce high-quality honey. On the other hand, a gentle spring with mild temperatures can signal an optimal time for harvesting.
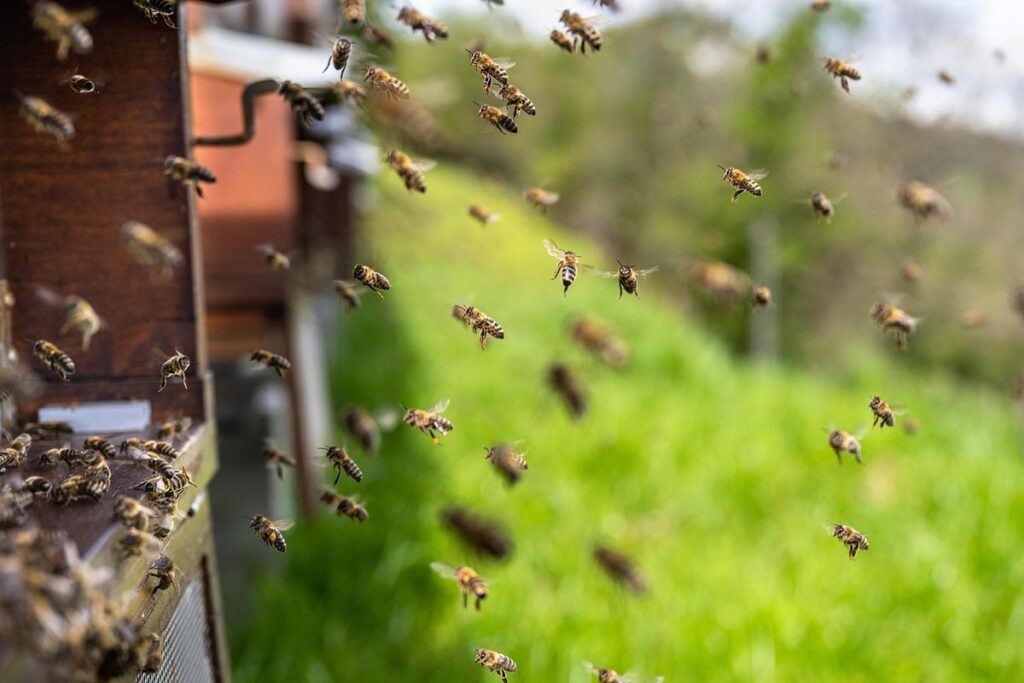
Nectar flow is another critical factor to consider. A strong nectar flow indicates that the bees are actively collecting nectar from the surrounding flowers, which means there’s likely a good supply of honey available. Conversely, a weak nectar flow may indicate that the bees are struggling to find food sources, impacting honey production.
Monitoring bee health is also essential when deciding on harvest timing. If the colony appears robust and healthy, with plenty of stored honey, it may be safe to harvest some or all of the honey stores. However, if the bees seem stressed or depleted, it’s best to wait until they’ve replenished their stores before harvesting.
Ultimately, determining the optimal harvest timing requires a delicate balance between these factors. By carefully monitoring weather patterns, nectar flow, and bee health, you can ensure that your honey harvest is not only successful but also sustainable for the long-term health of your colony.
Importance of Monitoring Bee Colonies
Monitoring bee colonies is crucial for determining when to harvest honey. It allows you to track the colony’s health and honey production, enabling you to make informed decisions about harvesting. Without regular monitoring, you may inadvertently disrupt the colony’s natural cycle or even cause harm to the bees.
By regularly inspecting your beehives, you can identify issues such as disease, pests, and nutrient deficiencies that could impact honey production. You’ll also gain valuable insights into the colony’s growth patterns, helping you anticipate when the nectar flow is at its peak. This knowledge allows you to plan ahead for harvesting, ensuring you catch the honey in its prime.
As a general rule, it’s recommended to inspect your beehives every 7-10 days during peak production periods. During these inspections, look for signs of strong nectar flows, such as a buildup of honey stores or bees clustering around the hive entrance. By monitoring your colonies regularly and responding promptly to any issues that arise, you’ll be able to time your honey harvest perfectly, minimizing waste and maximizing yields.
Determining the Right Time for Harvest
Determining the right time for harvest is crucial, as waiting too long can spoil your honey, while harvesting too early may leave you with a disappointing yield. Let’s explore some practical tips to guide you in making this decision.
Visual Cues: Examining Hive Conditions
When inspecting your hive, pay close attention to visual cues that signal it’s time to harvest. A key indicator is the condition of the honeycomb itself. Look for combs with a thick, even coating of beeswax and an abundance of sealed brood cells. This suggests a strong, healthy colony with ample resources.
The color of the honey is also important. High-quality honey will typically have a rich, golden hue due to its water content and floral origins. Avoid harvesting from combs with dark or discolored honey, as this can indicate contamination or issues within the hive.
Observe your bees’ activity levels as well. During peak foraging times, you should see a steady stream of workers entering and exiting the hive, carrying pollen and nectar. If they appear sluggish or reluctant to forage, it may be a sign that the colony is running low on resources or facing environmental stressors.
Take note of any signs of mold, fungus, or pests within the hive. This can compromise the quality and safety of your harvest. A healthy, thriving colony will typically show few visible issues with its honeycomb or inhabitants.
Measuring Nectar Flow and Bee Activity
To determine the optimal harvest window, it’s essential to measure nectar flow and bee activity levels. You can start by monitoring the weather patterns in your area, as warm temperatures and adequate rainfall promote healthy nectar flow.
Regularly check the hive for signs of high activity, such as a steady stream of bees entering and leaving the hive or an increase in the number of new bees being added to the colony. These indicators suggest that the nectar flow is robust, and it’s a good time to harvest.
To gauge the nectar flow more accurately, you can use tools like the “nose-to-tail” method, where you inspect the brood nest for the presence of sealed frames or assess the honey stores by cutting open a few combs. This will give you an idea of the colony’s productivity and help you determine if it’s ready for harvesting.
It’s also crucial to track your observations over time to identify patterns and trends in nectar flow and bee activity levels. By doing so, you’ll develop a better understanding of when to harvest at its peak, ensuring maximum honey yield and quality.
Assessing Honey Quality and Maturity
To harvest honey at its best, it’s crucial you can assess its quality and maturity. This involves checking for factors like moisture levels and aroma.
Characteristics of Mature Honey
When it comes to assessing whether your honey is mature and ready for harvest, there are several characteristics you can look out for. First and foremost, take a closer look at the color of your honey. Mature honey will typically range in color from a light amber to a dark brown, depending on the type of flowers the bees have been collecting nectar from.
Another indicator of maturity is the aroma of the honey. Mature honey should have a rich, floral scent that’s noticeable but not overpowering. If it smells sour or soapy, it may be a sign that the water content is too high, indicating immaturity.
In terms of texture, mature honey will typically be smooth and even, with a consistent viscosity. If it’s grainy or crystalline, it may be a sign that it’s not yet ready for harvest.
When inspecting your honey, also check its weight and moisture levels to ensure they meet the standards for maturity. With practice and patience, you’ll develop an eye for what mature honey looks like – and you’ll know exactly when to bring in the harvest!
Factors Affecting Honey Quality
When assessing the quality and maturity of honey, it’s essential to consider several factors that can impact its overall quality. One critical factor is moisture content, which refers to the amount of water present in the honey. If the moisture level exceeds 18%, the honey may become discolored, crystallized, or even ferment. To check for this, beekeepers can use a refractometer to measure the honey’s moisture content.
Another crucial factor affecting honey quality is impurities, such as wax, propolis, and other debris that may contaminate the nectar. These contaminants can not only affect the honey’s appearance but also its taste, aroma, and nutritional value. Regular cleaning and maintenance of beehives can help minimize these impurities.
Fermentation is another critical factor to consider. If honey has fermented, it may exhibit off-flavors or aromas, which can make it unsuitable for consumption. To prevent fermentation, beekeepers should ensure that the honey is extracted within 24-48 hours after harvesting and store it in a clean, dry environment.
Regular checks on these factors will help you determine when to harvest honey and ensure that your final product meets high quality standards.
Preparing for Harvest: Equipment and Safety Considerations
Before you start harvesting your honey, it’s essential to have the right equipment and consider important safety precautions to avoid any accidents or damage. Let’s review what you need to get started safely.
Essential Tools and Equipment
When it comes to harvesting honey, having the right tools and equipment is crucial for safe and efficient operation. You’ll want to ensure you have a reliable extractor, as this will determine the quality of your harvest. Consider investing in an electric or manual centrifugal extractor, which can process larger quantities of frames.
Protective gear is also essential for safeguarding yourself from stings and other potential hazards. This includes a beekeeping suit, veil, gloves, and a smoker to calm the bees. Regular maintenance of equipment is vital as well; make sure your extractor is clean and in good working order before each use.
Other tools you’ll need include a cappings scraper for removing wax cappings from the frames, and a honeycomb foundation tool for ensuring proper alignment. It’s also a good idea to have some basic first aid supplies on hand, including an EpiPen or other epinephrine injector in case of severe allergic reactions.
Personal Protective Gear and Best Practices
When working with bees and extracting honey, it’s crucial to take necessary safety precautions to avoid injuries and exposure to potential allergens. To protect yourself from stings, use a beekeeping suit that includes a veil, gloves, and boots. A bee escape device should be used to prevent bees from entering the honey super during harvest.
Regularly inspect your equipment for damage or wear and tear, especially on protective gear like gloves and veils. Ensure all connections between frames are secure, as loose parts can cause accidents. Store equipment and honey in a clean environment, away from pests and contamination sources.
Maintain good hygiene by washing hands thoroughly before handling bees or equipment. Avoid touching your face or eyes while working with bees, as this can lead to unwanted stings. Consider wearing a mask if you have allergies or are sensitive to bee products. Always follow established procedures for handling and storing honey to prevent contamination and maintain quality. Regularly inspect the beehive for disease and pests to ensure a healthy colony.
Remember, prevention is key when it comes to avoiding accidents during harvest. Familiarize yourself with emergency response procedures in case of an allergic reaction or severe stinging incident.
Techniques for Safe and Effective Harvesting
When it comes to harvesting honey, timing is everything – learn the techniques that will ensure a safe and successful harvest every time. We’ll walk you through the essential steps to achieve optimal results.
Extracting Honey from Frames
Extracting honey from frames requires care and attention to detail to avoid damaging the comb or harming the bees. To extract honey effectively, start by preparing your equipment, including a extractor, uncapping knife, and brush. Remove the frames from the hive and place them into the extractor, ensuring they are secure and level.
Next, use an uncapping knife to gently remove any wax cappings from the cells. This allows the honey to flow freely when extracted. Brush away any excess wax or debris from the frames before placing them in the extractor.
Operate the extractor slowly and smoothly to prevent agitation of the beeswax or honeycomb. Extracting too quickly can cause the comb to tear, leading to damage and waste. Monitor the temperature and rate of extraction to avoid overheating the honey or causing the wax to melt.
As you extract the honey, check for any signs of spoilage or contamination, such as mold, fermentation, or off-odors. If you notice any issues, stop the extraction process immediately and inspect the frames further. Proper extraction techniques will help preserve the quality and integrity of your honey.
Handling and Storage Procedures
When harvesting honey, proper handling and storage procedures are crucial to maintaining its quality. This means avoiding contamination, moisture buildup, and other factors that can spoil the honey.
To prevent contamination, always handle equipment with clean hands and sanitized tools. If you’re bottling directly from the hive, make sure to sanitize any containers or equipment before use. Use a bottle brush to scrub out any debris or residue from previous batches.
Bottled honey should be sealed tightly to prevent moisture from entering the container. For longer-term storage, consider using airtight containers or jars with tight-fitting lids. Store these containers in a cool, dry place away from direct sunlight and heat sources.
It’s also essential to label your bottles clearly, including the date of harvest, type of honey, and any relevant allergen information. This ensures that you can track the age of your stored honey and use it within its optimal window for quality and flavor.
Post-Harvest Care and Maintenance
Now that you’ve harvested your honey, it’s time to focus on proper post-harvest care to ensure it remains healthy and fresh for consumption. This includes steps like cleaning equipment and storing frames carefully.
Hive Reorganization and Repair
After harvesting honey, it’s essential to give your beehive some TLC to ensure the health and well-being of your bees. Reorganizing and repairing the hive is a crucial step that often gets overlooked, but it can make all the difference in maintaining a thriving colony.
Start by removing any debris or old comb that may have been damaged during harvesting. This will give you a clean slate to work with and help prevent disease from spreading. Next, inspect the hive for any structural damage, such as cracked frames or torn screens. Repair these issues promptly to maintain the integrity of your hive.
Reorganize the hive by rearranging the frames to ensure even spacing and adequate ventilation. Remove any weak or diseased combs, replacing them with new ones to promote healthy growth. Don’t forget to clean and disinfect all equipment before putting it back in place. By taking these simple steps, you’ll be creating a happy and healthy environment for your bees to thrive in the months to come.
A well-maintained hive is also less prone to pests and diseases, which can save you time and effort in the long run.
Monitoring Bee Health and Activity
Monitoring bee health and activity levels post-harvest is crucial to ensure the continued productivity of your apiary. After harvesting honey, it’s essential to keep a close eye on your bees’ well-being. Start by regularly inspecting the hive for signs of disease or pests. Look for moldy combs, unusual odors, or an excessive amount of debris.
Check the brood pattern and ensure that there are enough nurse bees to care for the young. A healthy brood should have a consistent pattern of eggs, larvae, and pupae. If you notice any irregularities, it may indicate a problem with queen performance or nutrition.
Monitor the bees’ activity levels by observing their behavior during inspections. Watch for signs of stress, such as increased agitation or absconding (leaving the hive). Keep an eye on the temperature in the hive, ideally between 90-100°F, and ensure that there is adequate ventilation to prevent moisture buildup.
Regularly weighing the honey super will also help you track the bees’ activity levels. A significant decrease in weight may indicate a problem with foraging or storage issues within the hive.
Frequently Asked Questions
How do I know when to start monitoring nectar flow measurements?
Monitoring nectar flow is crucial for determining the right time for harvest. Start by observing your bees’ activity around flowers and measuring the nectar flow using a flow meter or other tools. Typically, this begins 2-4 weeks before peak nectar flow, allowing you to track changes in nectar production.
Can I harvest honey if there’s been heavy rainfall recently?
Yes, rainfall can impact honey quality and quantity. However, it doesn’t necessarily mean you should delay harvesting entirely. Assess the hive conditions, checking for signs of water damage or mold growth. If all appears well, proceed with caution, but be prepared to discard any affected frames.
How do I ensure my bees are healthy enough for harvest?
To determine if your bees are healthy enough for harvest, examine their overall condition, including body weight and brood population. Look for signs of disease or parasites, such as unusual behaviors, discolored wings, or excessive drone populations. If you notice any issues, it’s best to delay harvesting until the colony is healthy.
Can I harvest honey if some frames are still being used by the bees?
No, it’s essential to wait until all frames are empty and clean before harvesting. Leaving frames with active bees can lead to damage or even harm the bees during extraction. Wait for the bees to complete their work and then proceed with harvesting, ensuring both quality and safety.
What’s the best way to store my harvested honey?
To preserve the quality of your harvested honey, it’s crucial to store it properly. Transfer the honey to clean, dry containers, and seal them tightly. Store in a cool, dark place, away from direct sunlight and moisture. Consider using glass jars or containers with tight-fitting lids to prevent contamination and maintain flavor.