If you’re a gardener looking to add some punch to your fall harvest, growing hardneck garlic bulbs is an excellent choice. Not only do they bring a burst of flavor to your cooking, but they also require minimal care and can be harvested for months to come. However, successful growth depends on proper planning and technique, which is where our comprehensive guide comes in. In this article, we’ll walk you through the process of planting hardneck garlic bulbs in the fall, including tips on selecting the right variety for your climate and region. We’ll also share expert advice on how to optimize growth and ensure a bountiful harvest. Whether you’re a seasoned gardener or just starting out, our guide will help you grow the perfect hardneck garlic bulbs for optimal flavor and freshness.
Understanding Hardneck Garlic
So, you want to grow hardneck garlic? Let’s dive into understanding its unique characteristics, growth habits, and what makes it a great choice for fall planting.
Characteristics of Hardneck Garlic
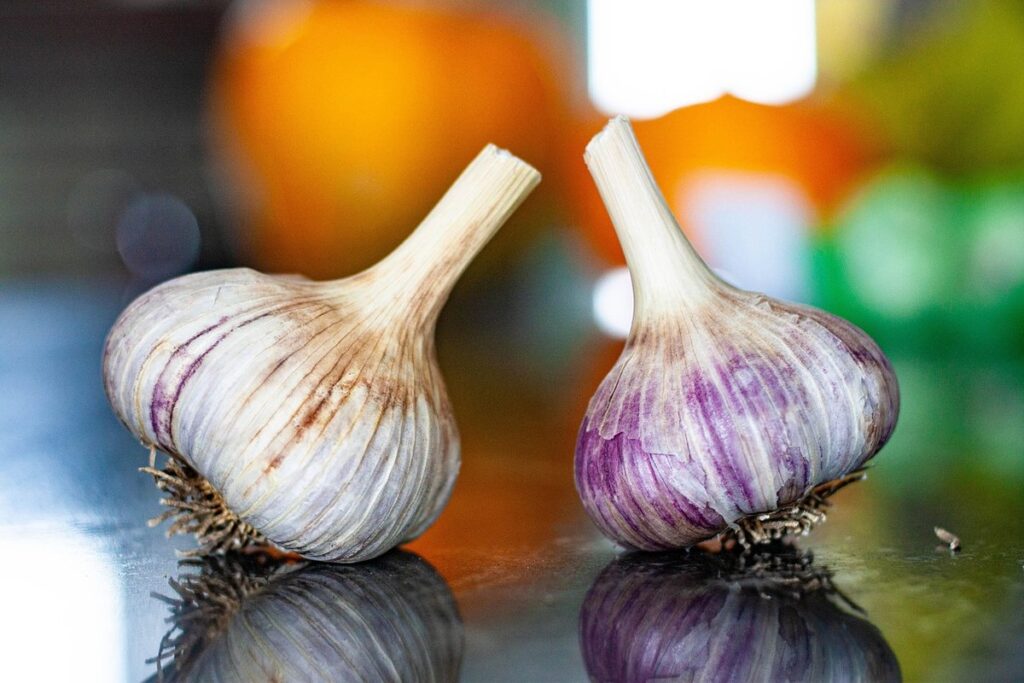
One of the most distinctive characteristics of hardneck garlic is its thicker stalk, also known as the “scape.” This stalk grows upright from the center of the bulb and can reach up to 2 feet tall. In contrast to softneck garlic, which has a thinner stem that wraps around the bulb, the thick scape of hardneck garlic serves as a natural trellis for the plant.
Another key feature of hardneck garlic is its smaller cloves, typically ranging from 4-6 per bulb. This lower clove count means you’ll have fewer bulbs to harvest, but each one will be more potent and flavorful. Hardneck garlic also tends to mature earlier than softneck varieties, with a typical harvesting time of 90-120 days.
Perhaps the most significant advantage of hardneck garlic is its robust flavor profile. With a stronger, pungent taste that’s often described as “garlicy,” hardneck garlic is perfect for cooking methods like roasting or grilling where you want to bring out the full depth of flavor.
Types of Hardneck Garlic
When it comes to hardneck garlic varieties, you’ll find that each one has its unique characteristics and growing requirements. Take ‘Chesnok Red’, for instance, a popular choice among gardeners due to its rich flavor and tender cloves. This variety prefers well-draining soil with a pH between 6.0 and 7.0, making it ideal for regions with slightly acidic to neutral soil conditions.
‘Hard Neck Robust’ is another widely cultivated hardneck garlic that thrives in cooler climates. It requires full sun exposure and can tolerate some frost, but its strong flavor may be compromised if the temperature drops too low. ‘Creole’, on the other hand, is more resilient and adaptable, tolerating a wide range of temperatures and soil types.
When planting these varieties, keep in mind their specific needs to ensure optimal growth and flavor development. Consider factors such as climate, soil pH, and sunlight exposure when selecting your hardneck garlic type. Researching each variety’s unique requirements will help you make informed decisions for your fall garden and produce the best possible results.
Benefits of Planting in Fall
When planting hardneck garlic bulbs in fall, you’ll want to know how it benefits your garden’s overall health and productivity. Let’s dive into the advantages of planting in autumn!
Why Fall is an Ideal Time for Planting
Fall is often considered the ideal time for planting hardneck garlic bulbs, and for good reason. Unlike spring planting, which can be hindered by unpredictable weather patterns and soil temperatures that may still be too cool for optimal growth, fall planting allows you to take advantage of improved soil conditions.
As the temperature cools down in the fall, the soil’s microbial activity increases, providing a boost to your garlic plants’ roots. This means they’ll have access to more nutrients and water, setting them up for a strong start in the spring. Additionally, fall planting reduces pest pressure, as many common garlic pests, such as aphids and spider mites, are less active during this time.
This is also a great opportunity to give your hardneck garlic bulbs a head start on the growing season, resulting in higher yields come harvest time. By getting them planted in the fall, you’ll be able to enjoy a more bountiful harvest of these delicious and versatile bulbs.
Preparing the Soil for Fall Planting
Preparing your soil for fall planting is crucial for hardneck garlic bulbs’ success. Before planting, ensure your garden bed has a well-balanced mix of nutrients and optimal drainage. If your soil lacks organic matter, add 2-3 inches of compost or well-rotted manure to enrich it.
Next, till the soil gently but thoroughly to break up any clods and aerate it. Avoid over-tilling, which can damage the delicate roots of hardneck garlic bulbs. Instead, use a fork to loosen the top 6-8 inches of soil without turning it over entirely.
Mulching is also essential for fall planting, as it helps retain moisture and suppress weeds that compete with your garlic for resources. Spread 2-3 inches of organic mulch like straw or wood chips around the plants after planting, keeping it a few inches away from the base to prevent rot.
Choosing the Right Hardneck Garlic Variety
When planting hardneck garlic, selecting the right variety is crucial for success. In this guide, we’ll walk you through some popular hardneck garlic options to consider for your garden.
Factors to Consider When Selecting a Variety
When selecting a hardneck garlic variety for fall planting, there are several key factors to consider. First and foremost, think about your climate. Some varieties are better suited to cooler temperatures, while others thrive in warmer conditions. For example, ‘Robust’ and ‘Creole’ varieties tend to do well in areas with moderate winters, but may not perform as well in extremely cold climates. On the other hand, ‘Porcelain’ and ‘Silverskin’ varieties are more adaptable to colder temperatures.
Next, consider your soil type. Hardneck garlic prefers well-draining soil that’s rich in organic matter. If you have heavy clay or sandy soil, choose a variety that’s known to perform well in those conditions. For instance, ‘Rocambole’ and ‘Marblehead’ varieties are known for their ability to tolerate poor drainage.
Lastly, think about your desired flavor profile. Do you prefer a strong, pungent garlic or something milder? Certain varieties tend to have more pronounced flavors than others. For example, ‘Elephant’ and ‘Artichoke’ varieties are known for their robust, complex flavors.
Popular Varieties for Home Growers
When it comes to growing hardneck garlic at home, there are several popular varieties that stand out for their exceptional quality and adaptability. Among these, ‘Muskmelon’ and ‘German White’ are two of the most sought-after choices among home growers.
‘Muskmelon’, as its name suggests, has a sweet and mild flavor profile, making it an excellent choice for cooking and roasting. This variety is known for its high yield, robust growth, and resistance to disease. However, it does require some extra care during harvest time due to its tendency to sprout earlier than other varieties.
On the other hand, ‘German White’ boasts a milder flavor with hints of nuttiness, which pairs well in a range of recipes from soups to salads. Its high storage potential and resistance to bolting (premature flowering) make it an attractive option for home growers looking for long-term availability.
Planting Hardneck Garlic Bulbs
To ensure a successful harvest, it’s essential that you properly plant your hardneck garlic bulbs, following specific techniques to promote healthy growth and robust flavor. This section will guide you through the process step by step.
Steps for Successful Planting
When planting hardneck garlic bulbs for fall harvest, it’s essential to follow specific steps to ensure successful growth and minimize risks of disease or pests. First, choose a spot with well-draining soil and full sun, ideally with a pH between 6.0 and 7.0.
Next, prepare the soil by loosening it to a depth of about 8-10 inches using a fork. Mix in a balanced fertilizer according to package instructions to provide nutrients for growth. Then, plant individual cloves 4-6 inches apart in rows that are spaced 12-18 inches apart. The pointed end of each clove should face upwards.
Planting timing is critical for hardneck garlic bulbs. Typically, fall planting begins about 6-8 weeks before the first frost date in your area. Plant the cloves at a depth that’s slightly more than the height of the bulb, usually around 2-3 inches deep. As you plant, make sure to leave enough space between rows and within each row for proper growth and air circulation.
Water the soil gently but thoroughly after planting, then keep it consistently moist during the growing season.
Handling and Storage of Bulbs
When handling and storing hardneck garlic bulbs before planting, it’s essential to maintain their viability and health. Start by gently removing any damaged or rotting cloves from the bulb. This will prevent the spread of disease and ensure that healthy growth occurs after planting.
To store the bulbs, keep them in a cool, dry place with good air circulation. Avoid storing them near heating vents or direct sunlight, as this can cause moisture to build up and lead to rot. Store them in paper bags or mesh bags, allowing for airflow around each bulb. Do not store them in plastic bags or containers, as this can create an environment conducive to fungal growth.
Check on the bulbs periodically and remove any that are showing signs of sprouting or mold. This will help prevent the spread of disease and ensure that only healthy cloves are planted. By following these steps, you’ll be able to maintain the quality and health of your hardneck garlic bulbs until planting time.
Growing Hardneck Garlic: Tips and Tricks
To successfully grow hardneck garlic, you’ll want to know how to prepare the soil, plant the bulbs at the right depth, and maintain optimal growing conditions throughout the season. With these tips, you’ll be well on your way to a bountiful harvest!
Common Challenges and Solutions
As you embark on growing hardneck garlic, you may encounter common challenges that can hinder your success. Pests such as aphids, spider mites, and thrips can cause significant damage to your bulbs. To combat these issues, use neem oil or insecticidal soap to control infestations. Keep in mind that integrated pest management (IPM) techniques are essential for maintaining a healthy ecosystem.
Diseases like white rot and pink root can also devastate your garlic crop. Prevent fungal growth by ensuring good air circulation around plants and maintaining a clean growing area. Remove any debris, and avoid overwatering, which can lead to disease development. Regularly inspect your plants for signs of distress and take action promptly.
Poor yields can be caused by inadequate soil quality or insufficient sunlight. To address this, test your soil pH levels and amend accordingly. Provide your garlic with full sun (at least six hours of direct sunlight) and ensure it receives adequate moisture during the growing season. By addressing these common challenges proactively, you’ll be well on your way to a bountiful harvest of delicious hardneck garlic bulbs.
Advanced Techniques for Optimal Growth
To achieve optimal growth with your hardneck garlic bulbs, it’s essential to implement some advanced techniques that will give you a head start on healthy and robust plants. Companion planting is an excellent way to boost growth and flavor by pairing your garlic with other vegetables that complement its needs.
For example, planting garlic alongside comfrey or marigold can help repel pests like aphids and nematodes, which can be detrimental to garlic health. Comfrey, in particular, acts as a fertilizer plant, providing essential nutrients to the soil for your garlic. On the other hand, mulching is another vital technique that will keep your garlic plants cool during hot summer months.
When choosing mulch, opt for organic materials like straw or wood chips, which retain moisture and suppress weeds without adding extra fertilizers. Apply a 2-3 inch layer around the base of your garlic plants to insulate them from extreme temperatures and maintain soil moisture levels. This simple yet effective technique will ensure your hardneck garlic bulbs grow strong and healthy throughout their lifespan.
Harvesting and Storing Hardneck Garlic
Once your hardneck garlic has finished curing, it’s essential to harvest and store the bulbs properly to maintain their flavor, texture, and longevity. Here we’ll cover how to do just that.
Timing the Harvest
Timing the Harvest is crucial for hardneck garlic bulbs, as it determines their flavor, storage life, and overall quality. Generally, you can expect to harvest hardneck garlic 3-4 months after planting, when the tops of the plants begin to yellow and fall over. This indicates that the bulbs have reached maturity.
Check on your garlic regularly during this period, looking for signs of readiness such as a soft neck where the leaves meet the bulb. If you wait too long, the bulbs will become dry and papery, losing their flavor and texture. Conversely, if you harvest too early, they may not be fully developed.
Consider the weather conditions before harvesting your hardneck garlic. Avoid harvesting during periods of high heat or humidity, as this can cause the bulbs to spoil quickly. Instead, plan to harvest on a cool, dry day when the soil is firm but not waterlogged. Use a garden fork to carefully dig around the plants, being careful not to damage the bulbs.
Storage Methods for Freshness
When it’s time to harvest your hardneck garlic bulbs, proper storage is crucial to maintain their freshness and quality. Curing is a critical step in the process, allowing the skin to dry out and form a natural barrier against moisture. To cure, tie the garlic bulbs in small bunches and hang them upside down in a warm, dry, dark place with good airflow. This can be a closet, attic, or garage. Leave them for 2-4 weeks, checking on them periodically to ensure they’re not becoming too moldy.
After curing, you’ll notice the skin has dried out and become papery. This is when you can start drying the garlic bulbs further by spreading them out in a single layer on a paper bag or paper towels. Store them in an airtight container to keep moisture at bay. If you have excess garlic that won’t be used within a few months, consider freezing it. Simply chop or mince the garlic and spread it out on a baking sheet lined with parchment paper. Place the sheet in the freezer until frozen solid, then transfer the garlic to an airtight container or freezer bag for storage.
Frequently Asked Questions
How do I determine if hardneck garlic is suitable for my region’s climate?
Hardneck garlic typically requires a cooler winter to induce dormancy, making it ideal for regions with moderate winters. If you live in an area with mild winters or extreme temperature fluctuations, consider consulting with local gardening experts or checking the specific growing requirements for your area.
Can I plant hardneck garlic bulbs as soon as I receive them, or is there a waiting period?
It’s recommended to allow 2-3 weeks after receiving new garlic bulbs before planting. This allows any potential stress from shipping and handling to subside, giving the plants a better chance of establishing themselves in the soil.
How do I prevent pests and diseases from affecting my hardneck garlic crop?
Regular monitoring for signs of pests or disease is crucial. Keep an eye out for aphids, spider mites, and bulb mites, which can be controlled with neem oil or insecticidal soap. Also, ensure proper air circulation around the plants to reduce moisture buildup and prevent fungal diseases.
Can I use hardneck garlic bulbs as a companion plant in my garden?
Hardneck garlic is known to repel pests like aphids, spider mites, and nematodes, making it an excellent choice for companion planting. Planting garlic alongside other vegetables can help deter these pests and improve overall soil health.
How do I know when my hardneck garlic bulbs are fully matured and ready for harvest?
Check the tops of the plants regularly for signs of yellowing or drying. Once about 6-8 inches of the stem has turned yellow, it’s an indication that the bulb is mature and can be harvested. Carefully dig up the entire plant to prevent damage to the bulb.