Starting your own monarch butterfly garden can be a wonderful idea, but it requires patience and attention to detail. One crucial step in this process is successfully germinating milkweed seeds. This delicate process involves selecting high-quality seeds, providing optimal growing conditions, and knowing how to care for the seedlings after they’ve sprouted.
In this article, we’ll walk you through the essential steps to germinate milkweed seeds effectively. We’ll cover everything from choosing the right type of milkweed to create a thriving monarch habitat, to understanding the ideal temperature and light requirements for successful germination. By following these simple tips, you can ensure that your milkweed plants grow strong and healthy, providing the perfect food source for these beautiful butterflies.
Understanding Milkweed Seeds
Milkweed seeds can be tricky to understand, but knowing how they form and mature will help you identify healthy seed pods. Let’s take a closer look at the process of milkweed seed development.
Characteristics of Milkweed Seeds
When handling milkweed seeds, it’s essential to understand their characteristics to ensure accurate identification and proper storage. Milkweed seeds are relatively small, typically ranging from 1-2 millimeters in length, making them easy to lose or misplace.
Their shape is often irregular, with some species displaying a more elongated form while others appear more rounded. The color of milkweed seeds can vary significantly depending on the species. Some common colors include brown, tan, and gray, although some may have distinctive markings such as ridges or stripes.
One key characteristic to note is that milkweed seeds are often quite brittle and prone to breaking when handled roughly. This fragility highlights the importance of gentle handling and proper storage conditions to maintain their viability for germination. For example, storing milkweed seeds in an airtight container at room temperature can help preserve their quality.
If you’re purchasing milkweed seeds from a supplier, familiarize yourself with the species characteristics to ensure accuracy. This knowledge will also aid in selecting the right seed storage and handling techniques for optimal germination success.
Importance of Seed Quality
When it comes to milkweed germination, seed quality is a crucial factor that can make all the difference between success and failure. High-quality seeds not only increase the chances of successful germination but also ensure healthy plant growth.
If you’re using low-quality seeds, you may experience lower germination rates, weak or deformed plants, and reduced yields. This is because poor-quality seeds often have issues such as low viability, genetic defects, or contamination, which can hinder seedling development. For example, a study on milkweed seed quality found that only 20% of seeds with poor quality had viable embryos, whereas 80% of high-quality seeds had healthy embryos.
To ensure the best possible results, it’s essential to choose reputable seed suppliers who offer high-quality milkweed seeds. Look for seeds that have been tested for viability and purity, and opt for species-specific varieties that are well-suited to your region’s climate. By investing in quality seeds, you’ll be more likely to achieve successful germination and enjoy a healthy, thriving crop of milkweed plants.
Factors Affecting Seed Viability
When it comes to milkweed germination, understanding the factors that affect seed viability is crucial for success. Temperature, humidity, and light exposure are three environmental factors that can impact the viability of milkweed seeds.
Temperature plays a significant role in seed germination. Milkweed seeds typically require a period of cold stratification, which involves exposing them to temperatures between 35°F and 45°F (2°C to 7°C) for several weeks. This process helps to break dormancy and stimulate growth. If the temperature is too high or too low, it can prevent germination altogether.
Humidity also affects seed viability. Milkweed seeds require a moist environment to germinate successfully. High humidity levels, typically above 50%, can promote germination, but excessive moisture can lead to rot and other problems.
Light exposure is another critical factor. Milkweed seeds are photoblastic, meaning they respond to light by either germinating or remaining dormant. Typically, milkweed seeds require darkness to break dormancy, so it’s essential to store them in a dark location until sowing time.
Preparation for Germination
Before you can even think about planting your milkweed seeds, it’s essential to prepare them properly. This involves carefully examining and cleaning each seed to ensure optimal germination conditions.
Choosing the Right Seeds
When selecting milkweed seeds, it’s essential to choose varieties that are suitable for your region’s climate and soil type. This may seem like a daunting task, but don’t worry – with a little research, you’ll be well on your way to success.
First, consider the type of milkweed you want to grow. There are several species, including Common Milkweed (Asclepias syriaca), Butterfly Milkweed (Asclepias tuberosa), and Swamp Milkweed (Asclepias incarnata). Each has its unique characteristics and growing requirements, so make sure to choose the one that best fits your needs.
Next, check the seed package or consult with a local nursery to determine if the seeds are suitable for your region’s climate. Some milkweed species are more tolerant of drought than others, while some may require regular watering. Consider factors like temperature, humidity, and sunlight when selecting seeds.
If you’re planting in an area with poor soil quality, look for seeds that are specifically labeled as “clay-tolerant” or “sand-tolerant.” This will ensure the best possible growth conditions for your milkweed. Remember to also check the germination rate of the seeds – a higher percentage ensures a better chance of success.
Pre-Treatment Methods
Before attempting to germinate milkweed seeds, it’s essential to enhance their natural dormancy through pre-treatment methods. These techniques help break down the physical and chemical barriers that prevent germination.
One of the most effective pre-treatment methods is cold stratification. This process involves subjecting the seeds to a period of cold temperatures (around 35-45°F or 2-7°C) for 30-90 days. During this time, the seeds undergo physiological changes that stimulate germination. You can simulate cold stratification by placing the seeds in a sealed plastic bag with moist peat moss or vermiculite and storing them in the refrigerator.
Another method to enhance germination rates is scarification. This involves lightly scratching the seed coat using sandpaper, a nail file, or a scarifier tool. Scarification helps break down the hard seed coat, allowing water to penetrate and initiate germination. You can also use chemical scarification by soaking the seeds in a 10% sulfuric acid solution for several minutes.
It’s crucial to note that not all milkweed species require cold stratification, so research the specific needs of your plant variety before attempting pre-treatment.
Seed Storage and Handling
Storing milkweed seeds properly is crucial for maintaining their viability and ensuring successful germination. When storing seeds, it’s essential to keep them away from direct sunlight, moisture, and heat sources. This can be achieved by sealing them in airtight containers or envelopes and placing them in a cool, dry location such as a basement or cupboard.
It’s also vital to maintain the proper humidity level during storage. Seeds are most viable when stored at 1-2% relative humidity, which is lower than what you’d typically find in a home environment. To achieve this level of humidity, store seeds in containers with silica gel packets that absorb excess moisture.
When handling milkweed seeds, be gentle to avoid damaging the delicate embryo. Avoid touching or rubbing the seeds excessively, as oils from your skin can reduce their viability. Instead, use tweezers or a small spoon to handle the seeds carefully.
Before storing seeds, make sure they’re completely dry and free of debris. Any residual moisture can cause mold or mildew growth during storage, further reducing seed viability.
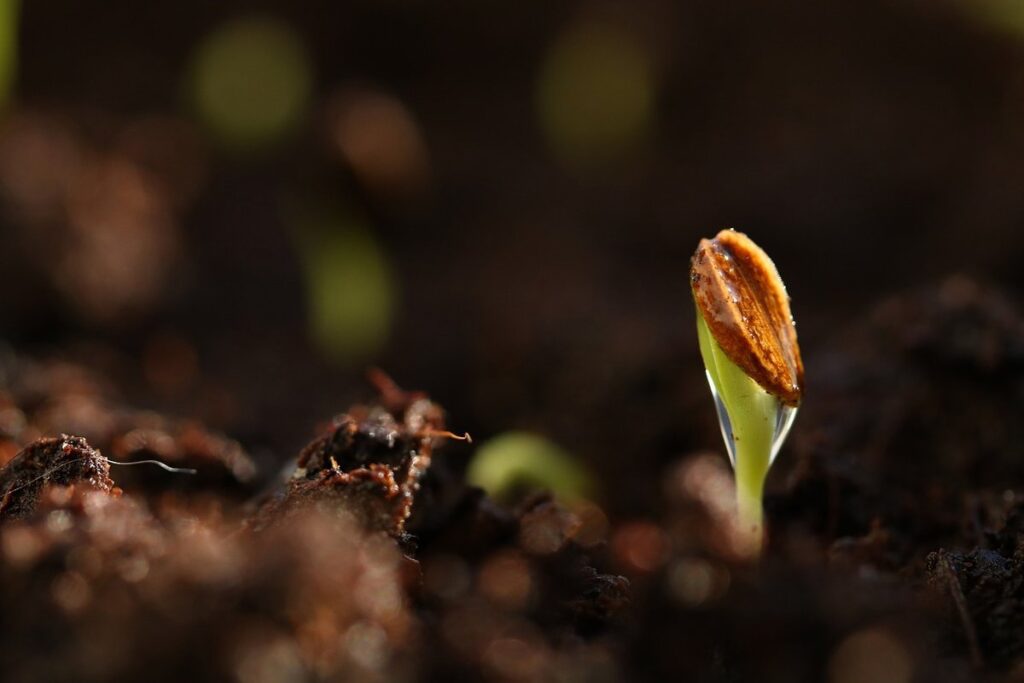
Germination Techniques
Now that you know how to prepare milkweed seeds, it’s time to learn some effective germination techniques to give your seeds the best chance at success. We’ll dive into the methods that yield consistent results.
Water-Based Methods
Soaking milkweed seeds in water is a simple and effective way to increase germination rates. To try this method, place the seeds in a clean cup or container and cover them with lukewarm water. Let it sit for 24-48 hours, then drain and plant as usual. This technique helps to rehydrate the seeds, which can be dormant due to their natural desiccation process.
Another approach is using a paper towel for hydration. Simply place the milkweed seeds between two dampened paper towels, fold them over, and seal in a plastic bag or wrap with a rubber band. Place it in the refrigerator for 2-3 days, then transfer the seeds to a pot or tray filled with soil.
Both of these methods can help break seed dormancy and increase germination rates. It’s essential to keep the water or paper towels moist but not soaking wet, as this can lead to mold or rot. By using one of these water-based techniques, you’ll be giving your milkweed seeds the best possible chance at successful germination.
Soil-Based Methods
Sowing milkweed seeds directly into soil is a simple yet effective method for germination. To begin, choose a well-draining potting mix specifically designed for native plants like milkweed. Fill the container with about 1-2 inches of moistened soil, leaving enough space to accommodate the seed’s depth.
When sowing milkweed seeds, follow these guidelines: sow 1/8 inch deep and 6-12 inches apart in a sunny location. You can also use seed starting trays or small pots for better control over conditions. Keep the soil consistently moist but not waterlogged – milkweed seeds can rot if they’re too wet.
For optimal growth, ensure your potting mix has a pH between 5.5 and 6.5, as this suits milkweed’s preferences. Transplant seedlings outdoors when they have at least two sets of leaves, usually in the spring after frost. Keep in mind that direct sowing can lead to variable results due to soil conditions, but it allows for easier adaptation to outdoor environments.
Combination Methods
When it comes to milkweed germination, combining different techniques can significantly improve success rates. This is because each method has its unique benefits and can complement others when used together. For example, you can combine the use of cold stratification with warm seed soaking.
By using a combination approach, you can exploit the strengths of multiple methods while minimizing their weaknesses. Cold stratification, for instance, helps mimic winter conditions that milkweed seeds require to break dormancy. Meanwhile, warm seed soaking accelerates germination by promoting metabolic activity in the seeds.
To combine these techniques effectively, start by cold stratifying your milkweed seeds for 30-60 days. This will help them develop the necessary physiological changes for germination. Next, soak the stratified seeds in warm water (around 70°F to 80°F) for 24 hours before planting. By using this combination approach, you can increase the chances of successful germination and give your milkweed plants a strong start. Remember to monitor seed condition and adjust the combination method as needed.
Environmental Considerations
When planting milkweed, it’s essential to consider the environmental implications of your actions and how they may impact the local ecosystem and wildlife. This includes choosing the right location and timing for germination.
Optimal Temperature and Light Conditions
When it comes to providing optimal temperature and light conditions for milkweed seedlings, understanding their specific needs is crucial. Milkweed prefers a warm environment, typically between 65°F to 75°F (18°C to 24°C), with some species tolerating temperatures as high as 90°F (32°C). However, extreme heat can be detrimental, causing seedling mortality.
On the other hand, cold temperatures below 55°F (13°C) can slow down germination and growth. If you’re starting seeds indoors, aim for a consistent temperature around 70°F (21°C) to promote healthy growth. When transplanting seedlings outdoors, ensure they are hardened off to tolerate variable outdoor temperatures.
Light conditions also play a significant role in milkweed growth. Milkweed requires full sun to partial shade, with some species tolerating more shade than others. Aim for at least 4-6 hours of direct sunlight per day. If you’re growing milkweed in an area with intense sunlight, consider using shading materials to prevent scorching.
It’s essential to note that temperature and light conditions can vary depending on the specific species of milkweed you’re growing. Research your particular variety to ensure you’re providing the optimal environment for success.
Humidity and Soil Moisture
Maintaining optimal humidity and soil moisture levels is crucial for healthy milkweed germination. The ideal environment for seed germination involves a consistent level of moisture that allows the seeds to absorb water without becoming waterlogged. Aim for a relative humidity between 50-80% during the first few weeks after sowing.
To achieve this, you can cover your propagation tray or container with a clear plastic bag or a cloche. This will trap moisture and maintain humidity levels while allowing light to pass through. Alternatively, you can place the seeds in a humid microclimate using a humidifier.
It’s essential to monitor soil moisture by checking the seedlings daily for signs of drying out. Water gently but thoroughly when necessary, ensuring that the top 1-2 inches of soil remain consistently moist but not waterlogged.
Be cautious not to overwater, as this can lead to fungal diseases and reduced germination rates. Keep an eye on temperature fluctuations in your growing space, as extreme temperatures can affect soil moisture levels and compromise seed viability. By maintaining a balanced and controlled environment, you’ll be well on your way to successful milkweed germination.
Protection from Pests and Diseases
As you nurture your milkweed seedlings, it’s essential to be aware of common pests and diseases that can harm them. Aphids, whiteflies, and spider mites are frequent visitors to milkweed plants, sucking sap and weakening the young shoots. To prevent infestations, keep your seedlings under covers or fine mesh when transporting them outdoors, as these insects can easily hitch a ride on nearby plants.
Another threat to milkweed seedlings is fungal diseases like powdery mildew and root rot. These often occur due to overwatering or poor air circulation. To prevent fungal growth, ensure good airflow around your seedlings by keeping the potting mix moist but not waterlogged. Regularly inspect your seedlings for signs of disease, such as yellowing leaves or blackened roots.
To manage pests and diseases effectively, use neem oil or insecticidal soap to control infestations. For fungal issues, treat affected areas with a fungicide specifically designed for indoor plants. Keep in mind that organic solutions might take longer to show results than chemical treatments. However, they’re generally safer for your seedlings and the environment.
Remember, prevention is key when it comes to protecting your milkweed seedlings from pests and diseases. By taking proactive measures and monitoring your seedlings closely, you can minimize the risk of damage and ensure successful germination and growth.
Post-Germination Care
Now that you’ve successfully germinated your milkweed seeds, it’s time to focus on providing the right conditions for them to grow into healthy plants. Proper care during this critical period will ensure a strong foundation for future growth and blooming.
Transplanting Seedlings
When it’s time to transplant milkweed seedlings, do so with care to prevent shock and ensure a healthy root system. Choose individual pots that are at least 4-6 inches deep to accommodate the taproot, which can grow quite extensive.
For direct planting into the garden, select an area with full sun and well-draining soil. Dig shallow holes slightly larger than the pot size, about 12-18 inches apart. Gently remove the seedling from its container, taking care not to disturb the roots.
If transplanting in pots, use a balanced fertilizer (10-10-10) at half the recommended strength to promote healthy growth. Water thoroughly after planting and maintain consistent moisture levels during the first few weeks. Transplant milkweed seedlings within 1-2 weeks of germination, when they have developed their first set of true leaves.
Monitor for signs of transplant shock, such as yellowing or droopy leaves. If you notice any issues, adjust your care routine accordingly. With proper handling and care, milkweed seedlings should adapt quickly to their new environment and thrive in the garden.
Fertilization and Pruning
Once your milkweed seeds have germinated and are growing, it’s essential to provide them with the right nutrients for healthy development. Fertilization is a crucial aspect of post-germination care.
Choose a balanced, water-soluble fertilizer that contains nitrogen, phosphorus, and potassium (NPK) at a ratio of 20-5-10 or similar. Dilute the fertilizer according to the manufacturer’s instructions and water your milkweed plants once a month during the growing season. You can also use compost tea as an alternative, which is rich in beneficial microorganisms that promote plant growth.
In addition to fertilization, pruning is also vital for maintaining the health and appearance of your milkweed plants. Remove any dead or damaged leaves or stems to prevent disease from spreading. Cut back the main stem after flowering to encourage new growth and prevent self-seeding. Prune your milkweed plants in late winter or early spring before new growth begins. This will help control their size, promote bushy growth, and direct energy towards producing more flowers.
When pruning milkweed, make clean cuts just above a node using sharp, sterile tools. Avoid damaging the plant’s roots during pruning.
Monitoring for Pests and Diseases
After germinating milkweed seeds, it’s essential to monitor for potential pests and diseases that can impact the health of your plants. One common issue is aphids, which are small, soft-bodied insects that feed on plant sap, causing curled or distorted leaves. To manage aphid infestations, inspect your plants regularly, and use neem oil or insecticidal soap to control outbreaks.
Fungal diseases like powdery mildew can also occur when the soil is too wet or when there’s excessive humidity. Keep the soil consistently moist but not waterlogged, and ensure good air circulation around your milkweed plants. If you notice white powder on leaves or stems, treat with a fungicide specifically designed for powdery mildew.
Root rot is another problem that can arise from overwatering. Be mindful of watering schedules and avoid getting water on the leaves to prevent fungal growth. Monitor your seedlings’ roots by gently removing them from their pots; if they’re soft or mushy, it’s likely due to root rot. Adjust your care routine accordingly to prevent further damage.
Regularly inspect your milkweed plants for signs of pests or diseases, and take prompt action when issues arise. By staying vigilant and employing integrated pest management strategies, you can minimize the risk of common problems and give your milkweed a healthy start in life.
Frequently Asked Questions
Can I use old or expired milkweed seeds for germination?
No, it’s best to use fresh milkweed seeds with high viability rates for successful germination. Old or expired seeds may not sprout at all, and even if they do, the seedlings may be weak or unhealthy.
What are some common mistakes people make when storing milkweed seeds?
One common mistake is exposing milkweed seeds to direct sunlight or moisture, which can cause them to become dormant or lose their viability. Store milkweed seeds in a cool, dry place, such as an envelope or container with a silica gel packet to maintain optimal humidity.
How do I know if my milkweed seedlings are getting enough light?
Milkweed seedlings need bright, indirect light to grow well. If your seedlings appear leggy or stretched out, it may be a sign that they’re not getting enough light. Consider moving them to a brighter location or supplementing with grow lights.
Can I use milkweed seeds from a friend’s garden for my own germination project?
While it’s possible to use seeds from a friend’s garden, it’s essential to ensure the seeds are healthy and suitable for your specific climate and growing conditions. Consider starting with high-quality seeds specifically selected for their adaptability and resilience.
What should I do if some of my milkweed seedlings develop pests or diseases?
Common pests on milkweed include aphids and whiteflies, while fungal diseases like powdery mildew can also occur. To prevent the spread of pests and diseases, isolate infected plants, treat them with organic pest control methods, and improve air circulation around your seedlings.