When it comes to growing your own plants from seeds, knowing when to pot up seedlings is crucial for their success. If you’ve recently started some seeds in a small tray or container, you’re probably wondering how long it’ll take before they outgrow their space and need transplanting into bigger pots. The key to successful seedling establishment lies in understanding the growth stages of your plants, as well as the environmental factors that influence their development.
In this article, we’ll break down everything you need to know about when to pot up seedlings, including how to identify the right time for transplanting and the best techniques for minimizing shock and ensuring a smooth transition. By following our comprehensive guide, you’ll be able to provide your seedlings with the best possible start in life and enjoy a bountiful harvest.
Understanding Seedling Stages and Transplanting Needs
To ensure you’re potting up seedlings at the right time, it’s essential to understand their growth stages and transplanting needs. Let’s break down what to look for as your seedlings develop.
The Importance of Monitoring Seedling Growth
Regularly monitoring seedling growth is crucial for identifying when they’re ready to be potted up. As seedlings develop, it’s essential to keep a close eye on their progress to ensure they receive the right amount of light, water, and nutrients. By doing so, you’ll catch any potential issues early on, preventing stunted growth or root bound conditions.
Signs that a seedling is ready for transplanting include a thickened stem, fully developed roots, and a robust leaf structure. To check for these signs, gently remove the seedling from its container and examine the root system. If you notice roots circling or pushing against the sides of the pot, it’s likely time to move them into a larger vessel.
Another key indicator is the seedling’s ability to support itself without toppling over. Gently blow on the leaves to check for stability; if they waver or fall, it may be a sign that the seedling needs more time to develop its root system before being transplanted.
Recognizing Ready-to-Transplant Signs in Seedlings
As you tend to your seedlings, it’s essential to recognize when they’ve outgrown their current container. This is a crucial step in their growth and development, as seedlings that are too crowded or root-bound can suffer from nutrient deficiencies and be more susceptible to disease.
Some common indicators that a seedling has reached the stage where it needs to be potted up include:
* The roots have started to grow out of the drainage holes in the bottom of the container
* The seedling has doubled in size since being transplanted into its current pot
* You can see new growth, such as leaves or stems, pushing against the sides of the container
* Water drains too quickly through the soil, indicating that it’s time to provide more room for the roots to expand
When you notice these signs, it’s likely time to transplant your seedling into a larger vessel with fresh potting mix. This will give its roots room to grow and establish themselves in their new home, setting the stage for healthy growth and development. Be sure to handle the roots gently when repotting to avoid damaging them, and provide plenty of light and water to support the transition.
When to Pot Up Seedlings: Timing and Considerations
Now that you’ve successfully grown your seedlings from seeds, it’s time to consider when they’re ready for their next big step. This section will help you determine if it’s time to pot them up into larger containers.
The Role of Age and Size in Determining Potting Up Time
As seedlings grow, they reach a point where their potting mix becomes depleted of nutrients and water retention capacity. This signals the need for repotting into fresh soil with adequate room for root expansion. The optimal age and size for seedlings to be transplanted depend on several factors, including root growth, leaf development, and overall health.
Typically, seedlings are ready for potting up when they have developed a robust root system that has filled the entire pot. This usually occurs around 2-4 weeks after germination, depending on the plant species. However, some plants like tomatoes and peppers can benefit from being potted up earlier, at around 1-2 weeks.
When evaluating seedling size, look for the following signs: a fully developed leaf set, with no visible stunting or yellowing; roots growing out of the drainage holes; and an overall increase in plant height. These indicators suggest that the seedling has exceeded its pot’s capacity and is ready to be transplanted into a larger container.
By monitoring these growth signals, you can ensure that your seedlings are given sufficient space to thrive, reducing the risk of overwatering or nutrient deficiencies.
Environmental Factors Affecting Seedling Development
As you carefully tend to your seedlings, it’s essential to consider the environmental factors that can either foster healthy growth or hinder development. Light exposure is a crucial factor, and most seedlings prefer bright, indirect light. However, placing them in direct sunlight can cause scorching, especially if they’re sensitive varieties.
Temperature fluctuations also play a significant role in seedling development. Most seeds germinate best between 65°F to 75°F (18°C to 24°C). Avoid exposing your seedlings to sudden temperature drops or increases, as this can shock them and hinder growth.
Watering schedules are another critical consideration. Overwatering can lead to root rot and underwatering can cause stunted growth. Monitor the moisture levels in the soil and water only when necessary, allowing the top 1-2 inches of soil to dry out between waterings.
When potting up seedlings, consider the environmental conditions they’ll be exposed to once transplanted outdoors. If your garden receives intense sunlight or experiences significant temperature fluctuations, it’s best to harden off your seedlings gradually before transplanting them outside. This process involves acclimating them to outdoor conditions over a period of 7-10 days to prevent shock and ensure successful transition.
Preparing for Potting Up: Container Selection and Soil Preparation
When it comes time to pot up your seedlings, selecting the right container and preparing the soil are crucial steps that can make all the difference in their health and growth. Choosing a suitable container is just one part of this process.
Choosing the Right Container Size and Material
Choosing the right container size and material is crucial when potting up seedlings. A suitable container will provide adequate drainage, root space, and ease of handling, which are essential for healthy growth.
When selecting a container, consider the mature size of the plant and its root system. If you’re growing tomatoes or peppers, for example, they’ll need more room to spread out as they grow. Choose containers that are at least 6-8 inches deep to accommodate their taproots. On the other hand, leafy greens like lettuce and herbs can thrive in shallower containers.
In terms of material, plastic pots are lightweight and inexpensive but may retain moisture, which can lead to root rot. Terracotta pots allow for better air circulation and drying out, but they can be heavy and prone to cracking. Consider using biodegradable containers or self-watering planters that minimize watering frequency.
When handling seedlings, a container with built-in handles or a wide mouth makes it easier to transfer them without damaging the roots.
The Role of High-Quality Seed Starting Mix in Successful Transplanting
Using high-quality seed starting mix is crucial when it comes to transplanting seedlings successfully. Regular potting soil won’t cut it; it’s formulated for established plants, not delicate seedlings. Seed starting mix, on the other hand, is specifically designed to support the unique needs of young seedlings.
This specialized blend typically contains perlite or vermiculite, which help with drainage and prevent waterlogged soil. It also has a higher pH level than regular potting soil, reducing the risk of seedling shock when transplanted into a new environment. Some high-quality seed starting mixes even include beneficial microorganisms that promote healthy root development.
When transplanting, make sure to handle your seedlings gently to avoid damaging their roots or disturbing the delicate soil structure. A high-quality seed starting mix will also help prevent overwatering, reducing the risk of fungal diseases and root rot. By using this type of mix, you’ll be giving your seedlings a strong foundation for healthy growth and development.
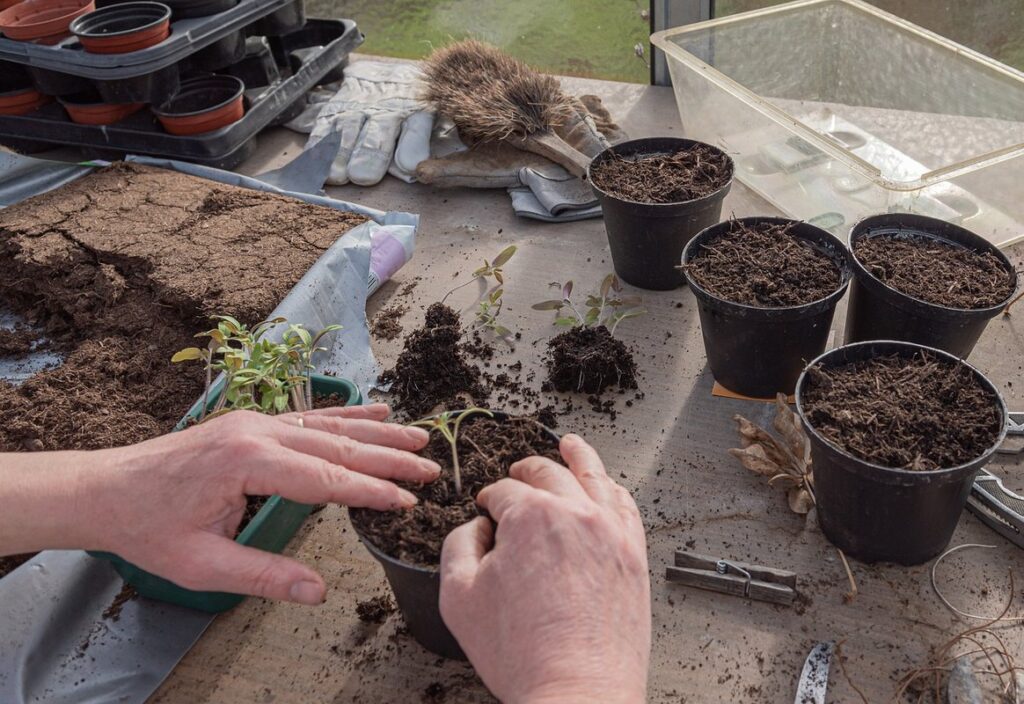
Potting Up Techniques: Hand Planting vs. Using a Soil Blocker
When it comes time to pot up your seedlings, you’ve got two main techniques to choose from: hand planting and using a soil blocker. Both methods have their advantages and disadvantages.
The Benefits and Drawbacks of Hand Planting Seedlings
Hand planting seedlings can be both beneficial and detrimental to their growth, depending on the context. On one hand, it offers a high degree of precision, allowing you to carefully place each root system within the new potting mix. This approach also provides an opportunity for manual adjustment of soil levels around sensitive roots.
However, this method is often more time-consuming than using a soil blocker and can be physically demanding when working with multiple seedlings. Moreover, there’s a higher risk of damaging delicate roots during the transplanting process.
To mitigate these risks, it’s essential to use a gentle touch while handling the roots, avoiding any tugging or stretching that may cause damage. Using a pair of clean and well-maintained transplant tools can also help minimize root disturbance.
Despite its drawbacks, hand planting remains an effective method for seedlings with sensitive roots or those requiring more precise soil placement. For example, delicate orchid or succulent seedlings might benefit from this approach to ensure their roots are properly situated within the new potting mix.
How to Use a Soil Blocker for Efficient Transplanting
Using a soil blocker can significantly simplify the transplanting process and reduce stress on seedlings. This tool helps to create uniform blocks of soil that can be easily planted out into larger containers. To use a soil blocker, you’ll need to fill it with moistened potting mix, then compress it firmly to remove excess air pockets.
The benefits of this method include reduced transplant shock, improved root growth, and faster establishment of the seedling in its new environment. For instance, by using a soil blocker, you can ensure that the roots are not disturbed during transplanting, which minimizes stress on the plant. This leads to healthier, more vigorous plants with better chances of survival.
When preparing the blocks, make sure the mix is consistently moist but not waterlogged. As a general rule, it’s best to use a soil blocker when potting up small to medium-sized seedlings (typically 2-4 inches tall). For larger seedlings or those that are more sensitive, hand planting may be a better option.
Common Challenges and Troubleshooting After Potting Up
Now that you’ve potted up your seedlings, it’s not uncommon to encounter some challenges. We’ll walk you through common issues and offer troubleshooting tips to keep your plants thriving.
Managing Transplant Shock: Causes and Solutions
Transplant shock is one of the most common challenges seedling growers face after potting up. It occurs when a seedling’s roots are exposed to new soil and conditions, leading to stress that can manifest as wilting, yellowing, or even death.
The causes of transplant shock are often related to how we handle the seedlings during the transition process. For instance, if the seedlings are disturbed excessively while being repotted, it can cause significant root damage, making them more susceptible to shock. Similarly, using a potting mix that’s too dense or watered with cold water can further exacerbate the problem.
To minimize transplant shock, make sure to handle your seedlings gently during repotting and choose a well-draining potting mix specifically designed for seedlings. Watering with lukewarm water can also help reduce stress on the roots. If you’re experiencing issues, try providing your seedlings with plenty of humidity by covering them with a clear plastic bag or a cloche. This will create a mini-greenhouse effect that’ll help them recover from transplant shock and thrive in their new environment.
In general, it’s essential to be patient during this transition period, as seedlings can take several days to fully adjust to their new surroundings. By taking these simple precautions, you can significantly reduce the risk of transplant shock and ensure your seedlings continue growing strong and healthy.
Identifying and Addressing Potential Root Problems Post-Potting
After potting up your seedling, it’s essential to monitor its root health and address any potential issues promptly. One common problem is when roots start growing out of the drainage holes or circling around the inside of the pot. This can lead to problems like waterlogging, reduced growth rates, and even plant stunting.
To identify these issues, gently remove your seedling from its container and inspect the root system. If you notice any tangled or overlapping roots, it’s likely a sign that your seedling needs more room to grow. In such cases, repot your seedling into a slightly larger container with fresh potting mix, taking care not to damage the delicate roots.
Another common problem is when roots become exposed due to over-potting or inadequate soil depth. To correct this, add a layer of fresh compost or well-rotted manure to provide extra nutrients and improve drainage. This will also help prevent water from accumulating in the pot, which can cause root rot and other problems.
Regularly inspecting your seedling’s roots after potting up will help you catch any potential issues early on, allowing for timely intervention and ensuring optimal growth rates. Remember, prevention is key when it comes to maintaining healthy roots, so keep a close eye on your seedlings’ progress and make adjustments as needed.
Tips for Successful Seedling Establishment in the New Container
Now that you’ve potted up your seedlings, it’s time to focus on establishing them in their new container. Here are some essential tips to help ensure a smooth transition.
Optimizing Watering Schedules After Potting Up
When you pot up seedlings, their watering needs change significantly due to increased soil volume and deeper roots. To prevent overwatering and ensure healthy growth, it’s crucial to adapt your watering schedule accordingly.
Firstly, consider the larger root system that has developed since transplanting. Seedlings need more water to sustain this expanded network, but be cautious not to drown them. A good rule of thumb is to increase water intake by about 50% after potting up. However, this may vary depending on factors like soil type and climate.
Monitor your seedlings’ moisture levels closely, checking the top inch of soil daily with your finger or a moisture meter. Adjust watering schedules based on actual conditions rather than a predetermined frequency. For example, if you’re using a well-draining potting mix, you might need to water more frequently due to faster evaporation rates. Conversely, a mix that retains water may require less frequent watering.
By adjusting your watering schedule to suit the new needs of your potted seedlings, you’ll be providing them with an optimal environment for continued growth and establishment.
Providing Optimal Lighting Conditions Post-Potting
When potting up seedlings, it’s essential to adjust their lighting conditions to promote healthy growth. Seedlings are more sensitive to light than mature plants, and sudden exposure can cause damage. When moving seedlings from a propagation tray or small pots to a new container, increase the duration of indirect light by 1-2 hours, but avoid direct sunlight for at least a week.
As seedlings adjust to their new environment, consider the intensity of lighting in your grow area. Brighter areas may require shading with sheer curtains or shade cloth to prevent scorching leaves. Conversely, low-light environments may necessitate supplementing with grow lights to ensure sufficient spectral balance. Maintain an optimal temperature range (typically 65-75°F) and humidity level to support photosynthesis.
Monitor your seedlings’ response to new lighting conditions. Watch for signs of stress, such as wilting or yellowing leaves, which can indicate inadequate light or excessive intensity. Adjust the position and type of lighting accordingly to ensure optimal growth. A general rule is to maintain 12-14 hours of indirect light per day to promote robust seedling development.
Conclusion: Mastering the Timing and Process of Potting Up Seedlings
Mastering the timing and process of potting up seedlings requires patience, attention to detail, and a willingness to observe your plants’ unique needs. By following the guidelines outlined in this guide, you’ll be able to confidently determine when it’s time to pot up your seedlings and set them on the path to thriving adulthood. Remember that every seedling is different, so don’t be afraid to adapt these general rules to suit your specific situation. With practice, you’ll develop a keen sense of observation, allowing you to recognize the subtle signs that indicate your seedlings are ready for their next step. By mastering this crucial process, you’ll be well on your way to becoming a skilled and successful gardener.
Frequently Asked Questions
Can I pot up seedlings at any time, or are there specific seasons that are better suited for transplanting?
Yes, the optimal time to pot up seedlings largely depends on your location’s climate and growing conditions. Generally, spring and fall are considered ideal times for transplanting, as temperatures are mild and there is ample moisture in the soil. Avoid transplanting during extreme weather conditions or when seedlings are under stress.
How can I minimize transplant shock and ensure a smooth transition to the new container?
To minimize transplant shock, make sure to handle seedlings gently, avoid exposing them to direct sunlight for an extended period after potting up, and maintain consistent watering schedules. Also, consider using a high-quality seed starting mix that promotes root development and reduces the risk of transplant shock.
What are some common mistakes to watch out for when choosing a container size and material?
When selecting containers, be mindful of their size and drainage holes. Avoid using small containers that can cause roots to become root-bound, and ensure your containers have sufficient drainage holes to prevent waterlogged soil. Also, opt for high-quality materials like terra cotta or ceramic pots, which retain moisture and regulate soil temperature.
Can I use any type of potting mix when transplanting seedlings, or are there specific requirements?
While many types of potting mixes can be used for seedlings, it’s essential to choose a mix specifically designed for seed starting. These mixes typically contain more organic matter, which helps retain moisture and nutrients, making them ideal for young seedlings.
How often should I water my newly potted seedlings, especially during the first week after transplanting?
Yes, watering frequency is crucial in the initial stages of potting up. During the first week, water your seedlings lightly but frequently to prevent overwatering and ensure optimal soil moisture levels. Aim for a consistent schedule that matches the needs of your specific plant species, taking into account factors like climate, humidity, and temperature.