Growing your own lentil sprouts at home can be a fun and rewarding experience, providing you with a constant supply of fresh produce right in your kitchen. Lentils are an excellent choice for sprouting due to their high nutritional value and ease of cultivation. However, knowing where to start can be daunting, especially if you’re new to the world of sprouting.
Don’t worry – we’ve got you covered! This step-by-step guide will walk you through everything you need to know to grow delicious and healthy lentil sprouts at home. From selecting the right type of lentils to harvesting and storing your fresh produce, we’ll cover it all. By the end of this article, you’ll be equipped with the knowledge to grow lentil sprouts like a pro. Let’s get started on this journey to sustainable and nutritious eating!
Choosing the Right Lentils
When it comes to growing lentil sprouts, choosing the right type of lentil is crucial for success. Selecting a variety that’s specifically bred for sprouting will give you the best results.
Selecting the Best Variety for Sprouting
When it comes to selecting the best variety of lentils for sprouting, you have several options to choose from. Green lentils are a popular choice among gardeners and cooks alike due to their high nutritional value and easy-to-grow nature. They tend to be slightly smaller than other varieties and have a milder flavor, which makes them perfect for salads and sautés.
Red lentils, on the other hand, have a sweeter taste and hold their shape well after cooking. However, they can be more challenging to sprout due to their slightly harder seed coat. Yellow lentils are another option, boasting a mild flavor and creamy texture. They’re also relatively easy to sprout but may require a bit more patience as they tend to take longer to germinate.
In terms of characteristics that affect the sprouting process, it’s essential to note that red lentils often produce stronger-tasting sprouts than green or yellow varieties. This is because their harder seed coat can slow down germination and lead to a slightly bitter flavor. Green and yellow lentils tend to produce milder-tasting sprouts, making them ideal for those who prefer a neutral flavor.
When selecting a variety of lentil for sprouting, consider the space you have available in your kitchen or garden. If you’re short on space, green or yellow lentils may be a better choice as they require less maintenance and can thrive in smaller containers.
Understanding the Importance of Quality Lentils
When it comes to growing lentil sprouts, using high-quality lentils is crucial for successful sprouting. One of the most important factors to consider is the moisture content of the lentils. Lentils that have been stored properly will generally retain a lower moisture content, making them ideal for sprouting. On the other hand, lentils with high moisture levels may produce mold or mildew during the sprouting process.
The storage conditions of your lentils are also vital to their quality and suitability for sprouting. Store lentils in an airtight container in a cool, dry place away from direct sunlight. This will help preserve their nutritional value and prevent them from becoming rancid. When selecting lentils, opt for those packaged in airtight containers or bags that are specifically designed to maintain freshness.
It’s also essential to inspect the packaging of your lentils before purchasing. Look for signs of damage or compromised seals that could indicate moisture exposure. Freshness dates can also be an indicator of quality. Choose lentils with recent packaging and processing dates for optimal results in your sprouting process.
Preparing the Lentils
Now that you’ve obtained your lentil seeds, it’s time to prepare them for sprouting by rinsing and soaking them thoroughly. This simple step sets the stage for healthy growth.
Cleaning and Sorting the Lentils
When it comes to growing lentil sprouts, the quality of the lentils is crucial for success. This is why cleaning and sorting them before sprouting is an essential step. To begin, rinse the lentils thoroughly with water to remove any impurities or debris that may have accumulated during storage.
Next, spread out the lentils on a clean surface or tray, such as a glass plate or a stainless steel tray, and sort through them by hand. This involves removing any stones, twigs, or broken lentils that could interfere with sprouting. You can use a fine-mesh sieve to sift through the lentils for added efficiency.
It’s also a good idea to remove any discolored or shriveled lentils, as these may not sprout properly. Once you’ve sorted and cleaned your lentils, rinse them again with water to ensure they’re free from any remaining debris. This simple step will help promote healthy germination and prevent any potential issues during the sprouting process.
In fact, studies have shown that cleaning and sorting lentils can improve their germination rate by up to 20%. By taking a few minutes to clean your lentils properly, you’ll set yourself up for success when growing your lentil sprouts.
Soaking and Rinsing the Lentils
Soaking and rinsing lentils before sprouting is an essential step that often gets overlooked. However, this simple process has a significant impact on the germination rate and overall quality of your lentil sprouts.
When lentils are soaked, they absorb water more evenly, which helps to soften their outer skin and stimulate the germination process. This is especially important for lentils, as they have a naturally hard exterior that can hinder water absorption if not properly prepared. By soaking them for about 8-12 hours, you’re essentially rehydrating the lentils and making it easier for them to sprout.
Rinsing the lentils after soaking helps remove any remaining impurities or residue, ensuring that your sprouts grow in a clean environment. It’s also crucial to rinse them before sprouting to prevent any potential mold growth during the germination process.
In summary, soaking and rinsing your lentils sets the stage for successful sprouting by allowing them to absorb water more efficiently and creating an optimal environment for germination.
Creating an Optimal Environment
To grow lentil sprouts successfully, you’ll need to create a controlled environment that’s perfect for their development. This includes choosing the right container and setting up ideal conditions for germination.
Understanding Light Requirements for Sprouting
Light is essential for lentil sprout growth, but it can be tricky to get it just right. Lentils require a delicate balance of light to produce healthy and nutritious sprouts. If you’re growing indoors, direct lighting from a south-facing window or LED grow lights is ideal. However, direct sunlight can cause the seeds to overheat, which can lead to poor germination rates.
Indirect lighting is also an option, but it’s essential to provide sufficient light for the lentil sprouts to undergo photosynthesis. Placing the seed tray near a north-facing window or using grow lights with a lower intensity setting can provide the necessary indirect lighting.
A good rule of thumb is to aim for 12-14 hours of light per day. You can also use a timer to ensure consistent light exposure. Keep in mind that lentil sprouts require less intense light than mature plants, so be cautious not to overdo it. By striking the right balance with light, you’ll be on your way to growing healthy and delicious lentil sprouts.
When choosing lighting options, consider the distance between the lights and the seed tray. LED grow lights are a great option as they produce minimal heat and can be placed close to the seeds without burning them.
Maintaining Proper Temperature and Humidity Levels
Maintaining proper temperature and humidity levels is crucial for successful lentil sprouting. The ideal range for temperature is between 65°F to 75°F (18°C to 24°C), with optimal growth occurring around 70°F (21°C). This temperature range allows for even germination and prevents fungal growth.
Humidity, on the other hand, should be kept high during the initial stages of sprouting. Aim for a relative humidity of 80-90% by covering your container or using a damp cloth to keep it moist. However, as the lentils start to sprout, reduce the humidity level to around 50-60% to prevent mold and promote healthy growth.
To maintain these conditions in a home environment, you can place your sprouting jar on a countertop away from direct sunlight and heat sources. Avoid placing it near drafty windows or doors that could cause temperature fluctuations. Regularly checking the temperature and humidity levels using a thermometer and hygrometer will help ensure optimal conditions for lentil sprouting.
Monitoring and Caring for Your Sprouts
Now that you have your sprouts growing, it’s essential to monitor their progress and provide the right care to ensure they remain healthy and thrive. This is where regular checking and proper maintenance come into play.
Recognizing Signs of Healthy Growth
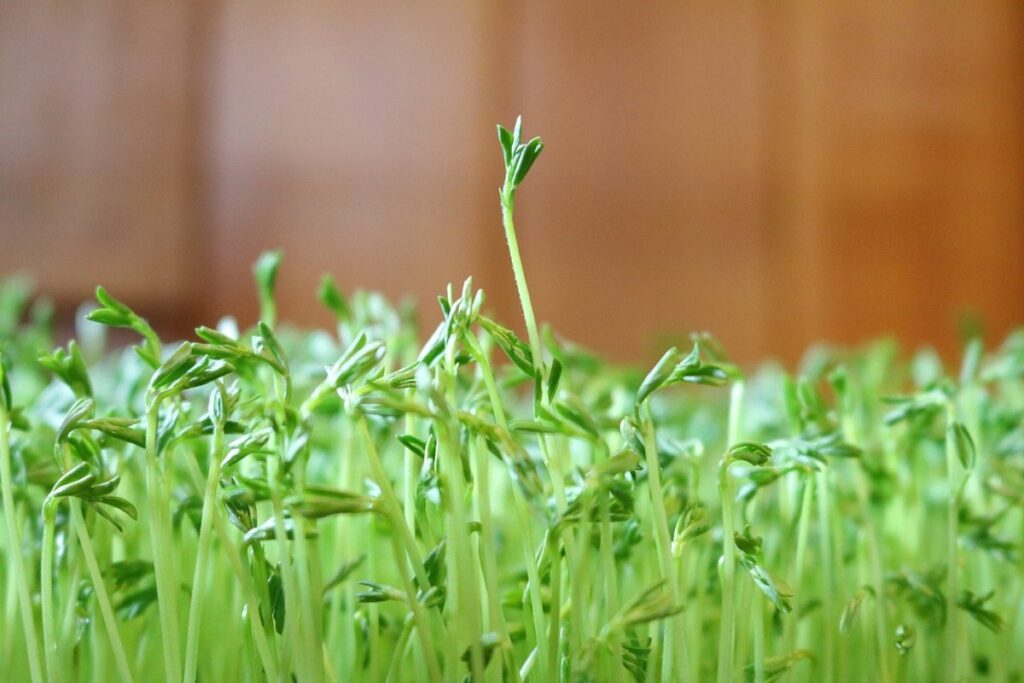
As you nurture your lentil sprouts, it’s essential to recognize the signs of healthy growth. A healthy lentil sprout will undergo several changes that indicate its vitality. One of the first noticeable changes is a shift in color. Typically, lentil seeds start as brown or tan and gradually turn green as they germinate. This color change usually occurs within 24-48 hours after soaking.
Another sign of healthy growth is texture. As your sprouts grow, you’ll notice the tender shoots emerging from the seed coat. These shoots will be soft to the touch and slightly crunchy. Avoid mistaking this for overwatering or rot – a common mistake many beginners make.
A pleasant and subtle aroma can also indicate healthy growth in lentil sprouts. This scent is often described as earthy or grassy, and it’s usually accompanied by a slight sweetness. However, be cautious not to confuse this with the sour smell of fermentation.
Identifying Common Issues and Troubleshooting
As you nurture your lentil sprouts, it’s essential to stay vigilant for potential issues that can arise. One common problem is mold or fungus growth, which can quickly spread and compromise the entire batch. To avoid this, make sure to maintain a consistent moisture level by rinsing your sprouts daily with fresh water. However, if you notice any fuzzy patches or slimy texture, take immediate action.
To troubleshoot mold or fungus, gently rinse your affected sprouts under cold running water, then dry them thoroughly with paper towels. Next, transfer the sprouts to a clean container and provide good air circulation by placing them on a tray or mesh screen. This should help combat the issue and prevent further growth.
Keep in mind that overwatering is often the culprit behind moldy sprouts. To avoid this mistake, monitor your sprout’s moisture levels closely, and adjust your watering schedule as needed. Remember, it’s always better to err on the side of caution when it comes to keeping your sprouts dry and healthy. By being proactive and addressing issues promptly, you can ensure a thriving batch of lentil sprouts that are ready for harvest in just a few days.
Harvesting and Storage
Now that you’ve successfully grown your lentil sprouts, it’s time to think about harvesting them and storing them for optimal flavor and nutrition. Let’s cover the best ways to dry and preserve your hard work!
Knowing When to Harvest Your Sprouts
When it comes time to harvest your lentil sprouts, you’ll know they’re ready when they’ve reached a certain color, texture, and flavor profile. Typically, this happens within 7-10 days of germination, depending on the temperature and humidity.
Look for sprouts with a vibrant green color and a slightly firmer texture than when they were first germinated. You may notice that some sprouts are more yellow or tan, which is completely normal – these will still be edible, but may have a slightly different flavor.
To determine if your lentil sprouts are ready to eat, simply taste one. If it’s tender and has a mild nutty flavor, it’s likely done. Be careful not to over-harvest, as this can cause the remaining sprouts to become leggy or weak.
It’s worth noting that lentil sprouts will continue to grow and develop after they’re harvested, so you can enjoy them at different stages of maturity depending on your preference. Simply rinse them with water before using in salads, sandwiches, or as a snack on their own.
Storing and Preserving Your Lentil Sprouts
Now that you’ve successfully grown and harvested your lentil sprouts, it’s time to think about storage and preservation. Proper handling will help keep them fresh for a longer period and maintain their nutritional value.
When storing lentil sprouts, make sure they’re completely dry before placing them in an airtight container or bag. You can store them in the refrigerator at a consistent temperature below 40°F (4°C) to slow down bacterial growth. They’ll typically stay fresh for up to five days when stored this way.
To extend their shelf life, consider freezing or dehydrating your lentil sprouts. Freezing is ideal if you want to retain the texture and crunchiness of the sprouts. Simply spread them out in a single layer on a baking sheet lined with parchment paper, place it in the freezer until they’re frozen solid, then transfer them to an airtight container or bag for storage.
Dehydrating using a food dehydrator or your oven (on its lowest temperature setting) will help remove excess moisture and make the sprouts easier to store. Once dried, you can keep them in airtight containers at room temperature for up to six months.
Incorporating lentil sprouts into recipes is also an excellent way to preserve them. Use them as garnishes or add them directly to salads, smoothies, or other dishes where you want a burst of nutrition and flavor.
Conclusion
Now that you’ve successfully grown your lentil sprouts, let’s wrap up with a summary of key takeaways to ensure your future successes. Review these essential reminders for optimal growth results.
Recap of the Key Takeaways
To successfully grow lentil sprouts, you’ve learned that it’s essential to start with high-quality seeds, which can be found at most health food stores or online. You should also soak the seeds overnight and then rinse them thoroughly before placing them in a sprouting jar or tray.
Throughout this guide, we emphasized the importance of providing adequate light and temperature conditions for your lentil sprouts. A spot with indirect sunlight and temperatures between 70-75°F (21-24°C) is ideal. Consistent watering is also crucial to prevent mold growth and ensure healthy development.
Additionally, you’ve discovered that regular rinsing and gentle agitation can help promote even sprouting and prevent seedlings from becoming too leggy. By following these simple steps and providing the right environment for your lentil sprouts, you can enjoy a bountiful harvest of nutritious and delicious greens in just a few days.
Remember to be patient and attentive throughout the process, as even small mistakes can impact the success of your crop. With practice, you’ll become more confident in growing lentil sprouts and exploring the world of microgreens.
Encouragement to Try Lentil Sprouting at Home
Now that you’ve learned the basics of growing lentil sprouts, we hope you’re excited to give it a try at home. Lentil sprouting is a fun and rewarding process that not only provides a nutritious addition to your meals but also allows you to connect with nature and take control of your food.
Don’t be intimidated if you think you need specialized equipment or expertise – all you’ll need are some basic kitchen supplies, such as a glass jar or container with a mesh lid. Simply rinse the lentils, soak them overnight, and let them sprout in a warm, dark place for 3-5 days. It’s really that simple!
To get started, make sure to choose a variety of lentil that is suitable for sprouting, such as green or brown lentils. Be patient and observe your sprouts’ progress – it may take some time to see the tiny shoots emerge, but trust us, it’s worth the wait.
If you’re new to lentil sprouting, consider starting with a small batch to ensure you can manage the process without feeling overwhelmed. With practice and experience, you’ll be hooked on growing your own lentil sprouts at home.
Frequently Asked Questions
Can I grow lentil sprouts indoors with low natural light?
Yes, you can successfully grow lentil sprouts indoors even with limited natural light. To do so, place your lentils near a sunny window or under LED grow lights that provide the necessary spectrum and intensity for photosynthesis.
How often should I water my lentil sprouts to prevent over-saturation?
Water your lentil sprouts gently but thoroughly 2-3 times a day, making sure not to leave them submerged in water. Over-saturation can lead to mold and fungal growth, so it’s essential to strike the right balance.
What are some common issues I might encounter during the sprouting process?
Common issues include inadequate moisture, insufficient light, or poor air circulation leading to mold or rot. Keep an eye out for these signs and adjust your environment as needed to ensure healthy growth.
How long do lentil sprouts typically take to mature from sowing to harvest?
Lentil sprouts usually take around 5-7 days to germinate after soaking, followed by another week or so of growth before they’re ready for harvest. Keep in mind that this timeframe may vary depending on factors like temperature and humidity.
Can I grow lentil sprouts year-round, regardless of the season?
Yes, lentil sprouts can be grown indoors throughout the year, unaffected by seasonal changes. This makes them an excellent choice for those looking to maintain a consistent supply of fresh produce, even in areas with limited growing seasons.