Are you ready to transform your lawn or garden with a lush, vibrant green carpet? Planting clover seeds is a simple yet effective way to achieve this look. Not only do they thrive in poor soil conditions, making them perfect for areas that need a little TLC, but they also provide an incredible source of nitrogen, reducing the need for synthetic fertilizers.
But before you start sowing those tiny seeds, it’s essential to get things right from the beginning. Choosing the right variety of clover for your specific climate and soil type is crucial for success. In this article, we’ll take you through the step-by-step process of planting clover seeds successfully, covering topics like soil preparation, sowing techniques, aftercare, and troubleshooting common issues. Whether you’re a seasoned gardener or just starting out, our expert tips will have you on your way to a thriving clover lawn in no time!
Choosing the Right Clover Variety
When selecting clover seeds, you’ll want to consider factors such as growth habits, soil preferences, and intended use. This will help you choose the perfect variety for your needs.
Understanding Different Types of Clover
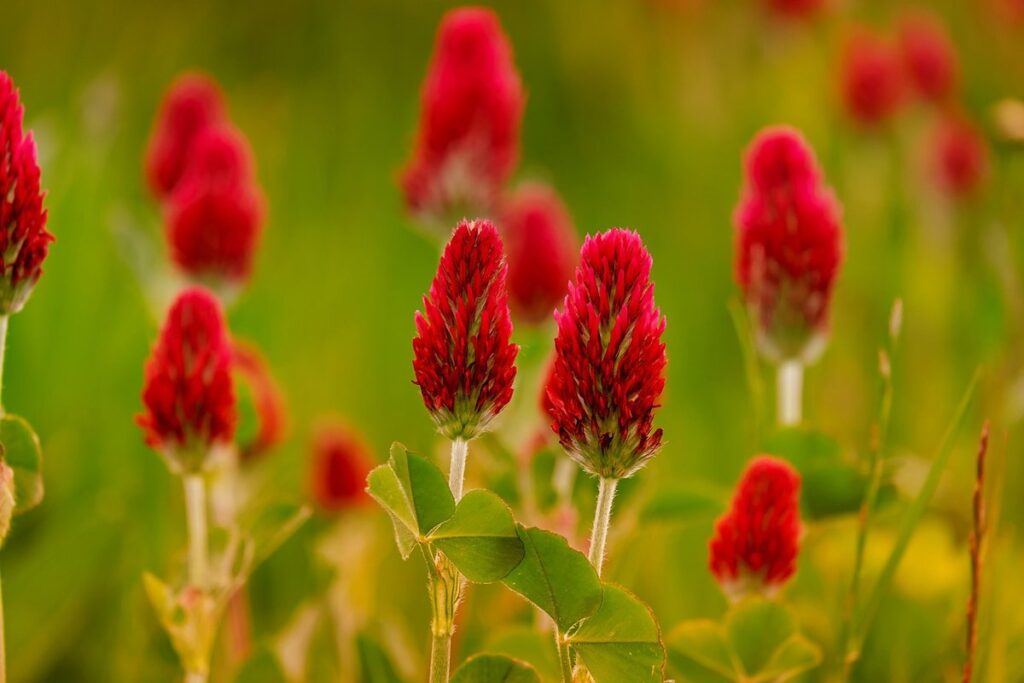
When it comes to choosing the right clover variety for your garden or lawn, understanding the different types of clover is crucial. There are several main types of clover, but we’ll focus on three of the most popular: white clover (Trifolium repens), red clover (Trifolium pratense), and microclover (Trifolium microphyllum).
White clover is a perennial favorite among gardeners due to its adaptability and ability to thrive in poor soil. It’s an excellent choice for lawns, as it can tolerate foot traffic and requires minimal maintenance. White clover also attracts pollinators like bees and butterflies, making it a great addition to wildlife gardens.
Red clover, on the other hand, is an annual or biennial variety that’s often used as a cover crop to improve soil health. It’s a nitrogen-fixing crop, meaning it converts atmospheric nitrogen into a form that’s easily accessible for plants, reducing the need for synthetic fertilizers. Red clover also has medicinal properties and can be harvested for its flowers.
Microclover is a low-growing, spreading variety that’s perfect for small spaces or areas with poor soil quality. It’s incredibly drought-tolerant and requires minimal watering, making it an ideal choice for water-conscious gardeners. Microclover also attracts pollinators and fixes nitrogen, just like white clover.
Selecting the Best Clover Seed for Your Needs
When selecting the best clover seed for your needs, there are several key factors to consider. Climate is one of the most crucial considerations, as different regions have unique temperature and moisture profiles that can affect clover growth. For example, if you live in an area with hot summers and cold winters, a drought-tolerant clover variety such as white clover or sweet clover may be a better choice.
Soil type is also important to consider, as different clover varieties thrive in different soil conditions. White clover, for instance, prefers well-draining soils, while red clover can tolerate wetter soils. If you’re planning to use the clover for hay production or livestock feed, a high-yielding variety such as crimson clover may be more suitable.
In addition to climate and soil type, it’s also essential to consider the intended use of the clover. Are you looking to establish a pasture for grazing animals? Or do you want to create a lush meadow for ornamental purposes? By carefully evaluating these factors, you can choose a high-quality clover seed that meets your specific needs and ensures optimal growth and performance.
Preparation is Key: Soil and Climate Considerations
Before you start sowing your clover seeds, it’s crucial to consider the soil and climate conditions of your area to ensure successful germination and growth. Let’s dive into these essential factors together!
Assessing Your Soil Type and pH
To grow healthy clover, it’s essential to understand your soil type and pH level. Start by digging a small hole about 12 inches deep in your planting area. Fill the hole with water, and observe how long it takes for the water to drain. If the water drains quickly, you likely have sandy soil. If it takes a few hours or even days to drain, you may have clay or loamy soil.
You can also conduct a simple pH test using a kit available at most gardening stores. These kits measure the acidity or alkalinity of your soil on a scale of 0-14. Most clover varieties prefer a slightly acidic to neutral soil pH between 6.0 and 7.0. If your soil is too acidic (low pH), add lime to raise it. If it’s too alkaline, mix in peat moss or sulfur to lower it.
To make these adjustments, start by testing your soil pH regularly throughout the growing season. Based on your results, apply small increments of amendments and monitor their effects over time. Remember that significant changes can shock your clover roots, so patience is key.
Understanding Microclimate Conditions
When it comes to growing clover seeds, understanding microclimate conditions is crucial for optimal growth and success. A microclimate refers to a localized area that has its own unique temperature, moisture, and sunlight characteristics, which can be quite different from the surrounding environment.
Temperature, for instance, plays a significant role in clover growth. Most clover varieties thrive in temperatures between 60°F and 80°F (15°C and 27°C). Extreme heat or cold can inhibit growth or even kill the plants altogether. In regions with harsh winters, it’s essential to choose a clover variety that is specifically bred for cold tolerance.
Moisture levels also impact clover growth significantly. Adequate water supply is necessary, but overwatering can lead to root rot and other issues. Aim for about 1-2 inches of rainfall or irrigation per week, depending on your region’s climate.
Sunlight exposure is another critical factor in microclimate creation. Clovers generally require full sun to partial shade, with at least 4-6 hours of direct sunlight per day. By understanding these factors and taking steps to create a suitable microclimate, you can increase the chances of successful clover growth.
Sowing Clover Seeds: Techniques and Timing
When it comes to successfully sowing clover seeds, timing and technique are crucial. Let’s dive into the specifics of how to get your seedlings off to a great start.
When to Plant Clover Seeds
When it comes to planting clover seeds, timing is everything. You want to plant at the right moment when the conditions are favorable for germination and growth. The best time to plant clover seeds depends on your region’s climate, weather patterns, and seasonal changes.
In general, spring and fall are the ideal seasons for sowing clover seeds in most regions. Spring planting typically occurs in late March or early April, while fall planting takes place in September or October. During these periods, the temperatures are mild, and there is ample moisture in the soil, making it an optimal time for clover seed germination.
If you live in a region with hot summers, consider planting clover seeds in the cooler months to avoid scorching heat and drought. Conversely, if your area experiences harsh winters, wait until spring when the ground has thawed and the temperatures have risen.
Before planting, make sure to check the specific weather forecast for your area to ensure that there are no extreme weather conditions that may hinder seed germination or growth.
Sowing Methods and Seed Rates
When it comes to sowing clover seeds, there are various methods you can employ to achieve optimal results. Broadcasting is one of the most common techniques, where you scatter the seeds evenly over the ground by hand or with a broadcast seeder. This method is ideal for small areas and can be done manually or mechanically using a spreader.
Another popular approach is drilling, which involves creating rows of seed holes using a drill or a hoe. This technique is suitable for larger plots and allows for precise control over the seeding process. Broadcasting with a spreader is also an effective option, especially when sowing on uneven terrain.
The key to successful clover establishment lies in choosing the right seed rate. A general rule of thumb is to sow 1-2 pounds per acre for white clover or 2-3 pounds per acre for red clover. However, this can vary depending on factors such as soil quality, climate, and desired density. It’s essential to consult with a local expert or check the seed package instructions for specific guidance on seed rates for your region.
For best results, make sure to sow seeds at the optimal depth of 1/4 inch, which allows them to germinate quickly and evenly.
Aftercare: Tips for Successful Clover Establishment
Now that you’ve sown your clover seeds, it’s time to ensure they get the best possible start. Here are our top tips for successful establishment and aftercare.
Mulching and Watering Techniques
Maintaining soil moisture is crucial for young clover seedlings to establish themselves. One effective way to retain moisture is through mulching. Apply a 2-3 inch layer of organic mulch such as wood chips, straw or grass clippings around the seeded area. This not only retains moisture but also suppresses weed growth by blocking light.
When watering your clover seeds, it’s essential to strike a balance between providing enough moisture and overwatering, which can lead to root rot. Water the soil gently but thoroughly after sowing the seeds. Keep the soil consistently moist during the first few weeks until germination occurs. Once established, reduce watering to about 1-2 inches per week.
To further prevent weeds from competing with your clover, consider using a pre-emergent herbicide or applying a layer of landscape fabric. These measures can help suppress weed growth and reduce maintenance needs. Regularly inspect the seeded area for signs of competition from weeds and address them promptly to ensure the health and success of your newly established clover.
Monitoring Progress and Dealing with Issues
As you tend to your newly sown clover seeds, it’s essential to keep an eye out for potential issues that may arise. Poor germination rates can be a common problem, especially if the soil is too dry or too cold. To combat this, ensure the soil is moist but not waterlogged, and consider providing some protection from extreme temperatures.
Another issue you might encounter is pests, such as aphids, whiteflies, or caterpillars. To prevent infestations, use row covers or fine mesh to keep these unwanted visitors out. For established infestations, treat your clover with neem oil or insecticidal soap.
Diseases can also be a concern for newly planted clover seeds. Keep an eye out for signs of fungal diseases like powdery mildew or rust. If you notice any issues, reduce watering and increase air circulation around the plants. Consider applying a fungicide specifically designed for clover to prevent further spread.
Regular monitoring will help you catch these problems early on, ensuring your clover has the best chance at thriving. Regularly inspect your seedlings, checking for signs of pests or diseases.
Maintenance and Care for Established Clover Stands
Now that you’ve successfully established a thriving clover stand, it’s essential to focus on maintaining its health and preventing common issues that can arise. This section will walk you through those crucial steps.
Mowing and Trimming Strategies
When it comes to maintaining established clover stands, mowing and trimming strategies play a crucial role in promoting new growth while preventing overgrowth. To strike the perfect balance between these two goals, it’s essential to understand that clover is more resilient than many other grasses and can tolerate some neglect. However, consistent maintenance will encourage continued health and vigor.
To prevent your clover from becoming invasive, aim for a mowing height of 2-3 inches during the growing season. This encourages new growth by allowing sunlight to reach deeper into the plant’s foliage while preventing it from spreading beyond its designated area. Mow every 7-10 days during peak growth periods, and reduce frequency in cooler months.
It’s also essential to trim any overgrown areas with a weed whacker or pruning shears to prevent seed dispersal. Regular trimming promotes air circulation, reducing the risk of fungal diseases that thrive in dense foliage. By maintaining your clover stand through strategic mowing and trimming, you’ll promote continued growth while keeping its spread under control.
Fertilization and Pest Management
Fertilizing clover stands is essential for maintaining their health and productivity. As a general rule of thumb, it’s best to fertilize clover stands during the spring growth phase when the plants are actively producing new leaves and stems. This typically occurs around 4-6 weeks after germination.
However, if you’re unsure about the specific needs of your clover stand, consider conducting a soil test to determine its pH levels and nutrient content. Based on the results, apply a balanced fertilizer that’s rich in nitrogen (N), phosphorus (P), and potassium (K). A general rule of thumb is to use 10-20 pounds of N per acre.
For integrated pest management (IPM) strategies, focus on monitoring your clover stand regularly for signs of pests or diseases. Use visual inspections and traps to detect potential problems before they become severe. When necessary, adopt targeted treatments that minimize harm to beneficial insects and the environment. For example, if you notice aphid infestations, use neem oil or insecticidal soap to control them without harming bees.
By adopting these strategies, you can maintain a healthy and thriving clover stand while minimizing the need for synthetic pesticides and fertilizers.
Benefits of Planting Clover Seeds: Environmental and Economic Advantages
Planting clover seeds offers a multitude of advantages, ranging from environmental benefits to economic gains that can positively impact your bottom line. Let’s explore these perks in more detail.
Pollinator Support and Biodiversity Enhancement
Clover seeds play a vital role in supporting pollinators and increasing biodiversity. As a key source of nectar and pollen, clover attracts bees, butterflies, and other beneficial insects to your garden. By planting clover seeds, you’re providing these essential pollinators with the sustenance they need to thrive.
One of the most significant benefits of clover is its ability to increase soil biodiversity. As a legume, clover has the unique capacity to fix nitrogen in the soil, creating a nutrient-rich environment that fosters the growth of beneficial microorganisms. This in turn supports a wide range of beneficial insects, from ground beetles to parasitic wasps.
To maximize the pollinator support and biodiversity enhancement benefits of your clover seeds, consider the following tips:
* Choose a mix of perennial and annual clover species to provide a constant source of nectar and pollen throughout the growing season.
* Plant clover in areas with low soil fertility, as it’s particularly effective at improving soil health in these conditions.
* Avoid using pesticides or herbicides near your clover patches, as these can harm beneficial insects and disrupt the delicate balance of your ecosystem.
Soil Health and Erosion Control
Planting clover seeds can have a profound impact on soil health and erosion control. One of the primary benefits of clover is its ability to improve soil structure. Clover’s extensive root system helps to break up compacted soil, allowing air, water, and nutrients to penetrate deeper into the soil profile. This improved drainage reduces soil compaction, making it easier for plants to grow and for farmers to till.
In addition to improving soil structure, clover is also a nitrogen-fixing legume. This means that it converts atmospheric nitrogen into a form that’s accessible to other plants, enriching the soil without the need for synthetic fertilizers. By incorporating clover into your planting rotation, you can reduce fertilizer application rates and minimize soil degradation.
To maximize the benefits of clover for erosion control, incorporate it into areas with high rainfall or steep slopes. Clover’s deep roots help hold the soil in place, preventing erosion and runoff. Consider mixing clover seeds with other cover crops to create a diverse and resilient ecosystem that promotes soil health and minimizes environmental impact.
Troubleshooting Common Issues with Clover Plantings
We’ve all been there – seedlings struggling to grow, uneven germination rates, and pesky weeds taking over your lovely clover planting. Don’t worry, we’ll walk you through common issues and their easy fixes!
Identifying and Addressing Poor Germination Rates
Poor germination rates can be frustrating, especially when you’re expecting a lush and vibrant clover lawn. But don’t worry, it’s often not the fault of the seeds themselves. Instead, there are several common causes that might be contributing to the issue.
Inadequate seed quality is one major culprit – using old or low-quality seeds can significantly impact germination rates. Seeds with a lower viability rate (typically below 80%) may struggle to sprout, so it’s essential to check the seed packet for its expiration date and store your seeds properly. Another common cause is inadequate moisture – clover seeds need consistent and adequate water to germinate. This means ensuring that you’re providing enough rainfall or supplemental irrigation to prevent drying out.
To address poor germination rates, start by testing your soil’s pH level and adjusting it if necessary (clover prefers slightly acidic to neutral conditions). Next, check the depth of sowing – clover seeds typically require a light covering of 1/8 inch. Finally, consider soaking your seeds in water for 24 hours before planting to help stimulate germination.
Managing Pests and Diseases in Established Clovers
As your clover plants establish themselves, you may encounter some common pests and diseases that can impact their health. Recognizing these issues early on is crucial to preventing them from spreading and causing significant damage.
Some of the most common pests that target clovers include aphids, whiteflies, and spider mites. These tiny insects feed on the sap of your plants, weakening them over time. To control aphid infestations, spray a solution of water and mild dish soap on the affected areas. For more severe cases, use insecticidal soap or neem oil according to the product’s instructions.
Fungal diseases like powdery mildew, rust, and leaf spot are also prevalent in clover plantings. These diseases thrive in moist environments, so ensure good air circulation around your plants by pruning nearby vegetation. To prevent fungal infections, apply a fungicide specifically designed for grasses and legumes, following the product’s instructions carefully.
Regular monitoring of your plants will help you catch pest and disease issues early on. Keep an eye out for unusual growth patterns, discoloration, or insect activity. By staying vigilant and taking swift action when needed, you can keep your clover plantings healthy and thriving throughout the growing season.
Frequently Asked Questions
Can I mix clover seeds with other types of grass or plants?
While it’s technically possible to intermingle clover seeds with other types of grass or plants, it’s essential to ensure that the companion species have similar growth habits and soil requirements. White clover, for example, can tolerate a range of conditions but may compete with more delicate plants. Choose compatible companions to avoid potential issues.
How long does it take for clover seeds to germinate?
Germination rates vary depending on factors like climate, soil quality, and seed quality. Generally, white clover and red clover can take 7-14 days to germinate, while microclover may take up to 21 days. Factors such as temperature, moisture, and pH levels also influence the rate of germination.
Can I use clover seeds for lawns with heavy foot traffic?
Yes, clover seeds are an excellent choice for high-traffic areas since they can tolerate moderate wear and tear. However, if your lawn is subjected to excessive foot traffic or vehicle usage, consider incorporating more robust clover varieties like microclover.
How do I protect newly sown clover seeds from pests and diseases?
Newly sown clover seeds are particularly vulnerable to pests and diseases. Implement preventative measures such as using fine-meshed bird netting to keep birds away, maintaining adequate soil moisture, and practicing crop rotation. Monitor for common issues like aphids, powdery mildew, or leaf spot.
Can I use existing lawn care equipment for sowing clover seeds?
Yes, you can use your existing lawn mowers or aerators for preparing the soil before sowing clover seeds. However, be cautious not to compact the soil too much during preparation to ensure the seeds have enough space to germinate and grow.