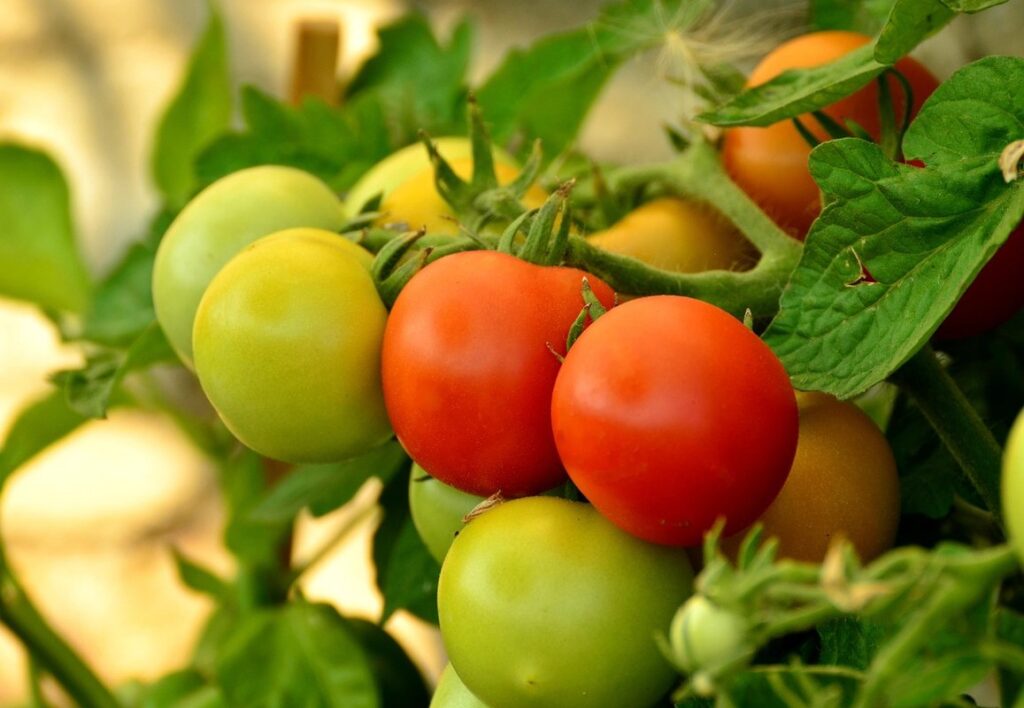
Getting ready for a bountiful tomato harvest? Planting tomatoes indoors is an excellent way to get a head start on the growing season. But when exactly should you plant those seeds, and how can you ensure they’ll thrive once transplanted outside? Knowing when to plant tomatoes indoors is crucial to giving them the best possible chance of success.
In this expert guide, we’ll walk you through the process of seed starting, soil preparation, and transplanting. You’ll learn exactly when to sow those seeds, what conditions are ideal for growth, and how to prepare your indoor space for maximum results. By following our tips, you can enjoy a bumper crop of juicy, delicious tomatoes right in your own backyard. Whether you’re a seasoned gardener or just starting out, this article has got you covered.
Choosing the Right Time for Indoor Seed Starting
When planting tomatoes indoors, timing is everything. In this next part, we’ll explore the ideal window to start your seeds for a head start on a bumper crop outdoors.
Determining the Last Frost Date in Your Area
To determine when to start seedlings indoors for tomatoes, it’s essential to know the last frost date in your area. This will help you avoid starting seeds too early and risking damage from late-season frosts. So, how do you find out the last frost date in your region?
You can check local weather forecasts online or through apps like Dark Sky or Weather Underground. These resources provide hyperlocal forecasts that take into account specific locations, including microclimates. For example, if you live in a valley surrounded by mountains, your area may have a different frost pattern than nearby cities.
Another excellent resource is the USDA Plant Hardiness Zone Map, which provides average annual extreme minimum temperature data for your area. This can give you an idea of when the last frost typically occurs in your region. You can also check with local nurseries or gardening clubs to ask about their experience with frosts and when they start seedlings.
Keep in mind that weather patterns are changing, so it’s a good idea to double-check multiple sources before making a decision.
Calculating the Number of Days Until Transplant
To ensure you’re planting tomatoes indoors at the right time, it’s essential to calculate the number of days until transplanting. This allows you to plan for a smooth transition from indoor seed starting to outdoor growth. To do this, consider the following factors:
First, count back 6-8 weeks from your last frost date to determine when to start seeds indoors. This will give seedlings enough time to mature before being transplanted outside. Next, calculate the days between indoor germination and transplanting. Generally, tomatoes take around 4-5 weeks to grow large enough for outdoor planting.
For example, if your last frost date is May 1st, you would start seeds indoors by mid-March. This allows 6-7 weeks of growth before transplanting outside on April 15th or later. Keep in mind that this is just a general guideline and may vary depending on your specific climate and region.
To be more precise, consider the average days to maturity for the tomato variety you’re growing. Some cherry tomatoes, like ‘Patio’, mature in as few as 40-50 days, while larger varieties can take up to 80 days or more.
Preparing Soil and Seedlings for Indoor Planting
Before planting your tomato seedlings indoors, it’s essential to prepare a nutrient-rich soil mix that will support their growth. Create a well-draining potting mix using a blend of peat moss and perlite.
Starting Tomatoes from Seeds Indoors
Starting tomato seeds indoors can be an intimidating task, but with the right steps and tools, you’ll be on your way to a bountiful harvest. The key is to begin by preparing a good quality seed starting mix specifically designed for indoor planting. This type of soil mix is usually finer and more sterile than regular potting soil, which helps prevent overwatering and root rot.
To sow the seeds, fill a small cell tray or seed starting container with the prepared mix, leaving about ¼ inch of space between each seed. Plant the tomato seeds about ¼ inch deep, making sure not to cover them too much as this can hinder germination. Water gently but thoroughly after planting and place in a warm location with indirect light.
Most varieties of tomatoes require around 12-14 hours of direct or indirect light per day to grow well indoors. If you’re using grow lights, position them about 6 inches above the seedlings and adjust as necessary to avoid burning the leaves. By following these steps, you’ll be able to give your tomato seeds a strong start on their journey to becoming robust and healthy plants that will thrive in your outdoor garden come springtime.
Using Seed Trays or Individual Pots
When it comes to starting tomato seeds indoors, you have two popular options: seed trays and individual pots. Both methods have their pros and cons, which we’ll explore below.
Seed trays are a great space-saving option, allowing you to start multiple seeds at once in a compact area. They’re also relatively inexpensive and can be easily transferred to larger pots or directly into the garden when the seedlings are ready. However, seed trays can lead to overwatering if not monitored closely, which can be detrimental to young tomato seedlings.
Individual pots offer better drainage and air circulation around each plant, reducing the risk of overwatering and root rot. They’re also easier to water, as you can focus on one pot at a time. However, individual pots require more space and are often more expensive than seed trays.
To prevent overwatering in either method, make sure to check the soil moisture regularly by sticking your finger into the soil up to the first knuckle. If the soil feels dry, it’s time to water. Water thoroughly, then let the pot or tray drain completely before returning it to its place. This simple tip can help ensure your tomato seedlings get off to a healthy start indoors.
Factors Affecting Indoor Tomato Plant Growth
When it comes to growing tomatoes indoors, several key factors can impact their growth and development. Let’s explore some of these crucial elements together.
Lighting Requirements for Tomatoes Indoors
Providing sufficient light is crucial for indoor tomato plant growth. While natural light is ideal, it’s not always possible to provide adequate sunlight indoors, especially during winter months or in regions with limited daylight hours.
LED grow lights are a popular choice among indoor gardeners due to their energy efficiency and adjustable spectrum settings. These lights mimic the sun’s rays, promoting photosynthesis and fruit production. Choose LED grow lights specifically designed for flowering plants, as they emit more red light, which is essential for tomato ripening.
Fluorescent lights, such as T5 or T8 bulbs, are another option. However, they tend to be less intense than LED lights and may require longer exposure times. Place fluorescent lights 6-8 inches above the plant’s canopy to prevent burning.
If possible, supplement with natural light by placing plants near a sunny window. Aim for at least 4-6 hours of direct sunlight per day. Monitor your plant’s response and adjust lighting accordingly.
Temperature Control for Healthy Plants
Temperature control is one of the most crucial factors affecting indoor tomato plant growth. Tomatoes are sensitive to temperature fluctuations, and maintaining a stable range can make all the difference between a healthy crop and stunted growth.
Tomato plants thrive in temperatures between 65°F (18°C) and 70°F (21°C) during the day, with a slight drop to around 55°F (13°C) at night. Avoid placing your tomato plants near heating or cooling vents, fireplaces, or drafty windows, as these can cause temperature fluctuations that may stress your plants.
To maintain an optimal temperature range, consider using fans or circulating air in your growing space. This helps prevent moisture buildup and reduces the risk of fungal diseases. You can also use thermal mass materials like concrete or brick to absorb excess heat during the day and release it at night, creating a more stable environment for your tomato plants.
Monitor your plant’s response to temperature changes by observing its growth rate, leaf color, and fruit production. Adjust your temperature control strategies accordingly to ensure you’re providing the best conditions for your indoor tomatoes to thrive.
Transplanting Indoor Tomatoes into Outdoor Conditions
Once you’ve nurtured your indoor tomato seedlings, it’s time to harden them off and transplant them outside for a summer of bountiful harvests. This process is crucial for their survival.
Hardening Off Seedlings Before Transplant
Hardening off seedlings before transplanting them outdoors is a crucial step that can make all the difference between a successful harvest and a disappointing one. When you plant tomatoes indoors, they’re accustomed to a controlled environment with plenty of light but minimal wind or extreme temperatures. But when you move them outside, it’s like transporting them to a different planet! To prevent shock and ensure your seedlings thrive in their new surroundings, you need to gradually acclimate them to outdoor conditions.
Start by moving the seedlings outdoors for short periods each day, beginning with just an hour or two of direct sunlight. This will allow them to adjust to the increased light intensity without burning their delicate leaves. Gradually increase the duration over several days, but don’t forget to provide some shade when it’s extremely hot. You should also expose your seedlings to gentle breezes, simulating the wind they’ll encounter outside. This helps develop stronger stems and more robust growth.
Remember, hardening off is a process that takes time – usually 7-10 days. Be patient and don’t rush it! By acclimating your seedlings to outdoor conditions gradually, you’ll be rewarded with healthier, more resilient plants that will produce an abundance of delicious tomatoes all season long.
Tips for Successful Outdoor Planting
When transplanting indoor tomatoes into outdoor conditions, it’s essential to prepare the soil properly to ensure a smooth transition. Start by loosening the soil to a depth of 12-18 inches to allow for good drainage and root growth. Add a balanced fertilizer to provide nutrients for healthy plant development.
Next, consider the planting depth of your tomato seedlings. Dig a hole that’s about the same depth as the pot, making sure not to bury the stem. Instead, gently place the seedling in the center of the hole and cover with soil, leaving only the top few sets of leaves exposed.
Adequate water supply is also crucial for successful outdoor planting. Water your transplanted tomatoes deeply once or twice a week, depending on weather conditions. Mulching around the plants can help retain moisture and suppress weeds, reducing the need for frequent watering. This will also promote healthy growth and prevent fungal diseases that thrive in moist environments.
Monitoring and Troubleshooting Indoor Tomato Plants
As you watch your indoor tomato plants grow, it’s essential to keep an eye on their health and catch any potential issues before they escalate into bigger problems. Here are some key signs of trouble to look out for.
Common Issues with Indoor Seed Starting
Indoor seed starting can be a delicate process, and it’s not uncommon for issues to arise. One of the most common problems is overwatering. Seeds need consistent moisture to germinate, but too much water can lead to rot and kill the seedlings. To avoid this, make sure your potting mix is well-draining, and only water when the top inch of soil feels dry to the touch.
Underwatering is another issue that can be just as detrimental. Seeds need a consistent level of moisture to develop their roots, but too little water can stunt growth and even kill the seedlings. Check the soil daily, and make sure to keep it consistently moist during the first few weeks after germination.
Inadequate light is also a common problem when starting seeds indoors. Tomatoes need plenty of direct sunlight to grow strong and healthy, but indoor spaces often lack sufficient natural light. Consider investing in grow lights or placing your seedlings near a sunny window to ensure they receive the necessary light.
Strategies for Preventing Pests and Diseases
To ensure that your indoor tomato plants thrive and produce a bumper crop, it’s essential to implement strategies for preventing pests and diseases. Proper sanitation is key; regularly inspect your plants for signs of infestation or infection, and dispose of any affected leaves or stems promptly.
Crop rotation can also help minimize the risk of pest buildup and disease transmission. This means changing the location of your tomato plants every season to avoid attracting the same pests and diseases that were present in the previous growing spot.
Another crucial aspect is integrated pest management (IPM). This approach combines physical, cultural, biological, and chemical controls to manage pests effectively. For example, you can use row covers to prevent whiteflies and aphids from reaching your plants. Organic pesticides like neem oil and insecticidal soap can also be used as a last resort.
To further reduce the risk of disease, ensure good air circulation around your plants by pruning them regularly and maintaining a clean growing area. By implementing these strategies, you’ll create an environment that’s less conducive to pest and disease development, allowing your tomato plants to focus on producing a bountiful harvest.
Advanced Techniques for Growing Tomatoes Indoors
Now that you know when to plant tomatoes indoors, let’s dive into some advanced techniques to optimize your indoor growing space and ensure a bountiful harvest. This section covers key strategies for maximizing yields.
Using Hydroponics or Aeroponics
Growing tomatoes indoors using hydroponics or aeroponics systems is an advanced technique that can provide numerous benefits. Hydroponic systems use a nutrient-rich solution to feed the plants, while aeroponic systems mist the roots with water and nutrients. These methods allow for more precise control over the growing environment, which can result in higher yields and better flavor.
One of the main advantages of using hydroponics or aeroponics is that they can conserve water up to 90% compared to traditional soil-based methods. This makes them an attractive option for urban gardeners who may have limited space or resources. Additionally, these systems can be designed to optimize light spectrum and intensity, which can enhance fruit production.
When transitioning from a traditional growing method to hydroponics or aeroponics, it’s essential to research and choose a suitable system that fits your needs and budget. Online resources such as the HydroGrower forum or the Aeroponic Growers Organization can provide valuable information on setting up and maintaining these systems.
Indoor Greenhouse Setup
Setting up an indoor greenhouse is crucial for optimal tomato plant growth. To begin, you’ll need to create a climate-controlled environment that provides the perfect balance of temperature, humidity, and light. This can be achieved using a combination of heating and cooling systems, as well as ventilation fans to maintain air circulation.
When it comes to lighting, tomatoes require at least 18 hours of supplemental lighting per day, including during the winter months when natural daylight is scarce. LED grow lights are an excellent option, offering high-intensity light output with minimal heat generation.
To ensure optimal growth, aim for a temperature range between 65°F and 75°F (18°C to 24°C) during the day and no lower than 55°F (13°C) at night. Maintain humidity levels between 40% and 60%. With proper climate control, ventilation, and lighting, you’ll be well on your way to a thriving indoor greenhouse setup that will support healthy tomato plant growth.
Consider investing in a hygrometer and thermometer to monitor temperature and humidity levels, allowing for adjustments as needed. A well-designed indoor greenhouse can produce up to 20% more fruit than outdoor plants, making it an excellent option for growers seeking optimal yields.
Frequently Asked Questions
What if I live in an area with unpredictable weather patterns?
If you’re unsure about the last frost date or experience sudden temperature fluctuations, consider using a cold frame or greenhouse to provide protection for your seedlings.
How many days before transplanting should I harden off my indoor tomatoes?
It’s recommended to start hardening off your tomato seedlings 7-10 days before transplanting. This allows them to adjust gradually to outdoor conditions, reducing shock and increasing their chances of success.
Can I use regular potting soil for indoor seed starting, or do I need specialized mix?
For optimal results, it’s best to use a high-quality potting mix specifically designed for seed starting. These mixes typically have the right balance of nutrients and moisture retention to support healthy growth from the beginning.
How can I prevent pests like whiteflies or spider mites in my indoor tomato garden?
To minimize the risk of infestation, ensure good air circulation around your plants, use physical barriers (like fine mesh), and maintain a clean growing environment. Also, consider introducing beneficial insects like ladybugs or lacewings to control pest populations naturally.
Can I use LED grow lights for tomatoes indoors, and if so, what color spectrum is most effective?
Yes, LED grow lights are suitable for indoor tomato cultivation. Choose a light with a balanced spectrum that includes blue (400-500nm), red (600-700nm), and green (500-600nm) LEDs. This will promote healthy growth, fruiting, and flowering in your tomatoes.