Drying flowers is an art that requires patience, skill, and the right choice of blooms. With so many varieties to choose from, selecting the best flowers for drying can be overwhelming, especially if you’re new to preservation techniques. But don’t worry, with the right guidance, you’ll be able to create beautiful, long-lasting arrangements that brighten up any room. In this comprehensive guide, we’ll walk you through the process of choosing the perfect flowers for drying and share expert tips on how to preserve them beautifully. From delicate petals to sturdy stems, we’ll cover everything you need to know about selecting, preparing, and drying flowers perfectly. Whether you’re a seasoned gardener or a DIY enthusiast, this guide is designed to help you get the best results with your flower-drying projects.
Choosing the Right Flowers for Drying
Now that you’ve selected a few flowers to dry, it’s time to choose which ones will turn out best. This section will help you narrow down your options and pick the perfect blooms for drying.
Understanding the Characteristics of Drying-Friendly Flowers
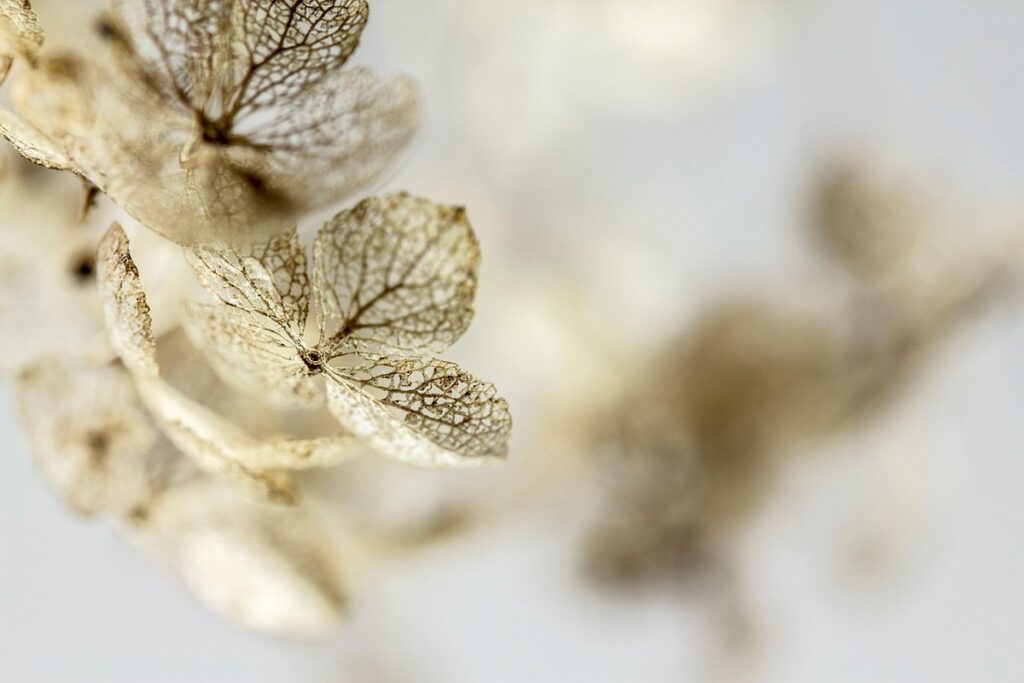
When selecting flowers for drying, it’s essential to understand their characteristics and how they’ll hold up during the process. Flowers with larger petals tend to dry better than those with smaller ones, as they provide more surface area for moisture to evaporate from. Conversely, delicate or fragile petals may become brittle and crumble when dried.
Stem length is also a crucial factor in determining a flower’s suitability for drying. Shorter stems are often preferred, as they allow the flower head to dry uniformly without getting tangled or weighed down by excess stem material.
Moisture content is another critical consideration. Flowers with high moisture levels may not dry well, leading to mold, mildew, or an unappealing texture. Opt for flowers that naturally have a low water content or those that can be properly preserved through desiccation methods.
When selecting drying-friendly flowers, prioritize those that retain their shape and color well after drying. Look for blooms with vibrant hues that don’t fade significantly when exposed to air. By choosing the right flowers with these characteristics in mind, you’ll increase your chances of achieving beautiful, long-lasting dried arrangements.
Common Mistakes to Avoid When Selecting Flowers
When selecting flowers for drying, it’s easy to make mistakes that can result in disappointing outcomes. One common error is choosing flowers with high water content, as they tend to retain moisture even after drying. This can lead to a soggy or moldy appearance, especially if not properly dried.
Another mistake to avoid is picking flowers prone to shedding petals. Delicate blooms like roses and carnations shed their petals easily, making them challenging to dry successfully. Similarly, flowers with soft or fragile petals, such as peonies and hydrangeas, are more likely to disintegrate during the drying process.
To ensure your dried flower arrangement looks its best, opt for species with low water content and sturdy petals. Some excellent choices include succulent flowers like aloe and agave, as well as daisy-like blooms that retain their shape well after drying. Remember to also research specific drying techniques suitable for each type of flower you choose, such as air-drying or using desiccants.
It’s also essential to inspect the flowers carefully before purchasing, looking for any signs of damage or decay that could affect their drying quality. By being mindful of these common mistakes and selecting the right flowers for drying, you’ll be well on your way to creating beautiful, long-lasting arrangements.
Preparing Flowers for Drying
Before you start drying, it’s essential to prepare your flowers properly. In this section, we’ll walk through the steps to preserve and prepare your blooms for a beautiful, long-lasting arrangement.
Harvesting at the Right Time
When it comes to harvesting flowers for drying, timing is everything. You want to pick them at the perfect stage of bud development, color intensity, and fragrance to ensure they dry beautifully and retain their natural charm.
For most flower varieties, the ideal time to harvest is when the buds are about 70-80% open. This allows the petals to unfold naturally as they dry, creating a more relaxed and organic shape. If you pick them too early or too late, the flowers may not dry evenly or may develop brown spots.
Cutting stems properly is also crucial for healthy drying. Use sharp pruning shears or scissors to make clean cuts just above a node (where a leaf meets the stem). This helps prevent bacterial entry points and promotes even moisture loss. Remove any excess foliage below the cut, as this can also contribute to mold and spoilage.
When harvesting delicate flowers like roses or lavender, handle them gently to avoid bruising or crushing the petals. For more robust blooms like sunflowers or dahlias, you can be a bit more rough – but still take care not to damage the stems. Remember, proper harvesting and handling set the stage for successful drying and preservation of your beautiful flowers.
Cleaning and Conditioning the Flowers
Before you start drying your flowers, it’s essential to clean and condition them thoroughly. This process helps remove dirt, debris, and excess moisture that can affect the quality of the dried flowers.
Begin by gently removing any leaves or stems that are wilted or damaged, as these can harbor bacteria and cause mold during the drying process. Next, mix 1 tablespoon of white vinegar with 2 cups of water in a bowl. Submerge your flowers into this solution for about an hour to loosen dirt and debris. After soaking, gently pat the flowers dry with paper towels.
To remove excess moisture, you can also try using a mixture of equal parts glycerin and water as a final rinse before drying. This will help retain the flowers’ color and texture while preventing shrinkage. Allow your cleaned and conditioned flowers to air-dry or use a desiccant to speed up the process. Remember to handle your flowers gently throughout the cleaning and conditioning process to avoid damaging their delicate petals.
Drying Methods
To achieve perfectly preserved blooms, understanding the different drying methods is crucial. This section will walk you through the various techniques to dry your flowers effectively at home.
Air-Drying: The Natural Way
Air-drying is one of the most natural and straightforward methods for drying flowers. This method allows you to preserve flowers without using heat, chemicals, or electricity. To get started with air-drying, choose a well-ventilated area with low humidity, such as a laundry room or attic.
To set up an air-drying station, you can use a drying rack or hang the flowers by their stems from a string or twine. The drying process typically takes 1-2 weeks, depending on the flower type and environmental conditions. It’s essential to monitor the flowers regularly to ensure they don’t dry out too quickly or develop mold.
Air-drying has several benefits, including preserving the natural color, texture, and fragrance of the flowers. This method is also a great way to dry delicate or sensitive flowers that might not hold up well with other drying methods. However, air-drying can be time-consuming and may result in some loss of shape or structure.
To minimize the risks, make sure to hang the flowers upside down from their stems, rather than right side up. This will help prevent moisture from accumulating on the petals and causing mold or discoloration.
Dehydrating with Machines
Dehydrating with Machines is a popular method for drying flowers, especially for those who want to preserve delicate blooms. Commercial dehydrators are designed to dry flowers quickly and evenly, retaining their color, texture, and aroma.
One of the main advantages of using a commercial dehydrator is that it allows for precise control over temperature and time settings. This ensures that your flowers are dried at an optimal rate, preventing over-drying or under-drying. For example, roses require a lower temperature setting (95°F – 105°F) to preserve their delicate petals, while sunflowers can handle higher temperatures (110°F – 120°F).
When using a dehydrator, it’s essential to follow the manufacturer’s guidelines for temperature and time settings. This may vary depending on the type of flowers being dried. Additionally, make sure to clean the dehydrator regularly to prevent any residual moisture or bacteria from affecting your flower preserves. With proper use and maintenance, commercial dehydrators can produce stunningly beautiful, long-lasting flower arrangements that will add a touch of elegance to any room.
Tips for Successful Drying
Now that you’ve chosen the perfect flowers for drying, let’s get into the nitty-gritty of successfully drying them to preserve their beauty. We’ll share expert tips on how to dry your blooms like a pro!
Monitoring Temperature and Humidity
When it comes to drying flowers, maintaining optimal temperature and humidity levels is crucial for achieving high-quality results. Most flowers will dry best between 60°F to 70°F (15°C to 21°C) with a relative humidity of 30% to 50%. If the temperature or humidity varies significantly from these ranges, it can lead to uneven drying, discoloration, or even mold growth.
To troubleshoot common issues caused by poor environmental control, monitor your drying flowers regularly. Check for signs of moisture accumulation, such as condensation on the glass case or a musty smell. If you notice any unusual changes, adjust the temperature or humidity levels accordingly. For instance, if the air is too dry, flowers may become brittle and prone to breakage.
To achieve optimal results, consider investing in a humidistat or hygrometer to monitor your drying environment. These tools will help you maintain precise control over temperature and humidity levels, ensuring that your dried flowers retain their natural color and texture. By paying attention to these factors, you can enjoy beautifully preserved blooms for months to come.
Storing Dried Flowers Properly
Proper storage is crucial to maintaining the beauty and essence of dried flowers. When storing dried flowers, it’s essential to keep them away from direct sunlight, moisture, and heat sources. This means avoiding areas like attics or basements.
Choose airtight containers made of materials like glass, wood, or paperboard to store your dried blooms. These containers will help maintain the delicate shape and color of the flowers. To prevent moisture buildup, place a silica gel packet or activated charcoal near the flowers to absorb any humidity.
When storing large quantities, use dividers or small bags within the container to separate each flower type. This prevents petals from getting crushed and preserves their individual scents. You can also package dried flowers in gift boxes or wrap them individually for a charming, rustic look. Remember to handle dried flowers gently, as they are more prone to breakage than fresh ones.
Proper storage will help preserve your dried flowers for years to come, keeping them a lovely addition to any room or arrangement.
Preserving the Color and Scent of Dried Flowers
To keep your dried flowers looking their best, you’ll want to learn some effective techniques for preserving color and scent, such as air drying, desiccant sachets, and glycerin sprays.
Using Natural Preservatives
When working with delicate flowers, it’s essential to preserve their color and fragrance to maintain their beauty and scent. One way to achieve this is by using natural preservatives like glycerin or silica gel. These products help to absorb moisture from the flowers, preventing mold and bacterial growth.
Glycerin is particularly effective in retaining the vibrant colors of dried flowers. It’s a natural humectant that absorbs water without leaving any residue behind. When using glycerin, make sure to mix it with water according to the manufacturer’s instructions, then gently submerge your flowers in the solution. This will help lock in their color and prevent fading.
Silica gel is another popular choice for preserving dried flowers. It works by absorbing moisture from the air, creating a dry environment that inhibits bacterial growth. To use silica gel, simply place it in an airtight container with your flowers and seal it. The silica gel will absorb any excess moisture, helping to preserve the flowers’ color and fragrance.
Remember to use natural preservatives sparingly, as excessive amounts can damage or discolor the flowers.
Tips for Retaining Petal Flexibility
To maintain the delicate petal flexibility of dried flowers, you’ll want to consider a few key strategies. One approach is to use fixatives, which can help preserve the natural texture and shape of the petals without sacrificing color or scent. Glycerin-based fixatives are particularly effective for this purpose, as they draw moisture from the cells while retaining flexibility.
Adjusting your drying time can also make a big difference in maintaining petal flexibility. Over-drying can cause petals to become brittle and lose their natural texture, so it’s essential to strike the right balance between thorough drying and preserving moisture. A good rule of thumb is to dry flowers slowly and gently over several weeks, rather than trying to rush the process.
For delicate blooms like orchids or hydrangeas, you may need to take extra precautions to preserve flexibility. In these cases, try drying them in a single layer on a paper towel-lined surface, allowing air to circulate around each flower. This will help prevent moisture buildup and promote even drying. By following these tips, you can enjoy beautifully preserved dried flowers with soft, supple petals that retain their natural beauty for years to come.
Using Dried Flowers in Crafting
Now that you’ve learned which flowers dry best, let’s explore some creative ways to use dried blooms in your crafting projects for a beautiful and lasting effect.
Crafting Ideas for Dried Flowers
Dried flowers can be transformed into stunning decorative pieces, adding a touch of elegance and sophistication to any room. When it comes to crafting ideas, the possibilities are endless, but some projects stand out as favorites among crafters. One popular idea is creating beautiful wreaths using dried flowers and foliage.
To make a stunning dried flower wreath, start by selecting a mix of flowers in complementary colors and textures. Attach them to a wire or foam wreath frame using floral wire or hot glue. Consider adding some greenery like eucalyptus or ferns for added depth. You can also incorporate other elements like pinecones, ribbons, or berries to create a unique look.
Another creative way to use dried flowers is in making potpourri. Simply combine dried flowers with other ingredients like essential oils, spices, and herbs to create a fragrant blend that’s perfect for decorating closets, drawers, or even using as a gift filler.
To take your crafting game to the next level, consider experimenting with different shapes and sizes of containers filled with dried flowers. You can also use them to create beautiful decorative accents like candle arrangements, vase fillers, or even wedding decorations.
Tips for Working with Dried Flowers
Working with dried flowers requires some finesse, but don’t worry, we’ve got you covered. When handling dried flowers, it’s essential to be gentle to prevent breakage and preserve their natural beauty.
To begin arranging your dried flowers, start by selecting a clean and stable surface for crafting. This will help prevent any accidental damage or spills from ruining your project. Next, prepare your workspace with the necessary tools: floral wire, scissors, and a bouquet holder.
When working with individual blooms, gently shape and fluff out their petals to create a natural, relaxed appearance. To secure stems in place, use floral tape or wire wraps – this will help prevent any movement or shifting during handling.
When creating bouquets or arrangements, consider the overall balance of texture, color, and scale. Mix loose, flowing blooms with more structured shapes for visual interest, and don’t be afraid to experiment with unconventional materials like leaves or branches.
Conclusion: The Best Flowers for Drying
Now that you’ve learned how to choose and prepare your flowers, let’s wrap up by highlighting the top picks for drying and preservation.
Summary of Key Takeaways
When selecting flowers for drying, it’s essential to consider their natural moisture content and ability to retain color. Delphiniums, for instance, have a high water content, which makes them challenging to dry successfully. On the other hand, flowers like baby’s breath and statice are naturally low in moisture, making them ideal candidates for drying.
To ensure successful flower preservation, it’s crucial to prepare the blooms correctly before drying. This involves removing excess foliage, gently cleaning the petals with a soft brush, and trimming any imperfections or damaged areas. Proper preparation helps maintain the flowers’ natural shape and promotes even drying.
When preserving dried flowers, the choice of method is also vital. Air-drying is the most straightforward approach but can result in uneven color and texture. Desiccant methods, such as using silica gel or borax, yield more consistent results but require careful monitoring to avoid over-drying. Pressing between sheets of paper, on the other hand, produces a flat, preserved flower that’s perfect for arrangements.
Key takeaways from this guide emphasize the importance of flower selection and preparation in achieving successful drying results. Understanding the natural characteristics of various blooms and tailoring your preservation method accordingly can make all the difference. By choosing flowers with low moisture content, preparing them correctly, and selecting an appropriate preservation method, you’ll be able to create stunning dried arrangements that bring beauty and elegance to any space.
Incorporating a few simple techniques into your drying routine can also enhance results. For example, using a dehumidifier or placing the flowers in a dry location can help speed up the drying process. Experimenting with different preservation methods and techniques will allow you to develop a personalized approach that suits your unique needs and preferences. By following these guidelines, you’ll be well on your way to creating breathtaking dried flower arrangements that add warmth and character to any room.
Frequently Asked Questions
How do I determine if my dried flowers are fully dry?
Check for moisture by gently bending a petal or stem. If it bends without cracking, the flower is likely dry enough for use. You can also check the weight of the flower; dry flowers will be much lighter than fresh ones.
Can I dry flowers with artificial fragrances or dyes?
Yes, but keep in mind that these chemicals can affect the drying process and may not preserve the natural color and scent of the flowers. It’s best to use natural preservatives or avoid adding any extra fragrances or dyes altogether.
How do I prevent dried flowers from becoming brittle and fragile?
To retain petal flexibility, you can try using a gentle hair dryer on a low setting to dry the flowers more slowly. This method helps preserve the delicate structure of the petals.
Can I mix different types of flowers for drying together?
Yes, but be aware that some flowers may have stronger scents or colors than others, which can affect the overall appearance and aroma of your dried arrangements. Consider pairing flowers with similar characteristics to achieve a harmonious result.
How do I store dried flowers to maintain their color and scent over time?
Store dried flowers in a cool, dry place away from direct sunlight. Use an airtight container or bag to protect them from moisture and dust. You can also add natural desiccants like silica gel or borax to absorb any remaining moisture.