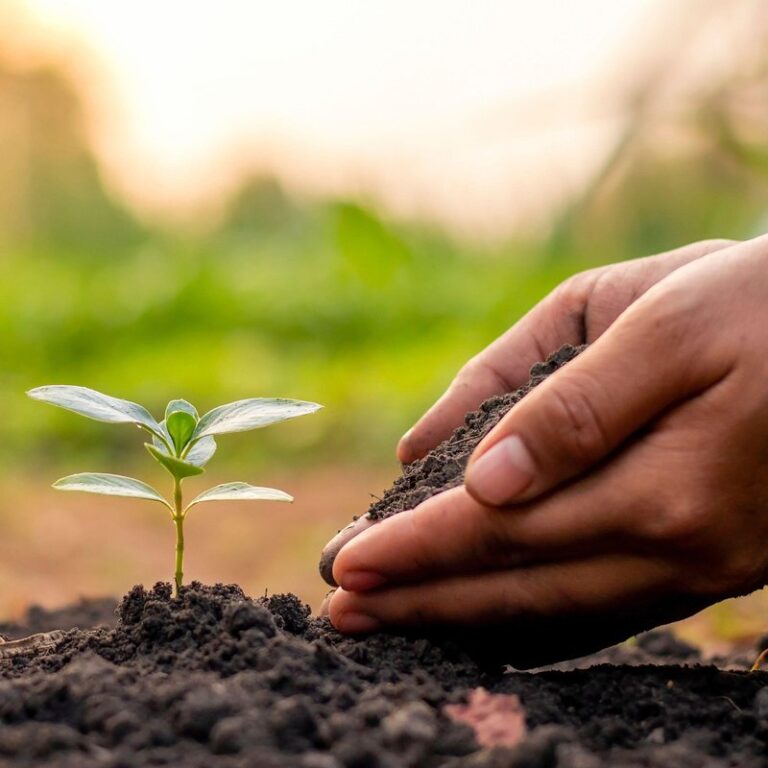
Are you gearing up to start your seeds indoors? Choosing the right seed starting soil is crucial for healthy germination and growth. With so many options available, it can be overwhelming to decide which one is best for your needs. Whether you’re a seasoned gardener or just starting out, selecting the perfect mix of peat-based or organic materials will make all the difference in getting those seeds off to a strong start. In this article, we’ll explore the ins and outs of seed starting soil, from evaluating ingredients like peat moss to understanding the benefits of going fully organic. By the end of this guide, you’ll be equipped with the knowledge to choose and prepare the perfect mix for successful seedling growth, every time.
Understanding Seed Starting Soil
When it comes to seed starting, the right soil is crucial for healthy growth and development. In this essential guide, we’ll break down what makes great seed starting soil.
What is Seed Starting Soil?
Seed starting soil is specifically designed for seedlings during their initial growth stages. It’s a type of potting mix that provides optimal conditions for seeds to germinate and develop strong root systems. The primary purpose of seed starting soil is to bridge the gap between sowing seeds directly into garden beds, which can be too dense or dry, and transplanting them later.
When using regular potting soil for seed starting, you risk compacting the soil as you water it, preventing proper drainage and potentially killing your young seedlings. Seed starting soil, on the other hand, is a loose and well-draining mix that allows for excellent air circulation around the seeds. This prevents fungal diseases from taking hold and ensures that the developing roots have enough oxygen to grow.
By using seed starting soil specifically, you’re giving your seedlings the best chance at success right from the start. This includes preventing overwatering, promoting healthy root growth, and providing a solid foundation for later transplanting into more robust potting mixes or garden beds.
Key Characteristics of Good Seed Starting Soil
When it comes to seed starting soil, some key characteristics make all the difference. First and foremost, good seed starting soil should have a pH level that’s suitable for the type of seeds you’re growing. Most vegetables and flowers prefer a slightly acidic to neutral soil pH, ranging from 6.0 to 7.0. If your soil is too alkaline or too acidic, it can hinder seed germination and growth.
In addition to pH, nutrient content is crucial. Seed starting soil should have a balanced mix of essential nutrients like nitrogen, phosphorus, and potassium (NPK). Look for soils that are specifically labeled as “balanced” or “complete,” which typically contain these NPK elements in a ratio of 10-10-10.
Another critical characteristic is water retention capacity. Good seed starting soil should be able to retain moisture but also drain excess water quickly. This prevents root rot and ensures the seeds have consistent access to moisture. To achieve this, look for soils with added perlite or vermiculite, which help improve water retention without causing waterlogging.
Common Mistakes to Avoid When Choosing Seed Starting Soil
When selecting seed starting soil, it’s easy to fall into common pitfalls that can hinder your seedlings’ growth. One of the most significant mistakes is choosing a mix that’s too dense for your needs. A dense mix can prevent proper water penetration and oxygen flow, leading to root rot and stunted growth.
On the other hand, opting for a mix that’s too light can also be detrimental. It may not provide enough support for delicate seedlings, causing them to become top-heavy and prone to collapse.
To avoid these mistakes, consider the specific needs of your seeds. For example, if you’re starting tomato or pepper seeds, they require a more dense mix with good drainage properties to prevent waterlogged soil. In contrast, lettuce and herb seeds prefer a lighter, well-structured mix that allows for easy root growth.
When selecting seed starting soil, look for products labeled as ‘balanced’ or ‘universal.’ These mixes usually offer a middle ground between density and structure, making them suitable for most seed types. Additionally, pay attention to the ingredients list and choose a product with high-quality peat moss, perlite, or vermiculite for optimal results.
Types of Seed Starting Soil
When it comes to seed starting, choosing the right soil can make all the difference. Let’s dive into the main types of seed starting soils that will get your seeds off to a strong start.
Peat-Based Seed Starting Soils
Peat-based seed starting soils have gained popularity among gardeners due to their unique properties. One of the primary benefits of peat-based soils is their ability to retain moisture. Peat has a high water-holding capacity, which means it can store large amounts of water and release it slowly as needed. This characteristic helps prevent overwatering and reduces the need for frequent watering.
However, there are also some drawbacks to consider. Peat-based soils can be acidic, which may require additional steps to adjust the pH level if your seedlings prefer a different environment. Moreover, peat itself is a non-renewable resource, and its harvesting has been linked to environmental concerns such as deforestation and habitat destruction.
To use peat-based seed starting soils effectively, it’s essential to choose products from reputable manufacturers that have implemented sustainable sourcing practices. You can also consider mixing in other ingredients to balance out the pH level or add beneficial microorganisms to promote healthy growth. By understanding both the benefits and limitations of peat-based soils, you’ll be better equipped to make informed decisions about your seed starting needs.
Coconut Coir Seed Starting Soils
Coconut coir seed starting soils have gained popularity in recent years due to their eco-friendly and sustainable attributes. Unlike traditional peat moss options, coconut coir is a byproduct of the coconut husk industry, making it a more environmentally responsible choice. When used as a seed starting medium, coconut coir retains moisture well, yet allows for excellent drainage, reducing the risk of waterlogged soil and root rot.
One of the significant advantages of using coconut coir is its ability to improve soil structure over time. As it breaks down, it adds organic matter to the mix, enhancing the overall fertility and microbial activity of the soil. This results in healthier plant growth and a reduced need for fertilizers. Furthermore, coconut coir is free of pathogens and weed seeds, making it an excellent option for indoor seed starting. To incorporate coconut coir into your seed starting routine, simply rehydrate it with water before using it as you would any other seed starting medium.
Organic Seed Starting Soil Options
When it comes to seed starting, using organic soil options can have a significant impact on your growing success. One of the main benefits of choosing an organic seed starting soil is reduced chemical usage. By avoiding synthetic fertilizers and pesticides, you’re not only creating a healthier environment for your seeds but also reducing your exposure to potentially hazardous chemicals.
Organic seed starting soils are made from natural ingredients such as peat moss, vermiculite, and perlite, which improve soil structure and drainage while retaining moisture. These ingredients also support the growth of beneficial microorganisms that contribute to improved soil health over time. As you continue to use the same organic soil for subsequent seed starts, it will develop a robust ecosystem with increased nutrient availability.
To make the most of your organic seed starting soil, consider replenishing it periodically with compost or worm castings to maintain its fertility and structure.
How to Choose the Best Seed Starting Soil for Your Needs
Choosing the right seed starting soil can be overwhelming, but by considering a few key factors, you’ll be well on your way to selecting the perfect blend for your seeds. Let’s break it down together.
Consider Your Climate and Region
When choosing seed starting soil, it’s essential to consider your local climate and region. Different climates require specific types of soils that can handle varying temperatures, humidity levels, and light exposure.
If you live in a dry climate with intense sunlight, look for a seed starting soil that is formulated to retain moisture but also drain excess water quickly. This will help prevent the roots from rotting due to overwatering. On the other hand, if you live in a humid or rainy region, opt for a soil that has good aeration and drainage properties to prevent waterlogged soil.
Consider the temperature fluctuations in your area as well. If you’re starting seeds indoors during winter, choose a seed starting soil that can handle lower temperatures without becoming too dense. Similarly, if you’re growing in a greenhouse or sunroom with high temperatures, select a soil that can maintain its structure and fertility even at extreme heat.
Ultimately, understanding your local climate and region will help you make an informed decision when selecting the best seed starting soil for your specific needs.
Think About the Type of Plants You’ll Be Growing
When selecting a seed starting soil, it’s essential to consider the specific needs of the plants you’ll be growing. Different species have varying requirements when it comes to pH levels and nutrient profiles. For instance, acid-loving plants like azaleas and blueberries thrive in soils with lower pH levels (around 4.5-6.0), whereas legumes and vegetables tend to do well in slightly acidic to neutral soil (pH 6.1-7.3).
If you’re planning to grow specific crops that demand high acidity, such as rhododendrons or strawberries, look for seed starting soils with an added sulfur or aluminum component to lower the pH level. Conversely, if your garden features vegetables like tomatoes and peppers, which prefer a slightly acidic soil environment, select a mix with balanced nutrient levels.
Consider what types of plants you’ll be growing in bulk, and invest in a seed starting soil that caters to their needs. This will not only save you money on multiple specialty mixes but also ensure optimal plant growth and development from the start.
Read Reviews and Look for Certifications
When selecting seed starting soil, it’s essential to consider not just its quality and composition but also its safety and efficacy. One way to gauge this is by reading reviews from other gardeners who have used the product. Look for online forums, social media groups, or websites where gardeners share their experiences with different seed starting soils.
Check if the soil has any certifications that ensure it meets certain standards. For instance, OMRI (Organic Materials Review Institute) certification means that the soil is made from organic materials and won’t contain synthetic fertilizers or pesticides. Similarly, USDA Organic certification guarantees that the soil meets strict guidelines for organic production. When reviewing products, pay attention to comments about germination rates, plant growth, and overall health.
Also, consider checking with local nurseries or gardening stores to see if they carry any seed starting soils with good reputations in your area. By combining online research with word-of-mouth recommendations, you can find a reliable and effective seed starting soil that will help your seeds get off to a great start.
Preparing Seed Starting Soil for Planting
To get your seeds off to a strong start, you’ll need to prepare your seed starting soil by adjusting its pH and fertility levels. This process is crucial for optimal growth.
Amending Seed Starting Soil for Better Results
Amending seed starting soil is an essential step to ensure healthy seedling growth and development. To improve its quality and fertility, you can incorporate various organic matter, fertilizers, or other materials into the mix. Start by adding compost, which serves as a nutrient-rich amendment that helps break down heavy clay soils and retain moisture in sandy soils.
Consider mixing in well-rotted manure, peat moss, or coconut coir to improve drainage and structure. These amendments will also enhance the soil’s water-holding capacity, reducing the need for frequent watering. Additionally, you can add a balanced fertilizer like fish bone meal or alfalfa meal to provide essential nutrients.
Another option is to incorporate worm casting, which contains high levels of nitrogen, phosphorus, and potassium. To make your own seed starting mix, combine two parts compost, one part peat moss or coconut coir, and a pinch of perlite for improved drainage. Remember that the key is moderation – avoid over-amending, as this can lead to nutrient imbalances and reduced soil fertility.
By amending your seed starting soil with these organic matter and fertilizers, you’ll create an optimal environment for seedling growth, setting them up for success once transplanted into larger containers or directly into the garden.
Creating a Seed Starting Mix from Scratch
Creating a seed starting mix from scratch allows you to tailor the ingredients to your specific needs and preferences. To make your own custom mix, start by selecting a base ingredient that provides good water retention and structure. Peat moss is a popular choice due to its ability to retain moisture, but it can be expensive and may contain additives.
Consider using alternatives like coconut coir or sphagnum moss as more eco-friendly options. Next, add ingredients that improve drainage and aeration, such as vermiculite or perlite. Vermiculite is an excellent option for seedlings, as it helps prevent root rot while allowing for healthy growth.
When combining your ingredients, start with 30-40% peat moss (or alternative) and mix in 10-20% vermiculite or perlite. Add a small amount of lime to adjust the pH level if necessary. Experiment with different ratios to find the perfect blend for your seed starting needs. Remember to store any leftover mix in an airtight container to preserve its integrity.
Sterilizing Your Seed Starting Soil
When it comes to seed starting, one often overlooked but crucial step is sterilizing your soil. This process may seem like a hassle, but trust us, it’s essential for the health of your young plants. By not sterilizing your soil, you risk introducing diseases and pests that can decimate your entire crop.
To understand why sterilization is necessary, consider this: seed starting soil often comes in contact with various pathogens, such as fungal spores or bacteria, which can spread quickly through contaminated soil. These microorganisms thrive in moist environments, making seed starting a perfect breeding ground for disease outbreaks. Moreover, pests like fungus gnats and spider mites can also infest your soil if it’s not properly sterilized.
To sterilize your seed starting soil, you have a few options. One method is to bake the soil in a preheated oven at 180°F (80°C) for an hour. This will kill any microorganisms present, ensuring your soil is safe for planting. Alternatively, you can use a steam sterilizer or a pasteurization process specifically designed for seed starting soils. Regardless of which method you choose, make sure to follow the manufacturer’s instructions carefully to ensure effective sterilization and avoid damaging the soil.
Tips for Successful Seedling Growth in Seed Starting Soil
Now that you’ve chosen your seed starting soil, let’s dive into some essential tips to ensure your seedlings thrive and grow strong roots. A little extra attention at this stage can make all the difference!
Maintaining Optimal Moisture Levels
Maintaining optimal moisture levels is crucial for seedling growth in seed starting soil. Over-watering can lead to root rot and under-watering can cause stress to the young plants. To strike a balance, create a watering schedule that takes into account the specific needs of your seeds.
Water your seeds when the top 1-2 inches of soil feel dry to the touch. A general rule of thumb is to water seedlings in the morning, allowing them to dry out slightly before nightfall. This helps prevent fungal diseases that thrive in moist environments.
Use a moisture meter or the finger test to gauge soil moisture levels. For sowing seeds in seed starting mix, aim for a consistent moisture level by keeping the soil consistently moist but not waterlogged. To water, gently pour water over the soil and avoid getting any on the leaves or crown of the plant.
Monitor your seedlings’ progress and adjust your watering schedule accordingly.
Providing Adequate Light and Temperature Conditions
When sowing seeds in seed starting soil, it’s easy to overlook one of the most critical factors for successful growth: providing adequate light and temperature conditions. As a gardener, you know that seedlings need a specific environment to thrive, but what exactly does this mean? In simple terms, seedlings need sufficient light to undergo photosynthesis and warmth to germinate and grow.
Aim for a spot with bright, indirect light, ideally 1-2 feet away from a south-facing window or under grow lights. Direct sunlight can scorch delicate seedlings, so keep them out of direct rays during peak hours. As for temperature, most seeds germinate between 65°F to 75°F (18°C to 24°C), while seedlings prefer warmer temperatures around 70°F to 80°F (21°C to 27°C). Some seeds, like those from tropical plants, may require even warmer conditions.
To ensure optimal growth, keep your seed starting soil in a spot with consistent temperatures between day and night. You can also use thermal mats or heating pads to maintain the ideal temperature range. By providing your seedlings with the right amount of light and warmth, you’ll be well on your way to happy, healthy plants that will thrive when transplanted outdoors.
Minimizing Transplant Shock
When moving seedlings from seed starting soil to larger pots or directly into gardens, it’s common for them to experience transplant shock. This stress can weaken the young plants and make them more susceptible to disease and pests. To minimize transplant shock, it’s essential to harden off your seedlings before transplanting.
Harden off by gradually exposing the seedlings to outdoor conditions over a period of 7-10 days. Start by moving them outside for just an hour or two on the first day, then increase the duration each subsequent day. This process allows the seedlings to adjust to the new environment without sudden exposure to wind, sun, and temperature fluctuations.
Another strategy is to choose seed starting soil that retains moisture but drains excess water well. Avoid overwatering your seedlings, as this can further stress them during transplanting. Finally, handle the roots of your seedlings gently when transplanting, and avoid disturbing their delicate root systems. By following these tips, you can reduce the risk of transplant shock and give your seedlings a strong start in their new environment.
Frequently Asked Questions
Can I use leftover potting soil from previous seasons for seed starting?
No, it’s not recommended to reuse potting soil for seed starting as it can contain diseases or pests that may harm your new seeds. Instead, opt for a fresh bag of high-quality seed starting soil specifically designed for the initial growth stages.
How long does homemade seed starting mix typically last before needing replacement?
A well-made homemade seed starting mix can last anywhere from 1 to 3 years, depending on storage conditions and usage. However, it’s best to err on the side of caution and make a fresh batch every season to ensure optimal results.
Can I add my own fertilizers or amendments to store-bought seed starting soil?
Yes, you can customize your store-bought seed starting mix by adding organic fertilizers or other beneficial amendments tailored to your specific plant needs. Just be sure to follow the manufacturer’s instructions and avoid over-fertilizing, which can harm your seeds.
How do I handle seedlings that have developed root bound conditions in their seed starting soil?
If you notice signs of root bound conditions, gently remove the seedling from its container and inspect the roots. Trim any circling or damaged roots with sterile scissors to prevent further damage. Then, transplant the seedling into a slightly larger pot filled with fresh seed starting soil.
Can I use seed starting soil for raised beds or directly in garden soil?
While seed starting soil is designed for indoor seedlings, you can repurpose it for raised beds or as a top dressing for existing garden soil. However, mix it with other amendments and compost to improve drainage and aeration, and consider creating a customized blend tailored to your specific climate and plant needs.