Spring is finally here, and with it comes the perfect opportunity to grow some of your favorite greens. Among them, spinach stands out for its incredible nutritional value and versatility in the kitchen. Whether you’re a seasoned gardener or just starting out, growing spinach in spring can be a rewarding experience that provides a fresh supply of this essential green all season long. But before you start planting, it’s essential to choose the right variety for your climate, prepare your soil properly, and learn how to care for your spinach plants to ensure they thrive. In this expert guide, we’ll walk you through everything you need to know about growing delicious and nutritious spinach in spring, from selecting the best varieties to harvesting tips and tricks.
Understanding Spinach and Its Requirements
To grow spinach successfully, you need to understand its specific requirements, including temperature, soil pH, and nutrient needs that are unique compared to other leafy greens. Let’s dive into these essential details now.
Choosing the Right Variety
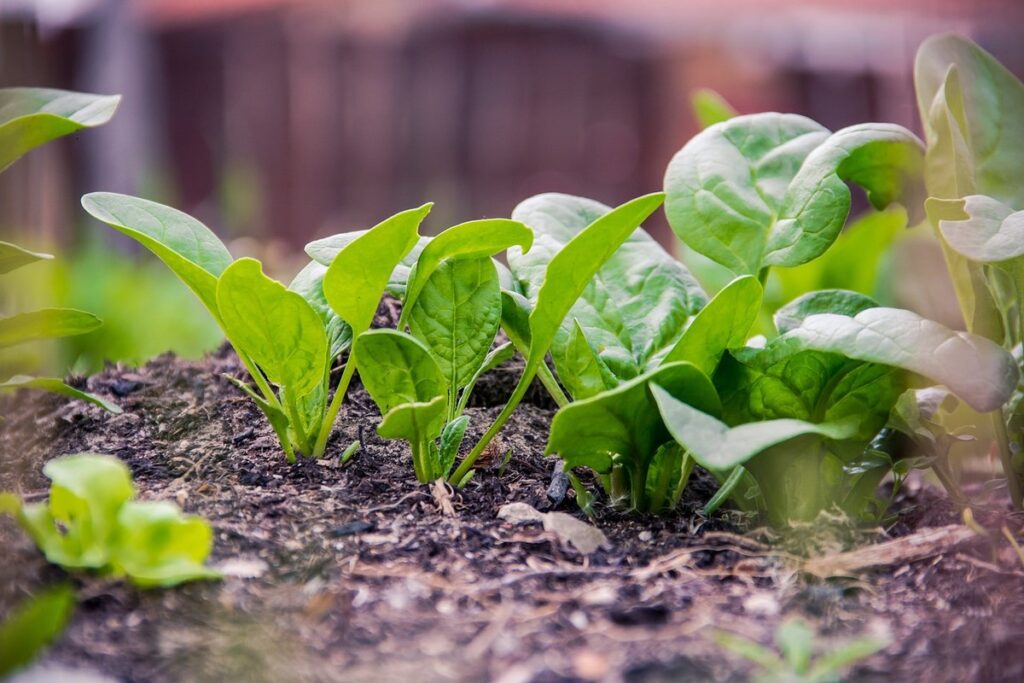
When it comes to growing spinach in spring, choosing the right variety is crucial for optimal results. There are several types of spinach, each with its unique characteristics that can affect yield, flavor, and texture.
Flat leaf spinach varieties, such as ‘Tyee’ or ‘Space’, have broad leaves and a more delicate taste. They mature quickly, usually within 20-25 days, making them ideal for early spring harvests. On the other hand, crinkled leaf varieties like ‘Red Cardinal’ or ‘Winterkeeper’ have curly leaves and a slightly sweeter flavor. These take around 30-40 days to mature.
Semi-savoy spinach varieties, such as ‘Olympia’ or ‘Kolibri’, offer a compromise between flat leaf and crinkled leaf types. They have smooth leaves with ruffled edges and a more robust taste. Semi-savoy varieties typically take 25-35 days to mature.
When selecting a variety for your spring garden, consider factors like climate, available space, and desired harvest timeframe. Choose a variety that suits your specific needs, and be sure to read the seed package or consult with local nurseries for more information on the best spinach varieties for your region.
Spinach Hardiness and Climate Considerations
Spinach is a cool-season crop that thrives in temperatures between 60°F and 70°F (15°C and 21°C). When the temperature rises above 75°F (24°C), spinach growth slows down, and it may bolt or go to seed. On the other hand, when the temperature drops below 40°F (4°C), spinach can become stressed and even die.
When planning your spinach crop, consider your region’s climate and temperature patterns. In areas with mild winters, you can plant spinach as soon as the soil can be worked in early spring, usually around late winter to early spring. For regions with colder winters, wait until the soil has warmed up a bit before planting.
Some regions have more extreme weather conditions that may impact spinach growth. For example, in areas prone to sudden frosts or heatwaves, plant multiple batches of spinach at two-week intervals to ensure continuous harvests. This will also help you avoid losing your entire crop due to adverse weather conditions.
Preparing the Soil for Spinach
To grow healthy spinach, it’s essential to prepare your soil correctly before planting. This involves loosening and aerating the soil, as well as removing any debris.
Testing and Amending Your Soil
Before planting spinach, it’s essential to test and amend your soil to ensure it provides the necessary nutrients for optimal growth. Spinach is a heavy feeder crop that requires a well-balanced mix of nitrogen, phosphorus, potassium, and other micronutrients.
To start, take a soil sample from your garden bed and send it to a lab for analysis. This will provide you with information on the pH level, nutrient content, and any potential deficiencies. The ideal pH range for spinach is between 6.0 and 7.0. If your soil test reveals low levels of nitrogen or phosphorus, consider adding organic matter like compost or well-rotted manure to improve its fertility.
When amending your soil, keep in mind that over-fertilization can harm your plants. It’s better to err on the side of caution and start with small additions, gradually increasing the amount as needed. For example, if your test reveals low nitrogen levels, you can begin by adding a 2-inch layer of compost around the base of your spinach plants. This will provide a gentle boost without overwhelming the soil ecosystem.
Some recommended amendments for spinach include:
* Compost: Rich in nutrients and beneficial microorganisms
* Well-rotted manure: Provides slow-release nitrogen and improves soil structure
* Green sand: Adds potassium and other micronutrients
Remember to incorporate these amendments into your soil at least 2-3 weeks before planting, allowing them to break down and become available to the plants.
Creating a Suitable Growing Environment
When preparing the soil for spinach growth, it’s essential to create a suitable environment that promotes healthy development. Spinach thrives in slightly acidic to neutral soils with a pH range of 6.0 to 7.0. If your soil’s pH is significantly higher or lower, consider adjusting it before planting.
To ensure good drainage and prevent waterlogged soils, mix in compost or well-rotted manure to create a well-draining soil mix. Aim for a mix that contains equal parts of topsoil, compost, and perlite or vermiculite. This blend will not only improve drainage but also provide essential nutrients for spinach growth.
Mulching is another excellent way to maintain a healthy environment for your spinach crop. Organic mulch such as straw or bark chips can help retain moisture, suppress weeds, and regulate soil temperature. Apply a 2-3 inch layer of mulch around the plants, keeping it a few inches away from the crowns to prevent rotting.
Consider incorporating compost into your mulching routine for added benefits. As spinach grows, add more compost or well-rotted manure around the base to maintain optimal nutrient levels.
Planting Spinach in Spring
When planting spinach in spring, timing is everything. Learn how to determine the ideal sowing time for your region and get a head start on growing delicious spinach.
Sowing Seeds Indoors vs. Directly in the Garden
When it comes to planting spinach in the spring, you have two popular options: sowing seeds indoors and then transplanting them outside, or direct sowing in the garden. While both methods can be successful, there are some key differences to consider.
Sowing seeds indoors allows for a head start on the growing season, typically 4-6 weeks before the last frost date. This gives the seedlings a chance to get a jumpstart on the weather, and they’ll be stronger and more robust when transplanted outside. Indoor sown spinach also tends to have higher germination rates, around 90%, compared to direct sowing which can range from 70-80%. However, indoor sown seeds are more prone to transplant shock, which can weaken the plant and make it more susceptible to disease.
Direct sowing in the garden, on the other hand, allows the spinach to establish its root system right where it will be producing leaves. This method eliminates the risk of transplant shock, but it may take longer for the plants to mature. In general, direct sown spinach tends to do well in regions with mild winters and cool springs.
Consider your specific climate and the time of year when deciding which method to use. If you live in a cooler region or have an early spring, indoor sowing might be the better choice. But if you’re in a warmer area or want to avoid transplanting altogether, direct sowing could be the way to go.
Spacing and Sowing Depths for Optimal Growth
When it comes to growing spinach in spring, spacing and sowing depths are crucial factors that can make all the difference in the world. Planting them too close together can lead to overcrowding, which can cause the plants to become susceptible to diseases and pests.
A good rule of thumb is to space spinach plants 2-3 inches apart, depending on the variety you’re growing. If you’re planting a compact or dwarf variety, you can get away with planting them as close as 1 inch apart. On the other hand, if you’re growing a larger variety, make sure to give them at least 4-5 inches of space between each plant.
When it comes to sowing depth, spinach seeds prefer to be planted about 1/8 inch deep in the soil. Planting them too deeply can cause the seeds to rot before they have a chance to germinate. You want the seeds to be just covered by a thin layer of soil, so make sure to plant them at the right depth.
It’s also worth noting that spinach plants prefer well-draining soil and should not be overwatered. Overwatering can cause the roots to rot, which can lead to all sorts of problems for your spinach crop.
Caring for Spinach Plants
To keep your spinach plants healthy and thriving, it’s essential to provide them with proper care, including regular watering, fertilization, and pest management.
Watering and Irrigation Strategies
Consistent moisture levels are crucial for spinach plants to thrive. Watering and irrigation strategies play a significant role in maintaining optimal growth conditions. Spinach prefers well-draining soil that is consistently moist but not waterlogged.
Underwatering can cause stress, stunting plant growth, while overwatering leads to root rot and reduces yields. Aim to provide about 1-2 inches of water per week, either from rainfall or irrigation. You can check the soil moisture by inserting your finger into the soil up to the first knuckle; if it feels dry, it’s time to water.
Consider installing a drip irrigation system for efficient watering. Drip emitters can be placed close to plant roots, delivering water directly where it’s needed most. This approach reduces evaporation and runoff, minimizing water waste. It’s also beneficial for spinach plants grown in containers or raised beds with limited soil capacity.
Fertilizing Spinach: Timing and Type
When it comes to fertilizing spinach plants, timing and type are crucial for optimal growth. You should start fertilizing your spinach plants about 2-3 weeks after transplanting them into their final growing location. For spring-grown spinach, a balanced fertilizer (10-10-10 NPK) is an excellent choice. Organic options like fish emulsion or compost tea can also be effective.
However, if you’re looking for a more targeted approach, consider using a fertilizer specifically formulated for leafy greens. These fertilizers typically contain higher levels of nitrogen and micronutrients that promote healthy growth and chlorophyll production.
As a general rule, apply fertilizer once every 1-2 weeks to maintain optimal nutrient levels. Avoid over-fertilizing, as this can lead to weak and leggy growth. It’s also essential to water your spinach plants thoroughly after fertilization to prevent burning the roots.
Keep in mind that soil temperature plays a significant role in nutrient uptake. Spinach prefers cooler temperatures between 40-70°F (4-21°C). If your soil is consistently above this range, adjust your fertilizer application accordingly to avoid nutrient burn.
Common Pests and Diseases Affecting Spinach
As you nurture your spinach crop, be aware of the common pests and diseases that can damage it, such as aphids and powdery mildew. Learn how to identify and manage these issues effectively.
Identifying Common Problems and Their Causes
As you begin to grow spinach in spring, it’s essential to be aware of some common pests and diseases that can affect your crop. One of the most prevalent issues is aphids, tiny sap-sucking insects that can cause curled or distorted leaves. To manage aphid infestations, use neem oil or insecticidal soap as a preventative measure, and consider introducing beneficial nematodes to your garden.
Another common pest is slugs, which can be particularly problematic in areas with high humidity. Slugs are attracted to moist environments and can cause significant damage to spinach leaves at night. To combat slugs, use copper tape around plant stems or set up a beer trap to capture them.
Diseases such as powdery mildew and downy mildew also frequently affect spinach crops. Powdery mildew appears as a white, powdery coating on leaves, while downy mildew produces yellowish patches with a fluffy growth underneath. To prevent these diseases, maintain good air circulation around your plants and ensure they receive adequate sunlight.
To identify potential problems early, inspect your spinach regularly for signs of pests or disease. Check for curled or distorted leaves, holes in leaves, or powdery coatings on the surface. Addressing issues promptly can help minimize damage to your crop.
Organic and Integrated Pest Management Techniques
When it comes to growing spinach in spring, using non-chemical methods for controlling pests and diseases is not only good for the environment but also ensures a healthier crop. One effective technique is crop rotation, which involves rotating spinach with other crops that have different pest spectra or growth habits. This disrupts pest life cycles and reduces the risk of infestation.
Biological controls are another valuable tool in integrated pest management (IPM) techniques. Introducing beneficial insects, such as ladybugs or lacewings, can help control pests like aphids and whiteflies. These natural predators feed on pest eggs, larvae, or adults, reducing their populations without harming the environment.
Physical barriers also play a crucial role in preventing pests from reaching spinach leaves. Using fine mesh or fine-netted row covers can exclude insects while allowing light, water, and air to reach the crop. By combining these techniques with good agricultural practices like maintaining soil health, monitoring for pests regularly, and removing weeds, you’ll be well on your way to growing healthy spinach in spring without resorting to chemical pesticides.
Harvesting and Storing Spinach
Once you’ve harvested a batch of fresh spinach, it’s essential to store it properly to maintain its flavor and nutritional value. This section will guide you through harvesting and storing your spring-grown spinach effectively.
Determining Optimal Harvest Times
When determining optimal harvest times for your spring-grown spinach crop, there are several key factors to consider. One of the most obvious signs that spinach is ready to be harvested is when the leaves have reached a suitable size. Typically, this will occur within 20-30 days of sowing, depending on weather conditions and growing practices.
As you inspect your spinach plants, look for leaves that have reached 2-4 inches in length and are at their peak color intensity. Younger leaves tend to be more tender and sweet, while older leaves can become tough and fibrous. Check the texture by gently plucking a leaf from the plant – it should come off easily if it’s ready.
Keep an eye out for any discoloration or browning of the leaves, as these can indicate stress or disease issues. Regularly inspecting your plants will help you catch any problems early on and ensure you harvest at the optimal time. By considering leaf size, color, and texture, you’ll be able to determine when your spinach crop is ready for harvesting.
Storage Tips for Fresh-Picked Spinach
Proper storage of fresh-picked spinach is crucial to maintain its quality and nutritional value. When harvesting your spring-grown spinach, make sure to follow these storage tips to keep it fresh for a longer period.
First, gently wash the leaves with cold water to remove any dirt or debris. Pat them dry with a clean towel to prevent moisture buildup, which can lead to spoilage. Next, place the cleaned spinach in a breathable bag or container, such as a paper bag or mesh produce bag. Avoid using plastic bags that trap moisture and promote mold growth.
For short-term storage (up to 3 days), keep the bagged spinach in the refrigerator at a consistent temperature below 40°F (4°C). For longer storage (up to 1 week), you can store it in the freezer. Simply blanch the leaves in boiling water for 30 seconds, then immediately plunge them into an ice bath to stop the cooking process. Drain and freeze the spinach in airtight containers or freezer bags.
When storing frozen spinach, be sure to label the container with the date and contents, and store it at 0°F (-18°C) or below. This will help maintain its texture and nutritional value for future use in cooked dishes.
Frequently Asked Questions
Can I grow spinach in containers if I have limited outdoor space?
Yes, growing spinach in containers is a great option for small gardens or patios. Choose a container that’s at least 6-8 inches deep and has good drainage holes to prevent waterlogged soil. Use a well-draining potting mix specifically designed for containers.
How do I protect my spinach from pests like aphids and slugs?
To minimize pest damage, introduce beneficial insects such as ladybugs or lacewings into your garden. For slugs, use copper tape around the base of plants to deter them. Hand-picking or using neem oil can also help control infestations.
What’s the best way to preserve fresh spinach for long-term storage?
To extend the shelf life of freshly picked spinach, store it in a sealed container with a paper towel to absorb excess moisture. You can also blanch and freeze spinach for later use in soups or smoothies. Freezing preserves the nutrients and flavor.
Can I grow multiple varieties of spinach together in the same bed?
Yes, you can intercrop different spinach varieties together. This can help improve growth rates and reduce pests. Choose complementary varieties with similar growth habits to ensure they don’t compete for resources.
How do I know if my spinach is past its prime or has a nutrient deficiency?
Inspect your spinach regularly for signs of nutrient deficiencies like yellowing leaves (nitrogen) or stunted growth (potassium). Check the soil pH and adjust as necessary. Also, harvest spinach before it bolts to prevent a decrease in quality and flavor.