Transplanting seedlings is an art that requires finesse. You’ve spent weeks coaxing those tiny seeds into robust, healthy growth, but now comes the crucial part: transferring them to a more permanent home. Successful seedling transplantation is key to a thriving garden or nursery. But it’s not just about plopping your seedlings into new soil and expecting them to thrive – there are specific techniques and considerations that can make all the difference. In this article, we’ll dive into expert methods for preparing soil, minimizing transplant shock, and ensuring optimal post-transplant care. We’ll cover how to handle delicate roots, choose the right time of day, and provide essential aftercare tips for a smooth transition from seedling to mature plant. By following these techniques, you’ll be well on your way to enjoying robust, healthy growth in no time!
Understanding Seedling Transplantation
When it comes to transplanting seedlings, understanding the process and timing is crucial for their survival. This section will break down the key considerations to ensure a smooth transition.
Benefits of Transplanting Seedlings
Transplanting seedlings offers numerous benefits that can significantly impact their growth and development. For one, it allows for faster growth rates compared to direct sowing. When seedlings are transplanted into a more spacious environment, they have room to expand their roots and leaves, leading to increased foliage and overall size. This is particularly evident in plants like tomatoes, where transplanting can increase yields by up to 30%.
Another significant advantage of transplanting seedlings is improved root development. When seedlings are initially sown in a small container, their roots become restricted due to lack of space. Transplanting them into a larger pot or directly into the garden allows for the unrestricted growth of roots, enabling plants to absorb more nutrients and water.
Moreover, transplanting reduces the risk of disease. By separating seedlings from overcrowded conditions, you minimize the spread of diseases that thrive in such environments. This is crucial, as many common pests and diseases can devastate entire crops if left unchecked.
Preparing Seedlings for Transplantation
Preparing seedlings for transplantation is an essential step that can make all the difference between success and failure. Before moving seedlings outdoors, it’s crucial to harden them off, which involves gradually exposing them to outdoor conditions over a period of 7-10 days. This process helps the seedling develop resistance to wind, rain, and extreme temperatures.
Pruning is another critical aspect of preparing seedlings for transplantation. Removing any weak or spindly growth can help direct energy towards healthy development and prevent damage during transplanting. For example, you can prune off lower leaves to prevent rotting and encourage new growth.
Watering is also a vital consideration when preparing seedlings for transplantation. Make sure the soil isn’t too wet, as this can lead to root rot and other problems. Water your seedling thoroughly 24 hours before moving it outside, but avoid overwatering.
As you harden off and prune your seedlings, keep an eye on their condition. If they show signs of stress or damage, adjust your hardening-off schedule or prune more carefully. With a little care and attention to detail, your seedlings will be ready for a successful transplant in no time.
Choosing the Right Time for Transplantation
When it comes to transplanting your seedlings, timing is crucial. This section will walk you through how to determine the ideal time for a successful transplantation process.
Determining Optimal Transplant Timing
When it comes to seedling transplantation, timing is everything. You want to transplant your seedlings at the right moment to minimize stress and ensure they continue to thrive. To determine optimal transplant timing, consider the following key factors: weather conditions, soil temperature, and plant development stage.
Start by checking the weather forecast for the next few days. Transplanting in extreme weather conditions such as intense heat, cold snaps, or heavy rainfall can be detrimental to your seedlings. Wait for a calm and cool period when the sun is not too intense. Soil temperature also plays a crucial role; transplant when the soil temperature matches the optimal range for your specific plant species.
Monitor your seedling’s development stage closely. Most seedlings are ready to transplant when they have two to three sets of leaves or when they reach about 2-3 inches in height. Transplanting too early can lead to root shock, while waiting too long may cause overcrowding and reduced growth rates. By paying attention to these factors, you’ll be able to determine the perfect time to transplant your seedlings and give them the best chance at success.
Avoiding Transplant Shock
Transplant shock is a common phenomenon that occurs when seedlings are suddenly exposed to new soil, light, and moisture conditions during transplantation. This stress can cause the seedling’s roots to go into shock, leading to a decline in growth and even death. To minimize its impact, it’s essential to take a gentle approach.
When transplanting, make sure to handle the seedling by the leaves or the crown, avoiding contact with the stem to prevent damage. Also, avoid exposing the roots to air for extended periods, as this can cause them to dry out. Water the seedling thoroughly before and after transplantation, but ensure the soil isn’t waterlogged.
Another crucial aspect is acclimating the seedling to its new environment gradually. Begin by placing the pot in a shaded area and then gradually move it to direct sunlight over a few days or weeks. This will help the seedling adjust to its new conditions without experiencing transplant shock.
Preparing the Soil for Seedling Transplantation
Before transplanting your seedlings, it’s essential to prepare the soil properly to prevent shock and ensure a smooth transition. This involves loosening the soil and adjusting its pH if necessary.
Soil Requirements for Seedlings
When transplanting seedlings into larger containers or directly into the garden, it’s essential to create an environment that meets their specific needs. Seedlings have unique soil requirements that, if met, will promote healthy growth and development.
The ideal pH level for most seedlings is between 6.0 and 7.0. This range allows them to absorb essential nutrients like nitrogen, phosphorus, and potassium. However, some plants prefer slightly acidic or alkaline conditions. For example, tomatoes thrive in a slightly acidic environment (pH 6.0-6.5), while lettuce prefers a more neutral pH (around 7.0).
In addition to maintaining the right pH level, it’s crucial to provide seedlings with adequate nutrient content. A balanced fertilizer with a mix of nitrogen, phosphorus, and potassium will support their growth. It’s also essential to ensure good drainage to prevent waterlogged soil, which can lead to root rot and other issues. Use well-draining potting mixes or add organic matter like compost to improve the soil structure and facilitate healthy root development.
Creating a Suitable Transplant Bed
When creating a suitable transplant bed, it’s essential to consider several factors that will provide optimal conditions for seedling growth. First, select a location that receives sufficient light and has good air circulation. This is crucial as seedlings need sunlight to undergo photosynthesis, but they also require some shade during the hottest part of the day.
Next, test the soil pH and nutrient levels using a soil testing kit or by sending a sample to a laboratory for analysis. Based on the results, you may need to amend the soil with organic matter such as compost or well-rotted manure to adjust its pH and provide essential nutrients. For example, if your soil is too acidic (low pH), add lime to raise it.
When amending the soil, be cautious not to overdo it, as this can cause nutrient imbalances. A general rule of thumb is to mix in 1-2 inches of compost or well-rotted manure into the top 6-8 inches of soil. This will provide a slow release of nutrients and improve soil structure without causing harm.
Additionally, consider adding organic mulch such as straw or bark chips to retain moisture and suppress weeds. A minimum of 2-3 inches of mulch is recommended, but be sure not to cover the roots or crown of the seedlings.
Transplanting Techniques for Success
Now that you’ve got a strong foundation, let’s dive into transplanting techniques to ensure your seedlings thrive and grow into healthy, robust plants. We’ll cover essential methods and tips to achieve success.
Hand-Transplanting Seedlings
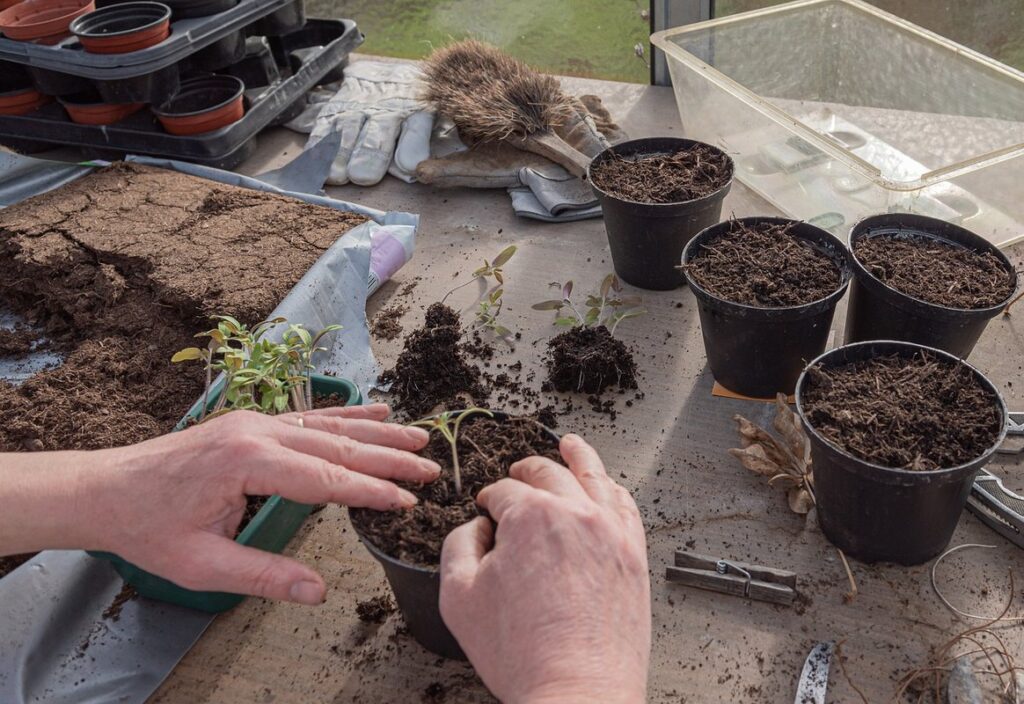
Hand-transplanting seedlings is a delicate process that requires finesse and care to avoid damaging the tender roots. To begin with, gently grasp the seedling by its leaves, rather than its stem, to minimize root disturbance. Hold the container at an angle, allowing the soil to flow out smoothly. As you lift, rotate the container slightly to release any trapped air pockets.
Once freed from their containers, handle the seedlings by the leaves or stems, taking care not to touch the roots with your fingers. Wet your hands to reduce friction and prevent damage. If transplanting into individual cells, separate them carefully using a blunt instrument like a chopstick or pencil, rather than your fingers. As you place each seedling into its new location, gently firm the soil around it to ensure stability.
Remember to maintain optimal temperatures and humidity levels during the transplanting process. Avoid exposing the seedlings to harsh sunlight or extreme temperatures, as this can cause shock and stress. By taking these precautions, you’ll be well on your way to a successful hand-transplanting experience.
Machine-Assisted Transplantation
Machine-assisted transplantation is an increasingly popular method for transplanting seedlings. This technique involves using specialized machinery to carefully lift and transfer seedlings from one container to another, minimizing root disturbance and shock. The machine-assisted transplantation process typically involves a combination of precision cutting tools and gentle handling equipment.
The advantages of machine-assisted transplantation include reduced labor costs, improved efficiency, and enhanced accuracy in transplanting delicate roots. For example, using a machine can help prevent accidental damage to the seedling’s roots, which is common when manually transplanting. This method also allows for faster transplant times, enabling growers to plant more seedlings per hour.
However, there are some disadvantages to consider. Machine-assisted transplantation requires significant upfront investment in specialized equipment and training for staff. It may not be feasible for small-scale operations or those with limited resources. Additionally, improper use of the machinery can lead to damage to the seedling’s roots or other plants nearby. To ensure successful machine-assisted transplantation, growers should carefully follow manufacturer guidelines and train their staff on proper operation and handling procedures.
Post-Transplant Care for Seedlings
After transplanting, it’s essential to provide your seedlings with proper care to ensure they thrive and adapt to their new environment. This involves monitoring water levels and fertilizing as needed.
Watering After Transplantation
Watering your seedlings after transplantation is crucial to help them recover from transplant shock and establish a strong root system. Overwatering can be detrimental at this stage, so it’s essential to strike the right balance.
As a general rule of thumb, water your seedlings 1-2 times a week during their first few weeks post-transplantation. However, this frequency may vary depending on the weather conditions and soil type. For example, if you’ve transplanted seedlings into a well-draining potting mix, they’ll likely require more frequent watering than those in a dense, water-retentive mix.
To ensure your seedlings receive just the right amount of moisture, check the top 1-2 inches of soil daily by inserting your finger or a chopstick. If it feels dry to the touch, it’s time to water. Water thoroughly until you see water coming out from the drainage holes, and then let the soil dry slightly between waterings.
Be cautious not to get water on the leaves to prevent fungal diseases. Instead, focus on watering at the base of the seedlings, allowing the roots to absorb the moisture. This will also help reduce the risk of overwatering-related problems like root rot.
Monitoring and Adjusting Post-Transplant Care
Monitoring seedling health after transplantation is crucial to ensure successful establishment and growth. After transplanting, keep a close eye on your seedlings for signs of stress, such as yellowing leaves, droopy stems, or visible pests. Regularly inspect the soil moisture levels, making sure not to overwater, which can lead to root rot.
Adjust care accordingly by monitoring temperature fluctuations and adjusting light exposure if necessary. For instance, seedlings that are sensitive to high temperatures may require shade cloth to prevent scorching. Make sure to maintain humidity around the plants by misting them lightly with water daily.
Observe your seedling’s growth rate and adjust fertilization schedules as needed. Fertilize when the seedlings are actively growing, but avoid overfertilizing, which can cause burning or stunted growth. Water gently but thoroughly after fertilization to prevent salt buildup in the soil.
Troubleshooting Common Issues in Seedling Transplantation
As you work on transplanting your seedlings, it’s not uncommon to encounter some hiccups along the way. This section will walk you through common problems and their solutions to ensure a smooth transition for your young plants.
Identifying Common Problems
When transplanting seedlings, it’s not uncommon to encounter common issues that can hinder their growth and survival. One of the most critical problems is transplant shock, which occurs when a seedling is suddenly exposed to new environmental conditions such as light, temperature, and humidity. This stress can cause the seedling to drop its leaves, become discolored, or even die.
Other common issues include root damage, often caused by over-handling or digging too deep into the soil. This can lead to a decrease in water and nutrient uptake, causing the seedling to struggle. Fungal infections are also prevalent, particularly if the transplanting site is contaminated with fungal spores. Symptoms of infection may include white powdery patches on the leaves, blackened stems, or cottony growths.
To mitigate these issues, it’s essential to handle seedlings gently and minimize root disturbance during transplanting. Choose a well-draining potting mix and ensure the new container is large enough to accommodate the roots. Regularly inspect your seedlings for signs of infection, and take prompt action if you notice any fungal growths.
Solutions for Common Problems
One of the most critical aspects of seedling transplantation is identifying and addressing common problems that can arise during this process. Here are some solutions for frequent issues:
When seedlings become too wet, it’s essential to ensure proper drainage and reduce watering frequency. To prevent waterlogged soil, repot your seedlings in well-draining pots or mix a small amount of perlite into the soil. This will help excess moisture escape, reducing the risk of root rot.
If seedlings are not receiving sufficient light, consider transplanting them to a brighter location or using grow lights. Aim for at least 4-6 hours of direct sunlight per day, and monitor your seedlings’ response to ensure they’re receiving adequate light.
Seedlings may also be susceptible to pests like spider mites or mealybugs. To prevent infestations, regularly inspect your plants and use neem oil or insecticidal soap as a preventative measure. If an infestation occurs, isolate the affected plant and treat it promptly with a suitable pesticide.
By addressing these common problems early on, you can ensure a successful seedling transplantation process and give your young plants the best chance at thriving.
Frequently Asked Questions
Can I transplant seedlings at any time of day, or is there a preferred schedule?
While it’s true that seedlings can be transplanted at various times, optimal results often come from transplanting during the cooler part of the day, such as early morning. This allows the seedling to recover more effectively from transplant shock and minimizes the risk of scorching due to intense sunlight. Yes, transplanting in the morning is a recommended best practice for many gardeners.
What’s the ideal soil pH range for seedlings after transplantation?
While it’s true that soil requirements vary by plant species, most seedlings thrive in slightly acidic to neutral soils with a pH between 6.0 and 7.0. Keep in mind that this can depend on the specific needs of your plants. Yes, maintaining an optimal soil pH is essential for healthy growth.
How do I handle delicate roots during transplanting?
Delicate root systems require gentle care to avoid damaging them. To minimize root disturbance, water the seedling well before transplanting and then gently loosen the surrounding soil with a fork or knife, taking care not to cut any roots. Handle the roots with care when planting in a new location.
Can I use regular potting mix for all seedlings, or do some require specialized mixes?
While many general-purpose potting mixes work well for various seedlings, specific species may benefit from more tailored mixes that address their unique needs. Research and choose a potting mix specifically formulated for your plants to optimize growth.
How often should I water seedlings after transplantation, and how will I know when they need it?
After transplanting, seedlings require consistent moisture to establish themselves in the new soil environment. Water them thoroughly upon planting, then maintain moist but not waterlogged conditions until established. Monitor their leaves for signs of stress or dehydration, such as wilting or discoloration.