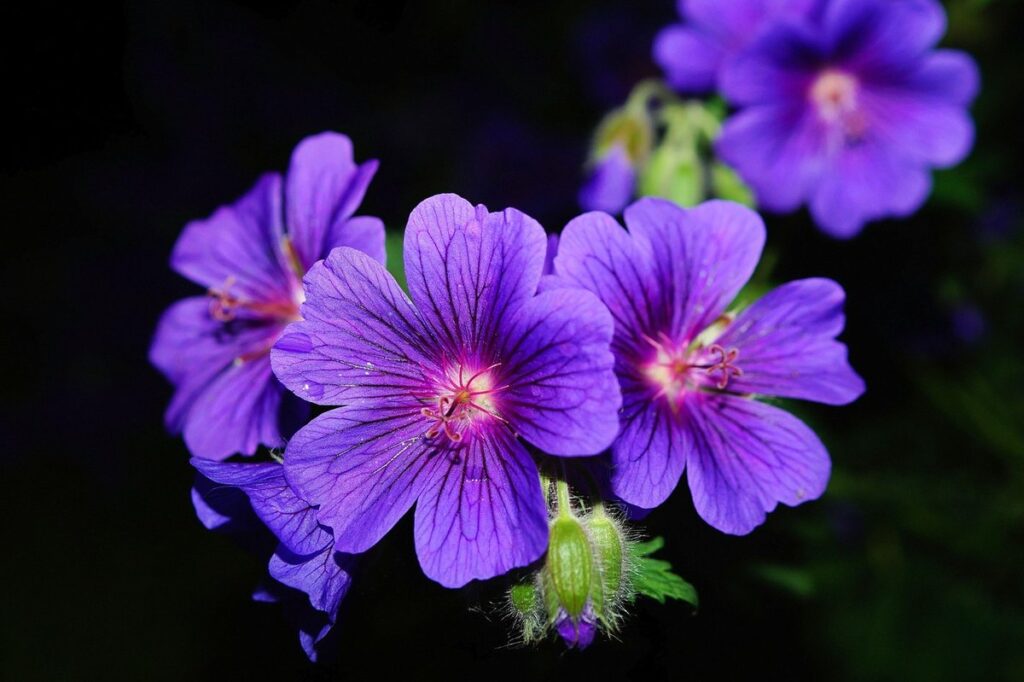
If you’re anything like me, you’ve probably fallen in love with the vibrant blooms and delicate foliage of geranium plants. But have you ever wanted to share that beauty with friends and family, or even propagate your own plants to fill every nook and cranny of your garden? Taking cuttings from geraniums is a simple yet effective way to multiply your favorite varieties, and with a few basic tools and some expert guidance, you can increase your chances of successful propagation. In this article, we’ll walk through the easy steps to prepare healthy stems, use rooting hormone to give them a boost, and care for your new cuttings until they’re strong enough to thrive on their own. By following these tips, you’ll be well on your way to growing more geraniums than you ever thought possible!
Preparing Your Plant for Propagation
Before you take cuttings, make sure your geranium plant is healthy and thriving. This section will walk you through the essential steps to prepare it for successful propagation.
Choosing Healthy Stems
When selecting stems for propagation, it’s essential to choose healthy ones that will give you the best chance of success. A good stem should be firm and supple, with a vibrant color that matches the rest of the plant. Avoid taking cuttings from weak or spindly stems, as these are more prone to disease and may not root well.
Look for stems with at least two sets of leaves, as this will give them a better chance of rooting quickly. Cuttings taken from new growth tend to do better than those from older wood, which can be woody and less responsive to rooting hormones. Also, try to avoid taking cuttings from areas of the plant that are prone to pests or diseases.
When selecting stems, gently grasp the leafy portion and inspect the stem below. It should be free from any signs of decay, such as soft spots or blackened areas. If you’re unsure about a particular stem, it’s always better to err on the side of caution and choose another one. By choosing healthy stems, you’ll increase your chances of success when taking cuttings from geraniums.
Removing Lower Leaves
Removing lower leaves is an essential step when taking cuttings of geraniums. This process may seem trivial, but it plays a significant role in the success of propagation. The primary reason for removing lower leaves is to prevent them from rotting and contaminating the cutting before roots have formed. When you take a cutting, the lower leaves are usually older and more prone to decay.
To remove the lower leaves correctly, start by holding the stem between your thumb and index finger. Identify the first two or three sets of leaves, counting from the base of the cutting upwards. Gently pinch or snip off these leaves using a pair of clean scissors or pruning shears. Be cautious not to damage the node where the leaf meets the stem, as this is where roots will develop.
This process not only minimizes the risk of root rot but also directs the plant’s energy towards developing new roots in the cutting rather than maintaining old foliage. By following these simple steps, you’ll be well on your way to taking healthy cuttings that are ready for propagation.
Taking Cuttings: The Right Method
When taking cuttings of geraniums, getting the right technique down is crucial to success. This section will walk you through the proper methods for harvesting and preparing healthy roots.
Stem Cuttings vs. Leaf Cuttings
When it comes to taking geranium cuttings, you have two main methods to choose from: stem cuttings and leaf cuttings. While both methods can be effective, they have their own advantages and disadvantages.
Stem cuttings involve cutting a section of the stem from the parent plant and rooting it in soil or water. This method is often preferred by experienced gardeners because it allows for more control over the rooting process. To take a successful stem cutting, choose a healthy stem with at least two nodes (the joint where a leaf meets the stem). Cut just above a node using a clean and sharp tool, making sure to remove any lower leaves that might be submerged in water or soil. The main advantage of stem cuttings is that they can produce multiple roots quickly.
Leaf cuttings, on the other hand, involve rooting individual leaves from the parent plant. This method is often used when stem cuttings are not available or when you want to propagate a specific variety. To take a successful leaf cutting, choose a healthy leaf with a good amount of petiole (the stalk that attaches the leaf to the stem). Cut just above the node where the leaf meets the stem, and plant it in soil or water. Leaf cuttings can be slower to root than stem cuttings, but they have a higher success rate.
Keep in mind that both methods require patience and proper care. Make sure to provide your cuttings with adequate light, water, and nutrients for them to develop properly.
Preparing the Cutting Station
Preparing a clean and sterile cutting station is crucial for successful geranium propagation. To start, you’ll need some basic equipment: a sharp, clean knife or pruning tool, a pot or container filled with a well-draining rooting medium, and a tray or saucer to catch any excess water.
Next, sanitize your workspace by wiping down all surfaces with a 1:10 bleach solution. This will help prevent the spread of diseases that can harm your cuttings. Allow the surfaces to air dry before moving on to the next step.
As you work, keep your hands clean and free from oils or other residue that could interfere with rooting. Wash your hands thoroughly after handling each cutting, and change your gloves if necessary. By taking these simple precautions, you’ll create a sterile environment where your cuttings can develop strong roots and thrive. Remember to use separate equipment for different plants to prevent cross-contamination.
Rooting Hormone: When to Use It
When taking cuttings of geraniums, knowing when to use rooting hormone is crucial for successful propagation. This section will guide you through the right times to apply this essential plant aid.
The Role of Rooting Hormone in Geranium Propagation
When you dip the cut end of a geranium stem into rooting hormone powder or liquid, you’re triggering a series of chemical reactions that stimulate root growth. This process is known as cell elongation, where plant cells at the base of the cutting begin to stretch and divide rapidly, forming new roots.
The benefits of using rooting hormone in geranium propagation are numerous. For one, it increases the chances of successful rooting by 2-3 times. This means more cuttings will develop a robust root system, allowing them to thrive as soon as they’re transplanted into individual pots. Moreover, rooting hormone helps shorten the rooting period by up to two weeks.
In practical terms, you can use liquid or powder rooting hormones, depending on your preference and convenience. Liquid formulas come with a pre-measured dropper for precise application, while powders require sprinkling a small amount onto the cutting.
Preparing the Cuttings for Hormone Treatment
Now that you have your cuttings ready to go, it’s time to prepare them for hormone treatment. This is a crucial step, as it ensures the roots will develop properly and the plant will thrive.
To start, inspect each cutting carefully for any signs of damage or blemishes. Remove any leaves that are below the node – these can be prone to rotting off during the rooting process. Cut any excess stem material back to about an inch above a node. This helps the hormone penetrate more evenly and minimizes waste.
Timing is also important when preparing cuttings for hormone treatment. Aim to dip your cuttings within 24 hours of taking them from the parent plant. This reduces the risk of contamination and ensures the highest success rate. As for concentration, follow the manufacturer’s guidelines carefully. A general starting point is to use a solution with around 5-10 ppm (parts per million) of rooting hormone. Some plants may require a stronger or weaker solution, so be sure to research specific requirements if you’re unsure.
Make sure your cuttings are clean and dry before treatment – this helps the hormone adhere evenly. Dampen the end of each cutting with water just before dipping it into the solution.
Planting Your Cuttings
Now that you’ve taken your geranium cuttings, it’s time to plant them and give them a chance to thrive. This is where patience and proper technique come into play.
The Optimal Potting Mix for Geranium Cuttings
When it comes to potting mix for geranium cuttings, there are some key characteristics that will help them thrive. A good potting mix should have excellent drainage properties to prevent waterlogged soil, which can be detrimental to the delicate roots of the cutting.
You’ll want a mix that allows excess moisture to escape quickly, such as a perlite or vermiculite-based blend. Avoid regular potting mixes designed for mature plants, as they may contain too much fertilizer and could harm your cutting.
In terms of nutrient requirements, geranium cuttings need a balanced diet to develop strong roots and stems. Look for a mix that contains essential micronutrients like iron, magnesium, and sulfur. A pH range between 6.0 and 7.0 is also ideal for geraniums, so choose a mix with this slightly acidic to neutral pH.
For example, you can use a mix specifically formulated for seed starting or propagation, which will provide the right balance of nutrients without over-fertilizing your cutting. This will give it the best chance to root and establish itself quickly and healthily.
Watering and Humidity Control
When it comes to watering and maintaining humidity levels for your potted geranium cuttings, consistency is key. Overwatering can lead to root rot, while underwatering will impede growth. As a general rule of thumb, water your cuttings when the top 1-2 inches of soil feels dry to the touch.
Water thoroughly, making sure the pot drains well to prevent waterlogged soil. Aim for about 1/4 cup of water per 6-inch pot. Frequency depends on temperature and humidity – typically, watering once a week is sufficient in average conditions. Be cautious not to let the cuttings sit in standing water, as this can lead to root rot.
Maintaining optimal humidity levels is crucial for successful rooting. You can achieve this by placing the pot on a tray filled with water and pebbles or using a humidifier nearby. Keep the humidity level between 40-60%. Some gardeners cover their pots with plastic bags to create a mini-greenhouse effect, but be aware that this may encourage fungal growth if not done correctly.
Monitor your cuttings’ progress closely and adjust your watering schedule as needed.
Aftercare: Key Factors for Success
Now that you’ve successfully taken your geranium cuttings, it’s time to focus on aftercare techniques to ensure they thrive. Here are key factors to consider for a successful outcome.
Providing Adequate Light and Temperature
Providing adequate light and temperature is crucial for promoting healthy growth of rooted geranium cuttings. When it comes to light, geraniums prefer bright, indirect light but can tolerate some direct sunlight. Placing them near an east- or west-facing window is ideal. If you’re propagating indoors, a south-facing window with a sheer curtain can provide the right amount of filtered light.
Keep in mind that geranium cuttings are sensitive to extreme temperatures, and most varieties thrive between 65°F (18°C) and 75°F (24°C). Avoid placing them near heating or cooling vents, fireplaces, or drafty windows. Aim for a consistent temperature range during the first few weeks after rooting.
To ensure optimal conditions, monitor your cuttings’ response to light and temperature. If you notice signs of stress, such as yellowing leaves or weak growth, adjust their placement accordingly. With proper care, your rooted geranium cuttings should develop strong roots and begin producing new growth within a few weeks.
Fertilization Schedule
When it comes to young geranium plants, providing them with the right nutrients is crucial for their growth and development. The ideal fertilization schedule will vary depending on the time of year and the plant’s stage of growth.
During the first few weeks after taking cuttings, it’s essential to use a balanced, water-soluble fertilizer that’s specifically formulated for indoor plants. Dilute the fertilizer to half the recommended strength to avoid burning the roots. Apply it once a week, making sure not to over-fertilize.
As your geraniums grow and produce new leaves, you can gradually increase the fertilizer strength to full recommended levels. Also, consider switching to a fertilizer that’s higher in phosphorus (such as 10-20-10) to promote healthy root growth and blooming.
Remember, fertilizing too frequently or with high concentrations of nitrogen can lead to weak and leggy stems, so be sure to follow the manufacturer’s instructions and monitor your plants’ responses. By sticking to a balanced fertilization schedule, you’ll help your young geraniums establish strong roots and develop into vibrant, flowering plants.
Frequently Asked Questions
Can I use rooting hormone with stem cuttings if they already have some leaves on them?
Yes, you can definitely use rooting hormone on stem cuttings that already have some leaves. In fact, using a rooting hormone can significantly increase the chances of successful propagation for these types of cuttings. Just make sure to follow the instructions carefully and apply the correct amount of hormone.
How often should I water my newly propagated geraniums?
Water your newly propagated geraniums when the top 1-2 inches of soil feels dry to the touch. This is usually every 3-4 days in warm temperatures, but it may vary depending on the humidity and temperature in your environment. Be sure not to overwater, as this can lead to root rot.
Can I propagate geraniums at any time of year?
While you can propagate geraniums at almost any time of year, it’s generally recommended to do so during the spring or summer months when the plant is actively growing. This will give your new cuttings a head start on establishing themselves before the winter months.
How long does it take for geranium cuttings to root?
The time it takes for geranium cuttings to root can vary depending on factors like temperature, humidity, and light exposure. Generally, you can expect roots to develop within 1-3 weeks after planting your cuttings. Be patient, as successful propagation requires some waiting.
Can I propagate geraniums from leaves instead of stem cuttings?
Yes, you can definitely propagate geraniums using leaf cuttings! This method is often called “leaf strike” and involves placing a healthy leaf on a potting mix or rooting medium. While not as reliable as stem cuttings, leaf propagation can be successful if done correctly. Just make sure to choose fresh, healthy leaves with plenty of room for new growth.