Planting clivias from seed can be a rewarding experience, but it requires patience and the right techniques. If you’re new to growing these beautiful flowers or want to start anew, this guide is for you. Clivias are known for their stunning blooms and ability to thrive in indoor conditions, making them a popular choice for plant enthusiasts.
In this article, we’ll walk you through everything you need to know about successfully planting clivias from seed. From preparing the perfect growing environment to choosing the right sowing techniques, we’ve got you covered. We’ll also share expert advice on optimal growing conditions and provide tips on how to care for your young plants as they grow into healthy, blooming clivias. Whether you’re a seasoned gardener or just starting out, our comprehensive guide will give you the confidence to try planting clivias from seed with ease.
Understanding Clivia Seeds and Germination
When working with clivia seeds, it’s essential to understand their unique characteristics and requirements for successful germination. This section will break down the intricacies of clivia seed germination, helping you become a pro at coaxing these plants from tiny seeds into thriving specimens.
Characteristics of Clivia Seeds
Clivia seeds are small, delicate, and have unique characteristics that play a crucial role in determining their germination rates. On average, clivia seeds measure around 1-2 cm in length and 0.5-1 mm in width, making them tiny but mighty. They have an elongated shape with a rounded tip at one end, resembling miniature footballs.
The color of clivia seeds can range from white to pale yellow or even pinkish-brown, depending on the specific variety. Some seeds may also display intricate patterns or markings, which are thought to influence the seed’s viability and germination potential. In terms of texture, clivia seeds have a slightly ridged surface, with fine lines and grooves that help them absorb moisture.
When selecting seeds for planting, it’s essential to choose those with minimal imperfections and damage. Seeds with cracks or bruises may struggle to absorb water, hindering their ability to germinate. Opt for seeds with smooth surfaces and even coloration, as these are more likely to produce healthy seedlings. By understanding the characteristics of clivia seeds, you’ll be better equipped to handle them gently and increase your chances of successful germination.
Preparing the Seeds for Planting
Clivia seeds can be sensitive and require special care to ensure proper germination. To begin preparing them for planting, you’ll want to start with a process called stratification. This involves simulating the natural cold and moist conditions that clivia seeds would experience in their native habitat.
To stratify your clivia seeds, place them between two sheets of damp paper towel or cloth, making sure they don’t touch each other. Seal this package in a plastic bag or wrap it in foil to maintain humidity. Store it in the refrigerator at a consistent temperature below 50°F (10°C). This process can take anywhere from 30 days to several months, depending on the seed’s age and quality.
Before planting, you’ll also want to soak your clivia seeds for about 24 hours to help soften their outer layer, making them more receptive to water. However, avoid soaking seeds that have already undergone stratification, as this can cause rotting. It’s essential to handle clivia seeds gently to prevent damage or cracking.
Choosing the Right Growing Medium
When planting clivias from seed, selecting the right growing medium is crucial for successful germination and healthy growth. In this section, we’ll walk you through the options available.
Types of Growing Mediums for Clivias
When it comes to planting clivias from seed, choosing the right growing medium is crucial for their healthy development. There are several types of growing mediums to consider, each with its own set of benefits and drawbacks.
Potting mix is a popular choice for clivias as it provides excellent drainage and retains moisture well. However, it can be too dense for young seedlings and may lead to overwatering if not monitored carefully. A good quality potting mix specifically designed for tropical plants like clivias would be an ideal option.
Seed starting mix, on the other hand, is a specialized blend of ingredients that promotes root development and prevents seedling rot. It’s usually lighter in texture than regular potting mix, making it easier to handle small seeds. However, it may not retain moisture as well as other mixes, requiring more frequent watering.
Perlite is another option for growing mediums, offering excellent drainage properties but can be too harsh on young roots if used alone. Mixing perlite with a general-purpose potting mix can provide the best of both worlds – good drainage and sufficient nutrients.
For clivias from seed, it’s essential to choose a growing medium that balances moisture retention with drainage. A mix specifically designed for tropical plants or one with added perlite will help young seedlings develop strong roots while minimizing the risk of overwatering.
How to Mix Your Own Seed Starting Mix
When it comes to growing clivias from seed, having a high-quality seed starting mix is crucial for optimal germination and development. But did you know that making your own custom mix can be just as effective, if not more so, than buying a commercial blend? With the right ingredients, you can create a tailor-made mix that meets the specific needs of your clivia seeds.
To get started, gather the following readily available ingredients: peat moss, vermiculite, and perlite. A general recipe for making your own seed starting mix is to combine 40% peat moss (which retains moisture), 20% vermiculite (which improves drainage), and 40% perlite (which enhances aeration). You can adjust these proportions based on your specific climate or soil conditions.
For example, if you live in an area with very dry summers, you may want to increase the amount of peat moss to retain even more moisture. Simply mix the ingredients together thoroughly and store them in an airtight container for future use. Remember to sterilize any containers or equipment used for seed starting to prevent contamination and ensure healthy growth.
Sowing Clivia Seeds: Techniques and Tips
Sowing clivia seeds can be a delicate process, but with the right techniques and tips, you’ll be well on your way to growing a healthy new plant. This section shares expert advice for success.
Direct Sowing vs. Seed Starters
When it comes to sowing clivia seeds, you have two primary options: direct sowing and using seed starters. Both methods have their benefits and drawbacks, which we’ll explore below.
Direct sowing involves planting the seeds directly into a pot or garden bed, typically 1-2 inches deep. This method can be beneficial for experienced growers who understand the specific needs of clivias. For instance, direct sowing allows for optimal root development and can save time on transplanting. However, it may not provide sufficient support during the seedling stage, increasing the risk of damage from wind or pests.
On the other hand, using seed starters involves planting seeds in small containers before transferring them to a larger pot or garden bed. Seed starters offer more control over factors like light, temperature, and moisture, which can be particularly beneficial for beginners. They also provide support during the delicate seedling stage. However, this method requires extra time and resources for setup and transplanting.
Ultimately, both methods can be effective if done correctly. Beginners may find it easier to use seed starters, while experienced growers might prefer direct sowing. Experiment with both approaches to see what works best for you.
Sowing Multiple Seeds at Once
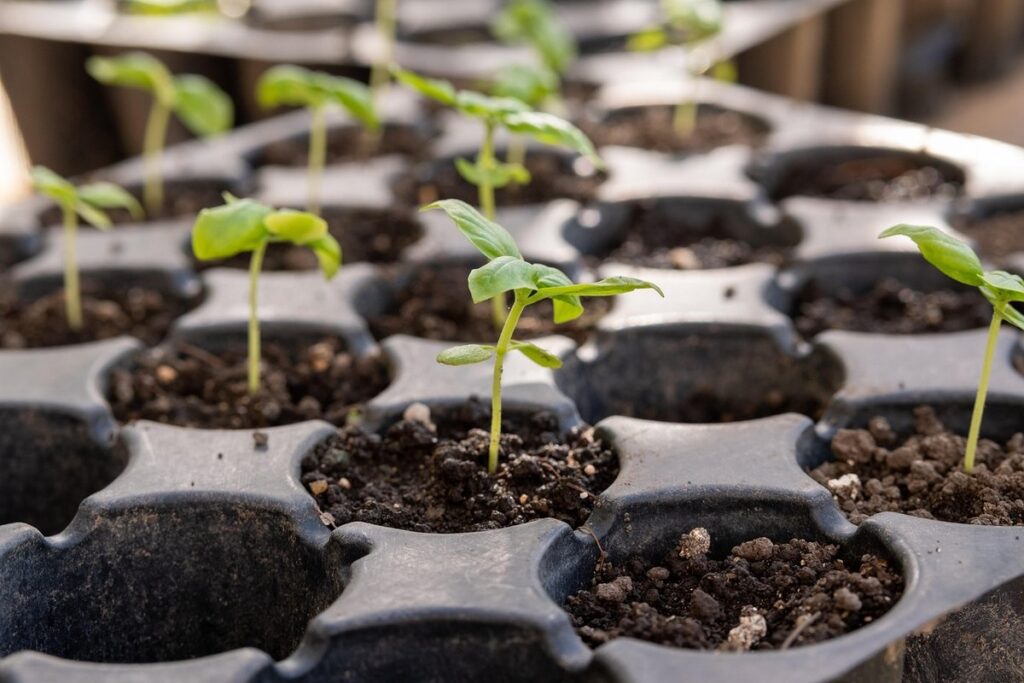
Sowing multiple seeds at once can be an efficient way to start your clivia collection, but it requires some careful planning. To begin with, select a well-draining seed starting mix and fill a small pot or tray with the medium. Next, gently scatter a handful of seeds over the surface, making sure not to overcrowd the container.
For optimal results, sow around 10-15 seeds at a time, spaced about 1-2 centimeters apart. This allows for proper growth and development without causing competition among seedlings. If you’re sowing in rows, maintain a consistent spacing of 2-3 centimeters between each row. When it comes to depth, plant the seeds just below the surface of the medium, about 0.5-1 millimeter deep.
Keep in mind that germination rates may vary when using this method. Some seeds might receive more moisture or light than others, affecting their chances of sprouting successfully. However, with proper care and attention to detail, you can increase your success rate. Water the seedlings gently but thoroughly after sowing, and maintain a humid microclimate until they’re about 2-3 centimeters tall.
Providing Optimal Growing Conditions
When planting clivias from seed, providing the right environment is crucial for successful germination and growth. This section will walk you through creating optimal conditions for your young plants to thrive.
Lighting Requirements for Clivia Seedlings
When it comes to providing optimal growing conditions for clivia seedlings, lighting is a crucial aspect that often gets overlooked. As a beginner gardener, it’s essential to understand the specific lighting requirements for these delicate seedlings. Clivias require indirect light, which means they should not be placed directly in front of a sunny window or under grow lights that are too intense.
Direct sunlight can be detrimental to clivia seedlings, causing them to become scorched and weakened. This is because their leaves are sensitive to extreme temperatures and UV radiation, which can lead to sunburn-like symptoms. To avoid this, place your clivia seedlings near an east- or west-facing window, where they will receive gentle, indirect light.
Aim for a location with bright, but not direct, light. You can also use sheer curtains or blinds to filter the sunlight and reduce its intensity. Avoid placing your clivia seedlings in low-light areas, as this can lead to weak and leggy growth. By providing your clivia seedlings with the right amount of indirect light, you’ll be giving them a strong start on their journey to becoming healthy, thriving plants.
Temperature and Humidity Control
When it comes to growing clivia seedlings from scratch, providing optimal temperature and humidity conditions is crucial for their survival and healthy development. As a general rule, clivias thrive in temperatures between 65°F (18°C) and 85°F (29°C), with ideal day temperatures ranging from 75°F (24°C) to 80°F (27°C). Nighttime temperatures can be slightly cooler, but it’s essential to maintain consistency.
To replicate these conditions, you can use a greenhouse or a propagation tray with a clear plastic lid. These setups allow for excellent temperature control and can help maintain a humid microclimate around the seedlings. You can also utilize a humidifier to increase the ambient humidity levels in your growing area. Aim for a relative humidity of 50-70% during the first few weeks after sowing.
Remember, clivia seedlings are sensitive to extreme temperatures and dry air. Avoid placing them near drafty windows or heating vents, as this can cause sudden temperature fluctuations that may shock the young plants. By replicating their natural habitat with optimal temperature and humidity levels, you’ll give your clivia seedlings the best possible start in life.
Transplanting Seedlings: Timing and Technique
When it’s time to transplant your clivia seedlings, getting the timing and technique right is crucial for their survival. Let’s dive into the best practices for a successful transplanting process.
When to Transplant Clivia Seedlings
When to transplant clivia seedlings is crucial for their growth and survival. It’s essential to wait until they have outgrown their seed starters or direct sowing location. Typically, this occurs 6-12 months after sowing.
Weather conditions can significantly affect the timing of transplantation. Clivias prefer warm temperatures above 64°F (18°C) during the day and around 55°F (13°C) at night. Avoid transplanting in extreme weather conditions like intense heatwaves or heavy rainfall, as this can cause shock to the seedlings.
As a general rule of thumb, wait until the seedlings have developed two to three sets of leaves before transplanting. This indicates they have sufficient root growth and are ready for a larger pot. Keep an eye on their growth rate and watch for signs like yellowing leaves or stunted growth, which can indicate they need more space.
Monitor your local weather forecast and plan the transplant when there’s a gentle, consistent temperature. Water the seedlings thoroughly before moving them to minimize shock. When transplanting, handle the roots gently, and avoid disturbing the surrounding soil.
Transplanting Techniques for Clivias
When transplanting clivia seedlings, it’s essential to handle the roots with care to minimize shock and ensure a healthy transition into their new home. Start by gently removing the seedling from its original pot, taking extra caution not to disturb the roots. If the seedling is pot-bound (the roots have filled the pot), you can use a fork or a blunt instrument to carefully loosen them.
Prepare your new potting mix by filling the container about 2/3 full with a well-draining mix specifically designed for tropical plants like clivias. You can also add some perlite or vermiculite to improve drainage and prevent waterlogged soil.
To transfer the seedling, place it in the new potting mix, gently firming the soil around the roots without compacting it too much. Make sure not to bury the leaves or crown of the plant, as this can lead to rot and other issues. Water your newly transplanted clivia well after planting and keep the soil consistently moist but not waterlogged during the first few weeks. This will help the seedling adjust to its new environment and establish a strong root system.
Common Issues and Troubleshooting
When planting clivias from seed, it’s not uncommon for things to go awry. This section will help you troubleshoot common problems and get back on track with your propagation project.
Pests and Diseases in Clivia Seedlings
As you nurture your clivia seedlings, be on the lookout for common pests and diseases that can weaken their growth. Fungal infections are a major concern, particularly in young plants. Overwatering is often to blame, so ensure good drainage and avoid getting water on the leaves or crown of the plant. If you notice yellowing leaves or white powdery patches, it may be a sign of root rot caused by too much moisture.
Other pests like aphids and spider mites can also wreak havoc on your clivia seedlings. Check for these tiny creatures on the underside of leaves and stems. To control infestations, use neem oil or insecticidal soap to wipe down affected areas. Be sure to follow the product’s instructions carefully to avoid harming your plants.
Prevention is key to keeping pests and diseases at bay. Inspect your seedlings regularly, and quarantine any new additions to prevent cross-contamination. Use physical barriers like fine mesh or fine-netted row covers to keep insects out. Keep the growing area clean and well-ventilated to reduce humidity and promote healthy growth.
Tips for Overcoming Germination Failure
When attempting to plant clivias from seed, it’s not uncommon for some seeds to struggle with germination. To overcome these failures and increase the chances of successful germination, consider the following potential causes.
One common reason for germination failure is poor quality seeds. Seeds that are old or have been stored improperly can have low viability rates, resulting in a lower success rate when planting. If you’re using seed from a reputable supplier, this might not be an issue; however, if you’ve saved your own seeds, it’s worth checking their age and storage conditions.
Inadequate moisture levels can also hinder germination. Seeds typically require consistent moisture to break dormancy and initiate growth. Make sure the soil remains consistently damp but not waterlogged during the first few weeks after planting.
Incorrect temperature conditions are another potential issue, with some seeds requiring specific temperatures for optimal germination. Most clivia species prefer daytime temperatures between 75-85°F (24-29°C) and cooler temperatures at night, around 60-65°F (15-18°C).
Conclusion: Planting Clivias from Seed with Success
Congratulations on successfully planting clivias from seed! You’ve taken the first step towards growing these beautiful, low-maintenance plants. To ensure their continued health and growth, remember to provide them with bright, indirect light and water sparingly but thoroughly until they’re established. Make sure your potting mix is well-draining to prevent root rot, a common issue when starting seeds from scratch.
Keep in mind that patience is key when growing clivias from seed. It can take several months for the seedlings to reach maturity, so be prepared to wait and enjoy the process of watching them grow. With proper care and attention, you’ll soon have a thriving collection of clivias that will bring joy and beauty to your indoor or outdoor space.
Frequently Asked Questions
Can I use leftover seed starting mix from previous plantings for clivias?
You can repurpose seed starting mix, but it’s essential to ensure the old mix doesn’t harbor diseases or pests that might affect your new seeds. If you’re unsure, create a fresh batch of seed starting mix using the instructions provided in our guide on “How to Mix Your Own Seed Starting Mix.” This will give your clivia seeds the best chance at successful germination and healthy growth.
How long does it take for clivias to go from seedling to blooming?
The time it takes for clivias to bloom can vary depending on factors such as climate, care, and variety. Generally, you can expect seedlings to take around 2-5 years to mature and produce flowers indoors, while those grown outdoors may bloom within a year or two.
Can I sow multiple seeds at once if they’re from the same clivia plant?
Sowing multiple seeds from the same clivia plant increases the chances of genetic diversity among your seedlings. This can lead to more robust and resilient plants in the long run. When sowing multiple seeds, ensure you provide sufficient space for each seedling to develop without overcrowding.
How do I know if my clivias are getting enough humidity?
Clivias prefer a relatively high level of humidity, typically between 50-70%. If your indoor environment is dry, consider using a humidifier near your plants or placing them on a tray filled with water and pebbles to maintain optimal moisture levels.
Can I use tap water for watering my clivia seedlings?
While tap water can work in an emergency, it’s not the best choice for regularly watering your clivia seedlings. Tap water often contains impurities like chlorine or fluoride that might harm your delicate seeds. Instead, opt for filtered or rainwater to ensure your plants receive the purest water possible.